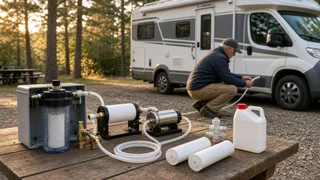
Replacing a Motorhome Water Filter
Replacing a motorhome water filter is usually a simple, tool-light job: shut off the water supply, relieve pressure, swap the old cartridge or inline filter for one that matches the original filter specification, then flush the new filter before use. What changes the answer is the type of filter your rig uses. A disposable inline filter on the fresh-water hose is replaced as a whole unit, while an under-sink or whole-system canister keeps its housing and only the cartridge inside is changed. The filter location, interval and correct replacement part depend on the motorhome's make, model year and plumbing layout, so the owner's manual and the label on the existing filter or housing are the best guide to exact parts.
What a Motorhome Water Filter Does
A motorhome's habitation water system draws from two sources: a city water connection at a campground spigot, or the onboard fresh-water tank fed by a 12-volt pump. Filters reduce sediment, rust particles and, depending on the media, chlorine taste and odor or certain other contaminants. Most filters are designed to improve water quality rather than make untreated water safe to drink, so a filter is not a substitute for a trustworthy water source or regular tank sanitation.
Common Filter Types and How Replacement Differs
Filter type | Where it sits | What gets replaced | Notes; Inline hose filter | Between the campground spigot and the motorhome's hose connection | The entire disposable filter unit | Filters water going to both the city water inlet and, when used while filling, the fresh-water tank; External canister system | Mounted outside or carried as a portable housing on the supply line | Cartridge inside a reusable housing | Often single- or multi-stage; housing must be opened and resealed; Whole-system internal canister | Inside a cabinet or service bay, after the pump and city inlet merge | Cartridge only | Filters all water in the coach regardless of source; Point-of-use (under-sink) filter | Under the galley sink, feeding a separate faucet or the main tap | Cartridge only | Treats drinking and cooking water only; Multi-stage or reverse osmosis unit | Under-sink or in a cabinet | Several cartridges and possibly a membrane, each on its own schedule | More components and more steps; follow the unit's own instructions closely
When to Replace the Filter
Filter makers rate cartridges by time in service, by total volume of water filtered, or both. Because usage varies widely between full-time and occasional travelers, the rated capacity on the cartridge or in its documentation is the primary reference. Beyond the stated interval, a few signs suggest a filter is due:
Noticeably reduced flow rate at faucets or the shower, especially on city water; Return of chlorine taste or odor that the filter previously removed; Visible discoloration or heavy sediment buildup in a clear housing; The filter has sat wet and unused for an extended period, such as through storage; After sanitizing the water system or de-winterizing, when a fresh cartridge avoids reintroducing anything trapped in the old one
Choosing the Correct Replacement
Matching the filter specification matters more than brand. A cartridge that is the wrong length or diameter may not seal, letting water bypass the media entirely. Check these points against the old filter or the housing label:
Physical size: cartridge length and diameter, or the thread size on an inline unit; Micron rating: smaller numbers capture finer particles but can reduce flow; Media type: sediment, carbon block, granular carbon, or combination media, each targeting different issues; Certification: in the US, many filters list NSF/ANSI standards that describe what the filter has been certified to reduce; confirm the claims on the specific product; Flow rate: the cartridge should support the flow your fixtures and pump need without excessive pressure drop; Compatibility with your housing model, since some housings accept only proprietary cartridges
Finer filtration and more stages tend to trade some flow for cleaner water. On a motorhome running from a modest 12-volt pump, a very restrictive filter can make showers feel weak, so balance filtration goals against how the coach actually draws water.
How to Replace an Inline Hose Filter
1) Turn off the campground spigot and disconnect the hose from the motorhome's city water inlet. 2) Unscrew the old filter from both hoses and let it drain. 3) Check the hose washers and replace any that are cracked or missing to prevent leaks. 4) Note the flow-direction arrow on the new filter and install it so water flows from the spigot toward the motorhome. 5) Attach it at the spigot end and hand-tighten the fittings. 6) Run water through the filter to waste for the time the maker recommends, usually until it runs clear, before connecting it to the coach. 7) Reconnect to the city water inlet and check every hose connection for drips.
Use only hose rated for drinking water on both sides of the filter. A clean filter connected to a garden hose not intended for potable water undermines its purpose.
How to Replace a Canister Cartridge
1) Turn off the water pump and disconnect or shut off city water. 2) Open a faucet to relieve pressure in the lines. 3) Place a towel or shallow pan under the housing to catch spills. 4) Unscrew the housing bowl, using a housing wrench if it is stuck; avoid forcing plastic housings with improvised tools. 5) Remove the old cartridge and discard it according to local rules. 6) Rinse the empty housing; wipe it with a mild sanitizing solution if it shows slime or residue, then rinse thoroughly. 7) Inspect the O-ring for cracks or flattening, clean it, and lightly lubricate it with a food-grade silicone lubricant if the housing maker recommends it. 8) Insert the new cartridge, making sure it seats on the center posts, and screw the bowl back on hand-tight. 9) Restore water slowly, bleed air from the system by opening faucets, and check the housing for leaks. 10) Flush the new cartridge as directed, which is especially important for carbon media that can release fine particles at first.
Filter Replacement, Sanitation and Winterizing
Filter changes fit naturally alongside routine sanitation of the fresh-water tank and lines. Carbon filters remove chlorine, so they are usually removed or bypassed before sanitizing with a chlorine solution; otherwise the filter absorbs the sanitizer and may be damaged. Once the system has been sanitized and flushed, installing a fresh cartridge avoids reintroducing contamination held in the old one.
Before winterizing, cartridges are generally removed so trapped water cannot freeze and crack the housing, and so RV antifreeze does not pass through the filter media. Many owners leave the empty housing in place or use a bypass, then fit a new cartridge when de-winterizing in spring.
Inline Filters and the Fresh-Water Tank
An inline hose filter treats water only while it passes through the hose. If you fill the fresh-water tank through the filter, that water is filtered on the way in, but the tank itself still needs periodic sanitation because stored water can develop problems over time regardless of filtration. A larger tank capacity also means stored water may sit longer between refills, which is one reason some owners add a whole-system filter downstream of the pump in addition to an inline unit at the hose.
Troubleshooting After Replacement
Leak at the housing: check that the O-ring is seated in its groove and not twisted, and that the cartridge is the correct size; Low flow: confirm the flow direction is correct, the micron rating is not finer than needed, and air has been bled from the lines; Cloudy or gray water at first: often trapped air or carbon fines; continue flushing as the filter maker directs; Persistent taste or odor: the source water, tank or lines may need sanitizing, or the cartridge media may not target that issue
The Bottom Line
Most motorhome water filter replacement comes down to identifying which type you have, buying a cartridge or inline unit that matches the existing filter specification, and following a simple shut-off, swap and flush routine. Pair filter changes with tank sanitation and seasonal winterizing, and use the filter's rated capacity and your own flow and taste observations to decide when the next change is due.