One-Man Brake Bleeder Kit: How to Choose the Right Type
The short answer
For most people who bleed brakes occasionally on one or two vehicles, a simple one-man kit works well. It is a clear hose with a one-way check valve and a catch bottle. It costs little, has almost nothing to break and lets you pump the pedal yourself while old fluid and air leave the bleeder screw. If you bleed brakes often, work on several vehicles or want to flush the whole system quickly, a pressure bleeder is usually the better buy. A vacuum or pneumatic bleeder suits you if you already own an air compressor. Reverse bleeders solve specific problems, such as stubborn air in a caliper or a newly installed master cylinder, but they are a specialist choice.
One condition can change the answer. Many vehicles with ABS or electronic stability control need a scan tool to cycle the hydraulic control unit if air reached it, for example after the master cylinder ran dry. No bleeder kit replaces that step. Check the service information for your exact model year, trim and brake system before you decide what you need.
How the main types of brake bleeders work
Every bleeder has the same job: move fresh fluid through the lines and push out old fluid and air through the bleeder screw at each wheel. The difference is what drives the fluid and whether you need a helper.
Type | What moves the fluid | Needs a helper? | Extra equipment | Best fit; One-man hose kit with check valve | Your foot on the brake pedal | No | None | Occasional bleeding, pad or caliper jobs; One-way bleeder valves (replacement bleeder screws) | Your foot on the brake pedal | No | None after installation | Owners who bleed the same vehicle repeatedly; Hand vacuum pump | Suction at the bleeder screw | No | None | Small jobs, clutch systems, bikes and motorcycles; Pneumatic vacuum bleeder | Compressed air creates suction at the bleeder | No | Air compressor | Faster flushes for owners who already have air; Pressure bleeder | Pressurized fluid pushed in at the reservoir | No | Reservoir adapter, sometimes a compressor or hand pump | Full flushes, frequent use, multiple vehicles; Reverse bleeder | Fluid pushed in at the caliper, out at the reservoir | No | Syringe or pump unit | Air trapped high in the system, new master cylinders
One-man brake bleeder kits
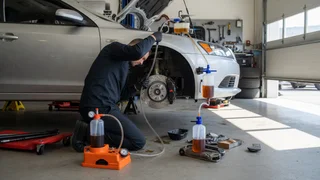
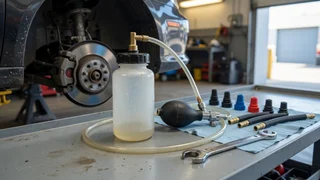
A basic kit uses a length of clear tubing that fits over the bleeder screw, a check valve that lets fluid flow out but not back in, and a bottle to catch the old fluid. You open the bleeder, pump the pedal from the driver's seat, then close the bleeder. Because the valve stops air from being drawn back in on the pedal's return stroke, you do not need someone to call out 'pedal down' and 'close it.'
The main drawback is visibility. You cannot watch the hose while you pump the pedal, so you check it between sets of strokes. Some kits include a magnetic or hook-on bottle so the hose stays put and the bottle sits above the bleeder, which helps keep any air in the hose from moving back toward the caliper.
One-way brake bleeder valves
These replace the factory bleeder screws with screws that have a built-in check valve. Once they are installed, you crack the screw open, pump the pedal and tighten it again. They are convenient if you track your car, bleed often or work alone regularly.
Fit is the main concern. Bleeder screws vary in thread size, thread pitch and seat shape between vehicles, and even between front and rear calipers on the same vehicle. Match the replacement to your exact caliper, not just to the make and model. If the original bleeders are seized or rounded, plan for the chance that removal will be harder than the bleeding itself.
Vacuum and pneumatic brake bleeders
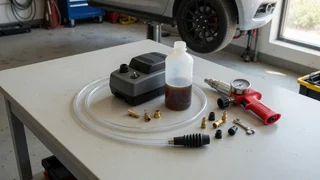
A vacuum bleeder pulls fluid through the system from the bleeder screw. Hand-pump versions are inexpensive and also work for clutch hydraulics. Pneumatic versions use shop air to create continuous suction, so they are faster and less tiring on a full flush.
One quirk catches many first-time users. Vacuum can draw air in around the threads of an open bleeder screw. That shows up as a steady stream of small bubbles in the hose even when the system itself is free of air. Some people put thread sealant or PTFE tape on the bleeder threads only, keeping it away from the tip and the passage. Others treat the vacuum flush as a first pass and finish with a few pedal strokes. Also keep a close eye on the reservoir level. Fast suction can empty it quickly and pull air into the master cylinder.
Pressure brake bleeders
A pressure bleeder attaches to the master cylinder reservoir with an adapter cap and pushes fluid in at low pressure. You then go around the vehicle opening each bleeder in turn. Because the reservoir stays full, there is little risk of running it dry and drawing air into the master cylinder. That is why many shops prefer this method for full fluid replacement.
Some units hold fluid in a pressurized tank. Others use a hand pump to pressurize the reservoir itself. The critical part is the adapter. Reservoir caps differ widely in shape, thread and seal design across brands and model years, and a poorly sealing adapter can spray brake fluid onto painted surfaces. Confirm which adapters come in the kit and whether one is available for your vehicle. Use the pressure your vehicle's service information or the bleeder's instructions recommend. Too much pressure can stress a plastic reservoir or blow the cap off.
Reverse brake bleeders
Reverse bleeding pushes fresh fluid in at the caliper's bleeder screw so it flows backward through the lines and up into the reservoir. Since air naturally rises, this can clear bubbles that resist conventional bleeding. Some technicians use it on new master cylinders or hard-to-bleed systems.
There are trade-offs. Fluid and debris from the calipers get pushed toward the ABS unit and master cylinder rather than out of the system. The reservoir also needs room to accept the incoming fluid, so you remove some fluid first and watch the level closely to avoid overflow. Some vehicle manufacturers do not include this method in their procedures. Treat it as a tool for particular situations rather than a routine flush method.
What to check before buying a brake bleeder kit
Fluid compatibility: Most cars use glycol-based fluid (DOT 3, DOT 4 or DOT 5.1). DOT 5 is silicone-based and must not be mixed with the others. Check that the kit's seals, hoses and container materials suit the fluid your vehicle specifies, and do not use one bottle for both fluid types. Bleeder screw fit: Hose inner diameter should seal snugly on your bleeder nipples. Many kits include several adapters or tapered fittings. A loose fit lets air in and gives misleading bubbles. Reservoir adapter (pressure bleeders): Confirm a matching cap adapter exists for your vehicle. If you work on several makes, check whether a universal adapter or an adapter set is included or sold separately. Check valve quality (one-man kits): The valve should seat reliably and be easy to clean or replace. A sticking valve defeats the purpose of the kit. Catch container: A bottle with a stable base, a hook or a magnet, and clear volume markings makes it easier to keep upright and to tell how much fluid you have moved. Hose length and clarity: Clear tubing long enough to route the bottle above the bleeder lets you watch for air and keeps the setup steady. Power source: Pneumatic units need a compressor that can supply the airflow the tool requires. Check this before buying if your compressor is small. Reservoir refill feature: Some vacuum and pneumatic kits include an automatic refill bottle that keeps the master cylinder topped up. It is useful if you work alone on a full flush. Other uses: If you also service a hydraulic clutch, a motorcycle or a bicycle with hydraulic brakes, check whether the kit's fittings cover those systems.
Matching the kit to the job
After replacing pads only, you often do not need to bleed at all unless you opened the hydraulic system. After replacing a caliper or a brake hose, a one-man kit or hand vacuum pump is usually enough to bleed the affected corner, followed by checking the other wheels if the pedal feels soft. For a full fluid flush, which many vehicle maintenance schedules call for at intervals that vary by manufacturer, a pressure or pneumatic bleeder saves time and reduces the risk of running the reservoir dry.
After replacing a master cylinder, bench bleed it before installing it. If air may have reached the ABS hydraulic unit, follow the vehicle's procedure, which may require a scan tool that can run an automated bleed. Bleeding order also differs between vehicles. Many follow a farthest-to-nearest pattern from the master cylinder, but some split or diagonal systems and some ABS designs specify a different sequence.
Common mistakes that a better kit will not fix
Letting the reservoir run low, which pulls air into the master cylinder and can mean starting over. Reusing old fluid from the catch bottle. Brake fluid absorbs moisture once exposed, so drained fluid should be disposed of properly. Leaving brake fluid on paint. Glycol-based fluid can damage finishes, so cover nearby surfaces and wipe spills promptly with water. Over-tightening bleeder screws, which can crack the seat or snap the screw. Pushing the pedal to the floor on an older master cylinder. This can move the seals over wear areas in the bore. Some technicians limit pedal travel during manual bleeding for this reason. Assuming bubbles always mean air in the system, when vacuum bleeders can draw air past the bleeder threads.
Which one to buy
Choose a one-man check-valve kit if you want the simplest, lowest-risk way to bleed brakes alone and you do it a few times a year. Add one-way bleeder valves if you bleed the same car often and are confident you can match the threads and seats. Pick a pneumatic vacuum bleeder if you already have a compressor and want faster flushes, and accept the thread-leak quirk. Go with a pressure bleeder if you flush fluid regularly or service several vehicles, once you have confirmed a reservoir adapter for each one. Keep a reverse bleeder in mind for difficult cases rather than as your only tool. Whatever you buy, check your vehicle's specified fluid type and bleeding procedure first, especially whether its ABS unit needs a scan tool to purge air.