Choosing a Front-Mount Intercooler Kit: Fitment, Features and Ownership Costs
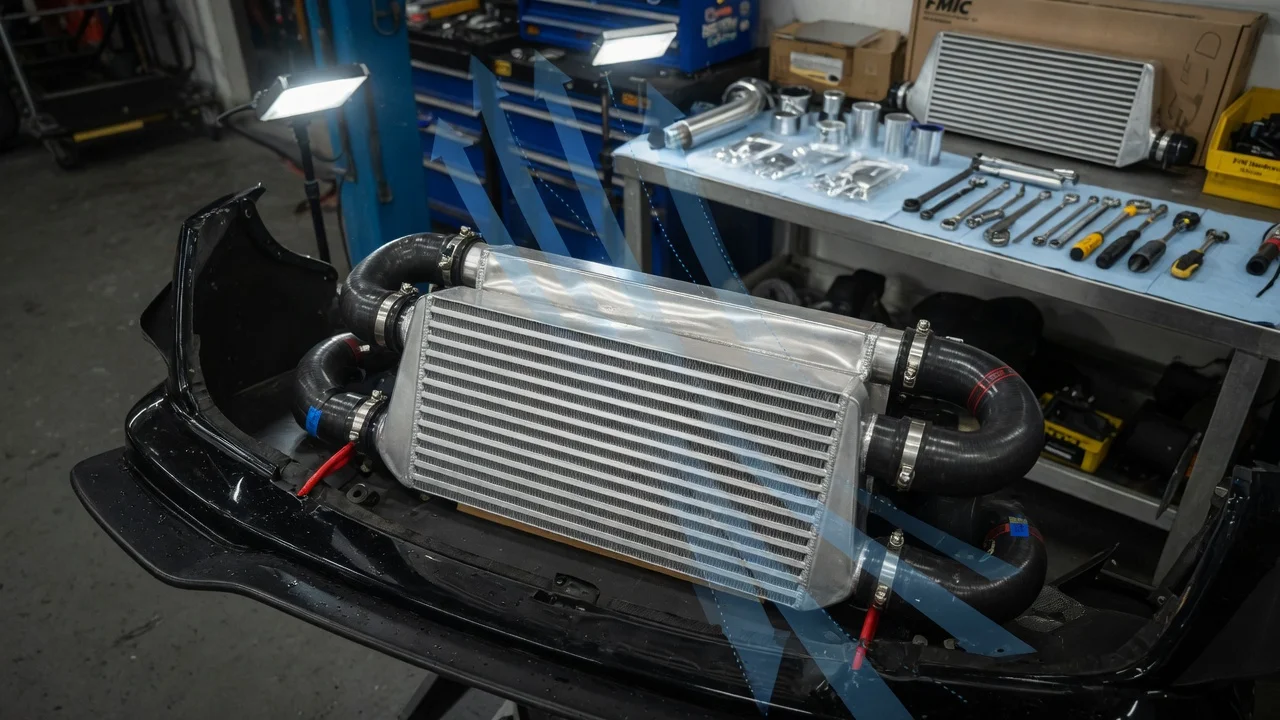
A front mount intercooler kit can lower charge air temperature on a turbocharged engine, but it only pays off when it matches the vehicle, its engine configuration and the way it is driven. This guide covers how to define the job the kit must do, confirm fitment for your model year and engine variant, judge features without leaning on marketing labels, and plan for the installation work and upkeep that come with moving the intercooler to the front of the car.
Define the job the product must do
Start with how the vehicle is used. A daily driver with a mild tune, a truck that tows in summer heat, and a car that sees repeated hard pulls at a track day place very different demands on an intercooler. Write down the engine configuration, current modifications, the boost level your tune targets, and whether the car is registered in a state that inspects aftermarket parts. Those answers decide how much core you actually need, how much extra piping length you can tolerate, and how far you are willing to modify the bumper or front structure to make room.
Next, separate symptom reports from verified failures. Power that fades after several pulls on a hot day, or owner posts describing heat soak on your model, are symptoms that point toward intake temperature but do not prove it. A verified failure is something you can show: an end tank that cracked and fails a pressure test, a smoke test that finds a leak at the factory core, or logged intake air temperatures that climb under the same symptom conditions every time. Check stored diagnostic codes and the service history before buying. Underboost or lean codes often trace back to a split coupler, a loose clamp or a failing bypass valve, and a new intercooler will not cure those.
Finally, set practical limits: budget for parts and labor, whether you can remove the bumper yourself, and how quickly the vehicle needs to be back in service. A kit that suits a weekend project may be the wrong choice for a car you commute in every day.
Check compatibility
Fitment is tied to the exact model year and engine variant, not just the model name. The same nameplate can be sold with different turbocharged engines, and a mid-cycle refresh can move the bumper beam, radiator support, intake piping routing or sensor positions. Confirm the kit against your engine code and production year, and ask the seller to state fitment by those details rather than a broad year range. If the vehicle came with a factory side-mount or top-mount intercooler, check which original brackets, ducts and pipes the kit replaces and which it reuses.
Then check the interfaces one by one. Compare inlet and outlet diameters with the turbo outlet and throttle body connections, and confirm the couplers match those flanges. Look for provisions for factory sensors mounted in the charge piping, such as boost or intake air temperature sensors, and for the factory bypass or blow-off valve flange if your engine uses one. Physical clearance matters just as much: the core must sit ahead of the A/C condenser and radiator without starving them of airflow, clear the crash beam or call for a documented modification, and leave room for horns, tow hook mounts, active grille shutters, parking sensors and any front radar module. Read the installation instructions before purchase, since they reveal cutting and relocation work a product page may not mention, and compare everything with the manufacturer specifications for your vehicle.
Features that affect the choice
Core construction is the main trade-off. Bar-and-plate cores are generally regarded as sturdier and heavier, while tube-and-fin cores are usually lighter; actual cooling and pressure drop depend on the specific design, so treat these generalizations as a starting point rather than a verdict. A larger core and longer piping add volume to the charge path, which can change throttle response and adds weight ahead of the front axle. Bigger is not automatically better if your engine and tune do not produce enough heat or airflow to use it.
Build quality shows up in details you can verify. Look at how the end tanks are made and welded, whether the maker states core and overall dimensions, what pipe material and finish are used, and whether couplers are reinforced silicone with clamps suited to your boost level. Brackets should bolt to existing mounting points or come with clear instructions for any new ones. Useful evidence includes a published fitment list by model year and engine, a complete hardware list, pressure testing statements from the manufacturer and plain warranty terms.
Treat marketing labels with caution. Phrases like race proven, maximum cooling or a quoted horsepower gain mean little without the test vehicle, tune, ambient conditions and measurement method. A gain recorded on a heavily modified car does not transfer to a stock engine, and many turbocharged engines need tune adjustments before a cooler intake charge turns into measurable power.
Limitations and ownership costs
Installation is usually more involved than swapping a factory part. Expect bumper removal, possible trimming of the bumper cover or splash shields, and on some vehicles cutting or modifying the crash beam, which can affect how the front structure behaves in a collision and deserves careful thought. Longer piping means more joints, and each joint is a potential leak point. Plan for a boost leak or smoke test after installation, a scan for new diagnostic codes and, where the tune expects factory airflow characteristics, a tune revision. Labor, tuning and any trim repair can add substantially to the purchase price.
Ownership brings ongoing items. Couplers and clamps age with heat cycles and belong in routine inspection, along with the core face, which sits low and is exposed to stones, road salt and debris. Oil mist from the crankcase ventilation system can collect in the core and piping, so periodic cleaning may be worthwhile, especially if oil appears at the couplers. A front-mount layout can also reduce ground clearance and change airflow to the condenser and radiator, which matters for towing or hot climates.
Be clear about what the kit cannot do. It will not repair a worn turbocharger, a leaking bypass valve, a vacuum leak, a fuel delivery problem or a misfire, and it does not by itself raise boost. If your diagnosis does not point to charge air temperature, the money is better spent fixing the confirmed fault.
Build a practical shortlist
Narrow the field to two or three kits and compare them on the same points. Confirm fitment by model year, engine code, transmission and trim differences such as front sensors or grille shutters. Check that inlet and outlet sizes, sensor bosses and the bypass valve flange match your engine. Note what has to be cut or relocated and whether the instructions cover it clearly. Compare core construction and stated dimensions with the job you defined earlier rather than simply picking the largest option.
Then weigh ownership factors: completeness of the hardware kit, coupler and clamp quality, finish and corrosion protection, warranty coverage, whether a tune revision will be needed, and whether the part is acceptable for road use where the vehicle is registered. Finally, set the shortlist against your own evidence. If logged intake temperatures, a confirmed core failure or a clear inspection result support an upgrade, choose the kit that fits cleanly and meets that need. If all you have is a symptom report, finish the diagnosis first.