Brake Booster Repair: Symptoms, Checks and When to Replace
Brake booster repair usually means replacing the booster as a complete unit rather than rebuilding it. The exceptions are the parts around it. A cracked vacuum hose, a failed check valve, a weak vacuum source or a master cylinder leak can produce the same hard pedal, and each is cheaper and simpler to fix than the booster itself. Before buying a booster, confirm that the booster is actually at fault. The answer also depends on the type of assist your vehicle uses. Most gasoline cars and light trucks use a vacuum booster. Many diesels and some heavy-duty trucks use a hydraulic system called hydro-boost. A growing number of hybrids and electric vehicles use an electric or electro-hydraulic brake unit. The diagnosis and repair approach differs for each, so identify your system first.
What a brake booster does
A brake booster multiplies the force of your foot on the pedal before that force reaches the master cylinder. The master cylinder is the component that converts pedal movement into hydraulic pressure in the brake lines. Without assist, the brakes still work mechanically, but the pedal takes far more effort and stopping distances increase because few drivers can push hard enough.
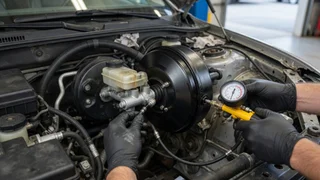
Vacuum booster: a round, drum-shaped housing mounted on the firewall between the pedal and the master cylinder. Inside, a rubber diaphragm separates two chambers. Engine vacuum, or a separate vacuum pump on many diesel and some turbocharged engines, holds both chambers at low pressure. When you press the pedal, a valve lets outside air into the rear chamber, and the pressure difference pushes the diaphragm forward to help you. Hydro-boost: uses pressurized fluid from the power steering pump instead of vacuum. It is common where engine vacuum is limited or where extra assist is needed. It shares fluid and hoses with the steering system. Electric or integrated brake units: use an electric motor or a pump and accumulator, often combined with regenerative braking and stability control. These are typically serviced as sealed modules and frequently require dealer-level software procedures after replacement.
Common symptoms of a failing booster
Hard or stiff brake pedal that needs much more effort than normal, especially from a stop. Hissing sound from under the dashboard when you press or release the pedal, which can indicate a torn diaphragm or leaking valve. Engine idle that drops, stumbles or stalls when you apply the brakes, a sign that the booster is leaking vacuum into the intake. Pedal that returns slowly or feels inconsistent from one stop to the next. Lean-condition or vacuum-leak fault codes from the engine computer. These codes point to unmetered air entering the engine and the booster is only one possible source. On hydro-boost systems: a hard pedal combined with heavy steering, power steering fluid leaks near the booster, or a pedal that chatters.
Several of these symptoms overlap with other problems. A hard pedal can come from a seized caliper or contaminated pads as well as lost assist. A sinking or spongy pedal usually points to the hydraulic side of the system, such as air in the lines, a leak or a worn master cylinder, rather than the booster.
How to check a vacuum brake booster
These checks help separate a failed booster from a vacuum supply problem. They apply to vacuum boosters on engines that produce usable intake vacuum or have a working vacuum pump. They do not apply to hydro-boost or electric brake systems.
Reserve test: with the engine off, pump the brake pedal several times until it feels firm. This uses up stored vacuum. The pedal should become noticeably harder with each press. If it feels the same from the first press, the booster may not have been holding vacuum to begin with. Assist test: with the pedal held down firmly and the engine still off, start the engine. The pedal should drop slightly under your foot as vacuum builds and assist begins. No movement suggests no vacuum is reaching the booster, or the booster is not using it. Hold test: run the engine for a short time, shut it off, wait, then press the pedal. You should still get one or more assisted presses. Losing assist quickly suggests a leak in the booster, the check valve or the hose. Listen test: with the engine idling, press and hold the pedal while listening near the pedal assembly under the dash. A steady hiss while the pedal is held often points to a leaking diaphragm or internal valve.
Check the parts around the booster first
Many booster complaints are solved without replacing the booster. These components are inexpensive and easier to reach.
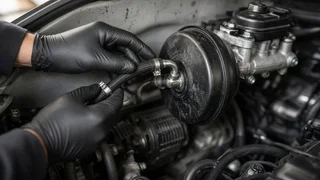
Vacuum hose: inspect the hose from the intake manifold or vacuum pump to the booster. Look for cracks, softness, collapse, oil saturation or loose fittings. Check valve: a one-way valve, usually in the hose or in the booster grommet, that keeps vacuum stored in the booster. Air should pass in only one direction when you blow through it. If it passes both ways or not at all, it has failed. Also check the rubber grommet that seals it to the booster. Vacuum source: a dedicated vacuum pump on a diesel or some gasoline engines can wear or leak oil. On engines that rely on manifold vacuum, low vacuum from an engine problem will reduce assist. Master cylinder: a leaking rear seal can push brake fluid into the booster. Look for fluid at the joint between the master cylinder and booster, or a dropping fluid level with no visible external leak. Brake fluid damages the booster diaphragm, so both parts may need replacement.
Interpreting the results
What you observe | What it likely indicates | Next step; No pedal drop when engine starts, hose and check valve good | Booster not using vacuum, possible internal failure | Confirm vacuum at the booster, then replace booster; No pedal drop, no vacuum at the hose | Vacuum supply problem | Diagnose the hose, pump or engine vacuum; Hiss under dash, idle drops when braking | Leaking diaphragm or internal valve | Replace booster; Assist lost quickly after engine shutoff | Leaking check valve, grommet or booster | Test check valve and grommet first; Brake fluid at the booster joint | Master cylinder rear seal leak | Replace master cylinder and inspect booster for fluid damage; Sinking or spongy pedal | Hydraulic system fault, not the booster | Check for leaks, air in lines and master cylinder condition; Hard pedal plus heavy steering on hydro-boost | Power steering supply or hydro-boost unit fault | Check fluid level, belt, pump and hoses before the unit
Repair or replace?
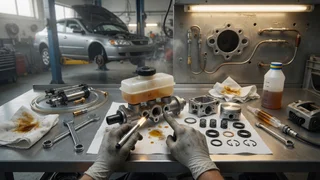
Modern vacuum boosters are generally sealed assemblies and are not designed for home rebuilding. Replacement with a new or remanufactured unit is the normal repair. Rebuild kits and rebuilding services exist for some classic and older vehicles, but rebuilding requires special tools and careful setup, and a mistake affects your ability to stop.
Hydro-boost units can sometimes be resealed, but replacement is also common. Electric and integrated brake modules are usually replaced as a unit and often need programming, calibration or a brake bleeding routine run through a scan tool. Check the requirements for your specific model year and powertrain before deciding on a repair path.
What booster replacement involves
The process varies widely by vehicle, but most vacuum booster replacements follow a similar outline. This overview is meant to help you judge the job, not to replace the service procedure for your vehicle.
Disconnect the vacuum hose from the check valve. Unbolt the master cylinder from the booster. On many vehicles it can be eased forward without opening the brake lines, which avoids bleeding the system. If lines must be disconnected, the brakes will need to be bled afterward. Under the dashboard, disconnect the booster pushrod from the brake pedal and remove the nuts that hold the booster to the firewall. Access is often tight and may require removing trim, ducts or other components. Install the new booster, reconnect the pedal linkage and reinstall the master cylinder. Check the pushrod length between the booster and the master cylinder if your vehicle's procedure calls for it. An incorrect setting can cause dragging brakes or excessive pedal travel. Check the brake light switch adjustment, since pedal position can change. Test pedal feel and assist with the engine off and running before driving, then test at low speed in a safe area.
When to stop driving and get professional help
Stop driving and have the vehicle towed or inspected if the pedal suddenly becomes very hard, if you cannot stop the vehicle confidently, if the brake warning light is on along with a low fluid level, or if the pedal sinks to the floor. Losing booster assist does not leave you without brakes, but the extra effort needed can make an emergency stop impossible for many drivers.
Professional diagnosis is the better choice for hydro-boost systems that share components with steering, for electric and integrated brake units, for vehicles where removing the master cylinder means opening the hydraulic system and bleeding an ABS unit, and any time the test results do not clearly point to one component. Treat a fault code as a starting point for investigation rather than proof that a specific part has failed.
Key takeaways
Identify whether your vehicle uses vacuum, hydro-boost or electric brake assist before diagnosing. Use the engine-off and engine-start pedal tests to confirm a vacuum booster problem. Inspect the vacuum hose, check valve, vacuum source and master cylinder before replacing the booster. Most boosters are replaced rather than rebuilt; rebuilding is mainly an option for older vehicles. A hard pedal that compromises stopping means the vehicle should not be driven until it is repaired.