How to Remove a Rear Axle Shaft
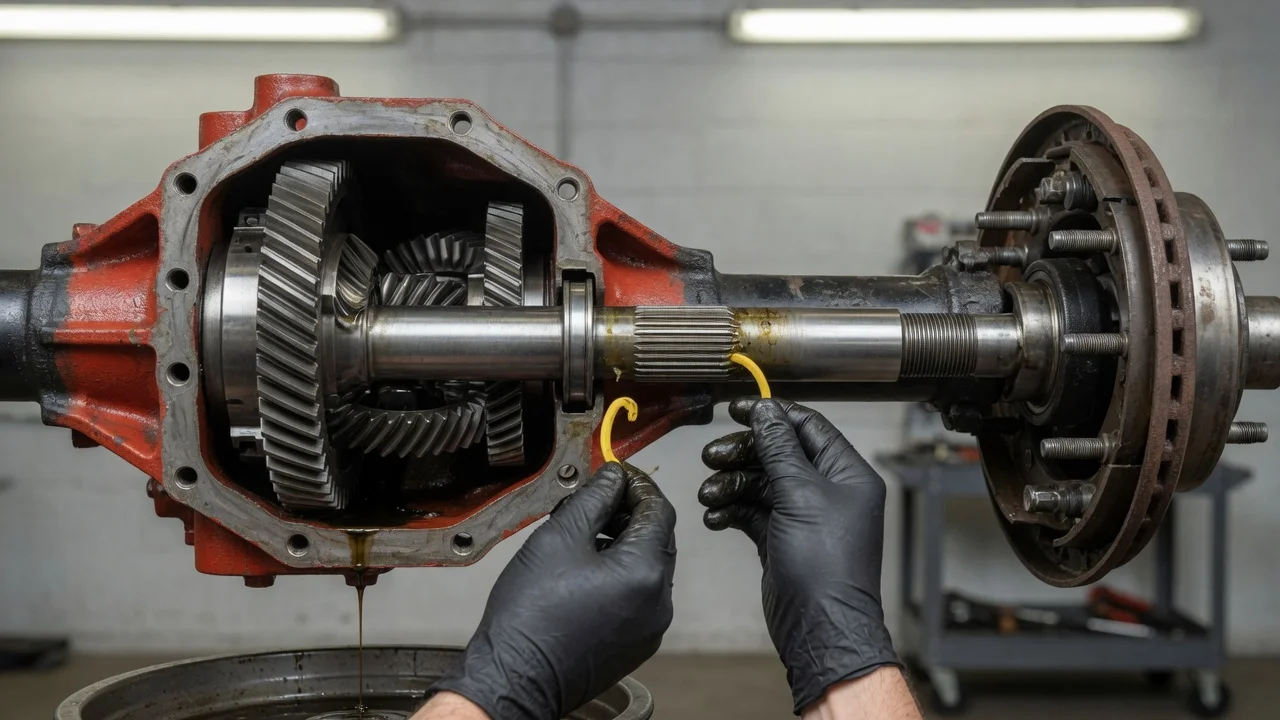
Removing a rear axle shaft is a common repair when a wheel bearing becomes noisy, an axle seal leaks gear oil onto the brakes, or a shaft is bent or broken. The procedure depends on how your axle holds its shafts in place, so this guide covers both common designs and explains what Jeep JK and TJ owners should confirm before they start loosening hardware.
Confirm the part and repair scope
Start by making sure the axle shaft is actually the problem. A leaking axle seal usually leaves gear oil on the inside of the wheel, the brake backing plate or the brake shoes or pads. A failing wheel bearing tends to produce a growl or hum that changes with speed and sometimes with steering load. A bent shaft can cause vibration or wheel wobble, while a broken shaft typically means the vehicle no longer moves under power on that side or makes a loud clunk. Before ordering parts, raise the wheel, check for play by rocking the tire top to bottom, and rule out suspension bushings, brake hardware and tire problems.
Next, identify your exact vehicle configuration. The axle model is often stamped on a tag or on the housing, and your build data or service history can confirm the gear ratio, spline count and whether the differential is open, limited-slip or a locker. These details determine which shaft, bearing and seal fit. Most important, determine how the shaft is retained. On a C-clip axle, a small clip inside the differential locks each shaft to the side gear. On a retainer-plate axle, a pressed-on bearing and a bolted plate behind the brake rotor or drum hold the shaft in the housing. A Jeep JK and a Jeep TJ use different rear axle hardware, and TJ models came with more than one rear axle depending on trim, so check your own vehicle rather than relying on a generic procedure.
Prepare tools and safe access
Gather a floor jack, jack stands rated for the vehicle, wheel chocks, a breaker bar, a socket and wrench set, a torque wrench, a drain pan, brake cleaner and shop towels. A C-clip axle also requires a new differential cover gasket or the sealant specified by the manufacturer, along with fresh gear oil of the correct type. A retainer-plate axle usually needs a slide hammer with an axle flange adapter. Replacement axle seals and, if the bearing is worn, a new bearing should be on hand before you begin, since a removed seal should not be reused.
Obtain the service information for your exact model before starting. Torque values for the cross-pin bolt, retainer nuts, caliper bolts and lug nuts, the correct gear oil specification and fill level, and any friction modifier requirement for limited-slip units all come from manufacturer specifications, not from a general rule. Work on level ground, chock the front wheels, loosen the lug nuts while the tire is on the ground, then lift by a solid point and support the axle housing on stands. Never work under a vehicle held only by a jack.
Some parts of this job are not well suited to inexperienced owners. Pressing a bearing and retaining ring onto a shaft requires a hydraulic press and the correct support tooling, and an improperly pressed ring can let the shaft walk out of the housing. Lockers and some limited-slip carriers also have different internal layouts that complicate cross-pin and clip access. If either applies and you lack the equipment or experience, have a shop handle that portion.
Remove without avoidable damage
Remove the wheel, then the brake caliper and its mounting bracket if equipped, and hang the caliper with wire so it does not dangle from the brake hose. Remove the rotor or drum. If a wheel speed sensor or parking brake cable is mounted where it can be damaged by the shaft coming out, disconnect or move it now and note its routing. Mark the shafts left and right so used parts go back where they came from.
For a C-clip axle, place the drain pan under the differential, remove the cover bolts and let the oil drain. Rotate the carrier until the cross-pin retaining bolt is accessible, remove that bolt, and slide the cross pin partway or fully out without letting the spider gears fall out of position. Push the axle shaft inward toward the center of the differential, remove the C-clip from the groove at the shaft end, then pull the shaft straight out. Support its weight as it exits so the splines do not drag across the seal or the bearing surface in the housing. Removing the second shaft follows the same sequence.
For a retainer-plate axle, the differential cover usually stays on. Remove the nuts or bolts securing the retainer plate, often reached through openings in the axle flange. Attach a slide hammer to the flange and pull the shaft out; the bearing and outer seal normally come out with it. Expect some gear oil to run out of the housing tube. Keep the backing plate, sensor wiring and any tone ring clear of the slide hammer, and inspect the shaft, bearing journal and splines once it is out.
Install and restore the system
Clean the axle tube end, seal bore and flange surfaces, and wipe metal debris from the differential. Install the new seal so its lip faces the gear oil, using a seal driver that bears evenly on the outer edge. On a retainer-plate shaft, install the new bearing and retaining ring with the correct press tooling if you are replacing them, and confirm any separate seal or retainer orientation against the service information.
Guide the shaft into the housing carefully, keeping it level so the splines do not cut the seal lip, and rotate it slightly until it engages the side gear. On a C-clip axle, push the shaft inward, fit the C-clip into its groove, pull the shaft outward to seat the clip in the side gear recess, then reinstall the cross pin and its retaining bolt with threadlocker if specified and torque it to specification. Install the cover with a new gasket or the specified sealant, and refill through the fill plug with the correct gear oil and any required additive until the level matches the manufacturer's instruction. On a retainer-plate axle, torque the retainer nuts to specification and top up fluid if the procedure calls for it.
Reconnect the wheel speed sensor and parking brake, then reinstall the rotor or drum, caliper bracket, caliper and wheel. Torque the caliper hardware and lug nuts to the specified values, and pump the brake pedal several times until it is firm before moving the vehicle.
Check the completed work
Before the first drive, rotate each wheel by hand and listen for scraping or grinding, and confirm there is no noticeable in-and-out play beyond what the service information allows. Recheck the differential fluid level and look for seepage around the cover, fill plug and axle seals. Start the engine and make sure no ABS or traction control warning lights remain on.
Take a short, low-speed test drive, then inspect again for leaks at the seals and cover. Check that brake pedal feel is normal and that the parking brake holds. Follow the manufacturer's guidance on rechecking lug nut torque and add this repair to your service history so the next inspection or maintenance schedule accounts for the new parts.
Further diagnosis is needed if you hear a clunk on acceleration or deceleration, if a whine or growl persists, if gear oil continues to appear on the brakes, or if a hub feels unusually hot after normal driving. A warning light that returns after the repair often points to a damaged sensor, wiring or tone ring. Address these signs promptly, because a shaft that is not properly retained or a contaminated brake can create a serious safety risk under real operating conditions.