How to Remove a Bearing From a Rear Axle Shaft
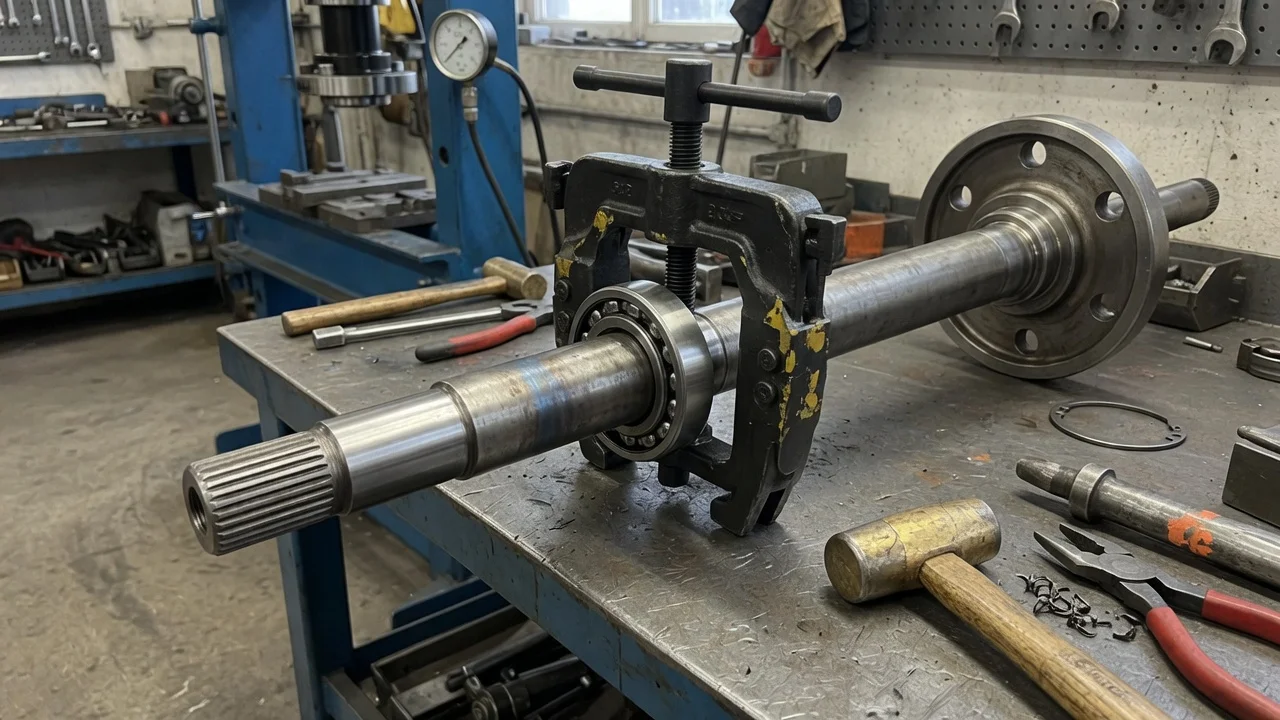
A worn rear wheel bearing usually shows up as a growl or hum that rises and falls with road speed. On many rear-wheel-drive vehicles with a semi-floating axle, the bearing either sits inside the axle housing or is pressed directly onto the shaft. That difference determines how the job is done. This guide covers how to remove a rear axle shaft bearing safely, which tools the job requires, and how to confirm the repair afterward.
Confirm the part and repair scope
Before taking anything apart, make sure the bearing is actually the problem. Tire noise from cupped or unevenly worn tread, a failing pinion or carrier bearing, and worn brake hardware can all sound like a bad axle bearing. A careful inspection helps narrow it down. With the rear raised and supported, spin each wheel by hand and feel for roughness. Check for play by rocking the tire at the top and bottom, and look for gear oil on the inside of the wheel, the brake backing plate or the brake shoes, which points to a leaking axle seal. If noise changes when you swerve gently left and right at speed, a wheel bearing becomes more likely, but it is not proof on its own.
Next, identify the exact axle in your vehicle configuration. Semi-floating axles generally use one of two designs. In a C-clip axle, the bearing is pressed into the end of the axle housing and the shaft rides directly on its rollers, held in place by a C-shaped clip inside the differential. In a bearing-retainer axle, the bearing and a retaining ring are pressed onto the shaft, and a retainer plate bolts the assembly to the housing. Full-floating axles, common on heavier trucks, carry their bearings in the hub and follow a different procedure entirely. Use the VIN, the axle identification tag or code, and the service history to match the correct bearing, seal and retaining ring. Many bearing kits include the seal, and the retaining ring must always be new on pressed designs.
Prepare tools and safe access
Work on level, solid ground with the front wheels chocked, and support the axle on rated jack stands rather than a jack alone. Typical tools include sockets and wrenches, a slide hammer with an axle flange adapter, a blind-hole bearing puller or bearing removal attachment, a seal and bearing driver set, a torque wrench, a drain pan, gasket material or sealant for the differential cover, and the gear oil grade the manufacturer specifies. If the axle has a limited-slip differential, check whether a friction modifier is required. Get the factory service information for your vehicle before you start, because torque values for the pinion shaft lock bolt, retainer plate nuts, cover bolts and wheel lug nuts vary by application and should come from manufacturer specifications, not memory or general charts.
A C-clip axle is usually manageable for an owner with solid mechanical experience. A pressed-on bearing is a different job. Removing it and installing the new bearing and retaining ring requires a hydraulic press with a bearing separator plate and adapters that support the shaft properly. Owners without that equipment often pull the shaft themselves and take it to a machine shop or parts store with press service. Wear safety glasses throughout, since pressed components can release suddenly under load.
Remove without avoidable damage
Both designs start the same way. Loosen the lug nuts, raise and support the vehicle, and remove the wheel. Remove the brake drum, or the caliper, caliper bracket and rotor on disc brake models. Hang the caliper so it doesn't hang from the brake hose. If an ABS wheel speed sensor reads a tone ring on the axle, disconnect or remove the sensor so it is not damaged when the shaft moves.
On a C-clip axle, drain the differential and remove its cover. Remove the pinion shaft lock bolt and slide the pinion shaft partly or fully out, taking care not to let the spider gears shift. Push the axle shaft inward toward the center, remove the C-clip from the groove at its inner end, then slide the shaft out of the housing while supporting it so the splines do not drag across the seal bore or damage the side gear. Remove the old seal with a seal puller or pry bar, then extract the bearing from the housing using a blind-hole puller or a slide hammer with a bearing attachment. Avoid gouging the housing bore, because scoring there can cause leaks or an improper bearing fit.
On a bearing-retainer axle, remove the nuts or bolts that hold the retainer plate to the housing, usually reached through an access hole in the axle flange. Attach a slide hammer to the flange and pull the shaft, bearing and retainer out as an assembly. To free the bearing, the retaining ring must come off first. A common method is to drill partway into the ring and then split it with a chisel, without letting the drill or chisel touch the shaft. Never use a torch, because heat can change the shaft's hardness and weaken it. With the ring removed, support the bearing on a separator plate in the press and push the shaft out of the bearing. Do not hammer the bearing off, which risks bending or nicking the shaft.
Install and restore the system
Clean every part and inspect the axle shaft before reassembly. On a C-clip axle, the bearing rollers run directly on the shaft, so the bearing journal must be smooth. Pitting, grooving or spalling there means the shaft needs replacement, or you need a repair-style bearing listed for that axle that moves the contact area to undamaged metal. Drive the new bearing squarely into the housing with a driver that contacts only the outer race, then install the new seal with its lip facing the differential side, as shown in the service information. Lightly lubricate the seal lip, slide the shaft in without dragging it across the seal, reinstall the C-clip, pinion shaft and lock bolt, and tighten the bolt to specification.
On a pressed design, slide on the retainer plate and any seal parts in the order shown for your axle, then press the new bearing onto the shaft until it seats against the shoulder, followed by a new retaining ring pressed tightly against the bearing. Never reuse the old ring. Check that the tone ring is intact before refitting. Guide the shaft into the housing, engage the splines with the side gear, and tighten the retainer fasteners to the specified torque. For both types, reinstall the ABS sensor, brakes and wheel. Fit the differential cover with a new gasket or sealant if it was removed, then fill with the specified lubricant to the correct level.
Check the completed work
Before lowering the vehicle, spin the wheel and confirm it turns smoothly without binding or scraping. Check that the brakes operate correctly, and adjust the drum brakes or parking brake if the procedure for your vehicle requires it. Verify the differential fluid level and inspect the axle end, cover and drain plug for seepage. Tighten the lug nuts to specification on the ground. Pump the brake pedal to restore firm travel before driving. Then make a careful road test at gradually increasing speeds, listening for noise and watching for an ABS or traction control warning light.
Recheck for leaks and fluid level after a short period of driving. Some symptoms call for further diagnosis rather than reassembly. If the original noise is still there, the cause may be a differential or pinion bearing, the tires, or the opposite wheel bearing. Fresh gear oil on the brakes points to a seal that was damaged, installed backward or not fully seated. A clunk, wobble or vibration can mean the C-clip or retainer is not properly seated, or the shaft is bent. An ABS warning usually traces to a damaged sensor, wiring or tone ring. Consider your operating conditions, such as towing or heavy loads, when deciding how often to inspect the axle, and follow the manufacturer's maintenance schedule for gear oil service.