How to Adjust Parking Brake Shoes
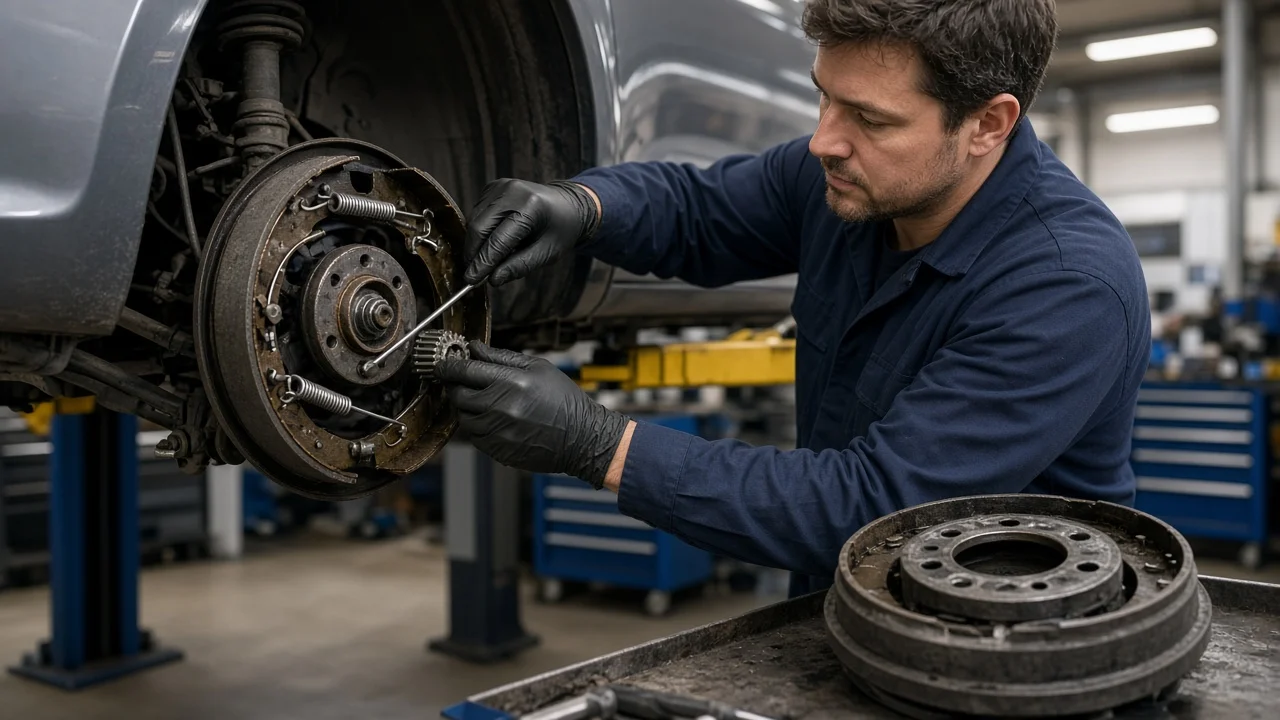
A parking brake that pulls up too high, will not hold on a slope, or drags after release often has shoes that are out of adjustment rather than a stretched cable. Adjusting parking brake shoes means setting the clearance between the shoe linings and the drum first, then taking up the remaining slack at the cable. This guide explains how that works on common rear brake designs, what changes the procedure, and when the job belongs with a professional.
The short answer
Adjust the shoes first, then the cable. Support the vehicle safely, release the parking brake fully, and loosen cable tension. Then turn the star wheel adjuster until the shoes just begin to drag on the drum. Back it off by the amount given in the service information for your vehicle, so the wheel turns freely with no more than slight contact. Once the shoes are set, adjust the cable at the equalizer or lever so the brake engages within the specified travel and releases completely. If the friction material is worn past its limit or contaminated, or the drum is beyond its maximum diameter, adjustment will not solve the problem and the parts must be replaced.
How parking brake shoes work
Parking brake shoes are curved steel shoes lined with friction material. When you pull the lever or press the pedal, a cable pulls an actuating lever inside the brake assembly. That lever spreads the shoes outward against the inside of a drum, and friction holds the wheel. When you release the brake, return springs pull the shoes back away from the drum. On many vehicles with rear disc brakes, the drum is machined into the center hat of the brake rotor. This layout is called drum-in-hat, and the small shoes inside it are used only for parking. On vehicles with rear drum brakes, the same shoes handle both normal stopping and parking.
The gap between linings and drum is set by an adjuster, usually a threaded strut with a toothed star wheel. Turning the wheel lengthens or shortens the strut, which moves the shoes closer to or farther from the drum. Cable adjustment only controls how far the lever travels before it starts pulling the shoes. If the shoes sit too far from the drum and you compensate by tightening the cable, the lever can run out of travel before the brake holds firmly. A cable that is too tight can keep the shoes partly applied, causing drag, heat and rapid lining wear. That is why the correct order is shoes first, cable second.
What changes the procedure
The design of your rear brakes determines access. On a drum-in-hat system there is usually no automatic adjuster for the parking shoes, so they need manual adjustment after new shoes or rotors are installed, or when lever travel becomes excessive. Some designs let you reach the star wheel through an access hole in the rotor face. Others have a rubber-plugged hole in the backing plate. On some vehicles you have to remove the caliper and rotor and set the shoes with a brake shoe gauge. Conventional rear drums usually have self-adjusters that work while the vehicle reverses or the parking brake is applied, but they still need an initial manual setting after a brake job.
Electronic parking brakes change the job considerably. Many use a motor on the rear caliper that squeezes the brake pads against the brake rotors, with no shoes at all. Others drive a drum-in-hat mechanism through a motor and cable. Either type may need a scan tool or a specific sequence to put the system into service mode before you touch it. Also check the details for your exact vehicle fitment. The adjuster threads may be left-hand on one side and right-hand on the other, and the turning direction to tighten depends on which side of the vehicle you are working on and where the access hole sits.
Adjusting the shoes step by step
Park on level ground, chock the front wheels, and raise the rear of the vehicle onto jack stands rated for its weight. Never work under a vehicle supported only by a jack. Release the parking brake. Then find the cable adjuster, often a nut on the equalizer under the vehicle or at the lever inside the cabin, and back it off so the cable is slack. This step matters: with the cable still tensioned, the shoes may not seat properly and the adjustment will be wrong. Remove the rear wheels so you can see the rotor or drum and reach the adjustment access point.
Rotate the rotor or drum until the access hole lines up with the star wheel. A flashlight helps confirm the position. Use a brake adjusting tool or a flat-blade screwdriver to turn the star wheel a few teeth at a time, spinning the rotor between adjustments. Keep going until you feel firm, even drag and the rotor becomes hard to turn by hand. Then back the adjuster off by the number of notches the service information specifies, until the rotor turns freely or with only light, uniform contact. Make sure the drag is not caused by the disc brake caliper or pads. Repeat the process on the other side so both wheels end up with similar clearance.
New parking brake shoes, or shoes paired with a new drum surface, often need a bedding or burnishing procedure before they hold at full strength. Some manufacturers specify a series of light, low-speed applications for this. Follow the procedure for your vehicle instead of improvising one, and do not test it in traffic.
Setting the cable and checking the result
With both sides adjusted, tighten the cable adjuster until the slack is gone but the shoes are not being applied. Work the lever or pedal several times to seat the cables. Then count the clicks or measure the travel to full engagement and compare it with the specification. Release the brake and confirm both rear wheels spin freely by hand. Refit the wheels, torque the lug nuts to specification, and lower the vehicle. As a final check, test the parking brake on a gentle incline with your foot ready on the service brake, and confirm the brake warning light goes out when the brake is released.
Problems adjustment will not fix
Adjustment only compensates for normal clearance. It cannot restore worn or damaged parts. Linings worn to their wear limits, cracked, or separating from the shoe need replacement, normally in axle sets. Linings soaked with gear oil from a leaking axle seal, or with brake fluid from a leaking wheel cylinder, will not grip reliably even when correctly adjusted. Fix the leak before installing new shoes. A star wheel seized by corrosion, broken or missing return springs, and cables that stick in their housings all prevent a proper result. Check the drum surface too: the maximum allowable diameter is usually cast or stamped on the drum or rotor hat. A drum beyond that limit leaves the shoes too far away to hold properly.
Limitations and next step
Procedures, back-off amounts, cable travel and wear limits vary by make, model, year and brake option. Use the service information for your specific vehicle rather than general figures. Electronic parking brake systems, vehicles that need rotor or caliper removal, and any situation where you are unsure of the adjuster direction or component condition are good reasons to have a qualified brake technician do the work. If the parking brake will not hold the vehicle, a rear wheel stays hot or drags after release, or you see fluid on the brake parts, stop relying on the vehicle and have the braking system inspected before driving it further.