How to Remove Parking Brake Shoes
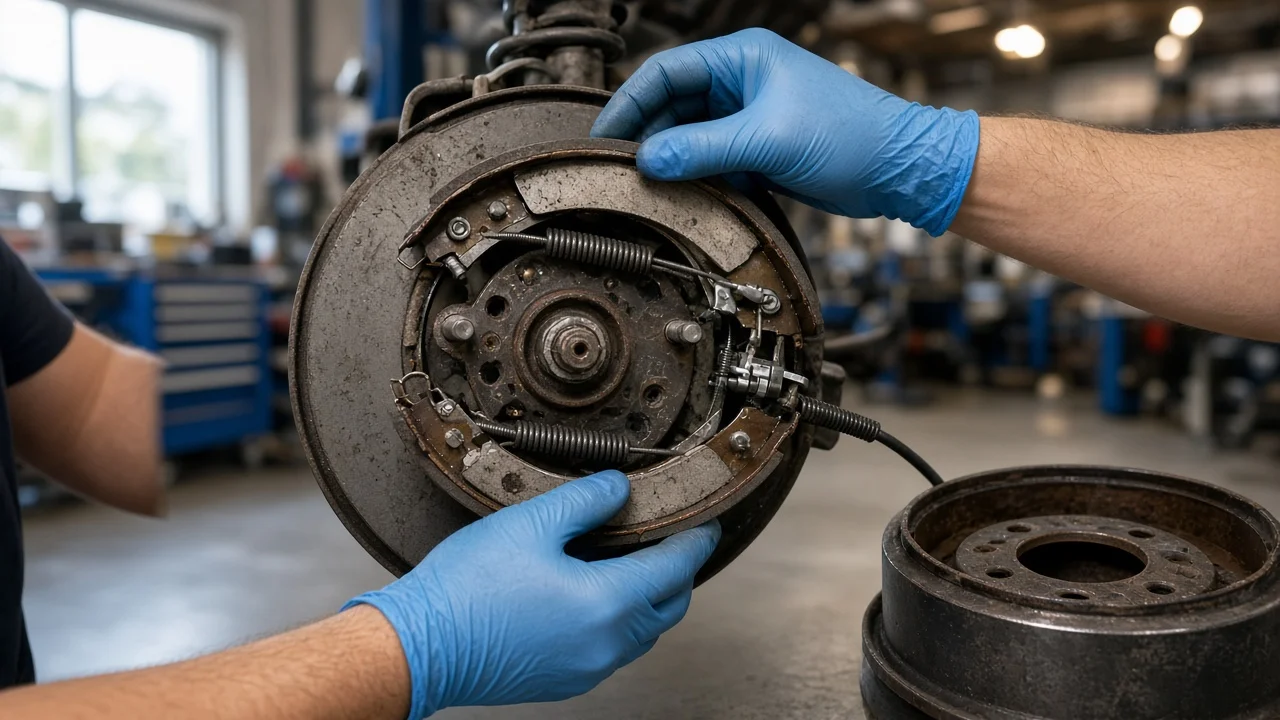
Parking brake shoes sit inside a brake drum or inside the hat section of a rear rotor, and they hold the vehicle when it is parked. Taking them out means releasing adjuster tension, unhooking springs and freeing the shoes without bending hardware or damaging the cable. This guide follows the general sequence a brake technician uses. Your vehicle's service information always takes priority for the exact procedure, adjustment method, torque values and wear limits.
Confirm the part and repair scope
Start by identifying which parking brake design your vehicle uses. Many vehicles with rear disc brakes use a drum-in-hat system: small shoes work inside the hat of the rear rotor, while the caliper and brake pads handle normal service braking. Vehicles with rear drum brakes usually use the same shoes for both service and parking braking. Some vehicles have an electronic parking brake built into the rear caliper and have no separate shoes at all. Shoe diameter, width, lever style and hardware can differ between model years, trims and axle options, so check vehicle fitment by VIN or exact build details before ordering parts.
Make sure new shoes will actually fix the complaint. A parking brake that holds poorly can be caused by a stretched or seized cable, a sticking lever, a seized adjuster, contaminated friction material or a drum surface worn beyond its limit, not only by worn linings. Measure the remaining lining and the drum or rotor hat inner diameter against the wear limits in the service information. If the linings are soaked with grease, gear oil or brake fluid, find and repair the leak, such as an axle seal or wheel cylinder, before fitting new shoes. Replace shoes as an axle set so both sides hold evenly.
Prepare tools and safe access
Typical tools include a jack, rated jack stands, wheel chocks, a lug wrench, a socket set, a torque wrench, brake spring pliers or a hold-down spring tool, a flat screwdriver or brake adjusting tool, brake cleaner and high-temperature brake lubricant. Park on level ground, chock the front wheels, raise the rear and support it securely on stands. Release the parking brake fully before starting, and never rely on it to hold the vehicle while you work. Brake dust should not be blown out with compressed air; wet it down with brake cleaner and wear gloves and a dust mask.
Get the vehicle-specific procedure before you begin. It tells you whether the rotor or drum comes off directly, whether the hub or axle must be removed, how the parking brake is adjusted and what torque the caliper bracket and wheel fasteners need. Some electronic systems that operate drum-in-hat shoes through a motorized cable require a scan tool to enter a service mode before the cable will release. Work on one side at a time and photograph the assembly so the other side serves as a reference. If you have never worked on brakes, or the procedure calls for axle or hub removal, this job is better left to a professional.
Remove without avoidable damage
Remove the wheel. On a drum-in-hat system, remove the caliper and hang it from the suspension with wire so it does not hang on the brake hose, then remove the caliper bracket if required and pull off the rotor. On a drum brake, remove any retaining screws and pull the drum. If the rotor or drum will not come off, the shoes are probably catching on a wear lip. Back off the star-wheel adjuster through the access hole, often hidden behind a rubber plug, instead of prying or hammering on the rotor, which can bend the shoes, backing plate or adjuster.
With the shoes exposed, take clear photos from several angles. Remove the return springs with the brake spring tool, then release the hold-down springs by pressing the retaining cup and turning it to align with the pin. Spread the shoes slightly, lift out the adjuster and any strut, and disconnect the parking brake cable from the lever. Depending on the design, the lever stays on the old shoe and must be transferred, or it stays attached to the backing plate. On rear drum brakes, note which shoe sits toward the front and which toward the rear, because their lining lengths often differ.
Inspect everything that came off. Springs that are stretched or discolored from heat should be replaced with a new hardware kit. Check that the adjuster threads turn freely, the cable moves smoothly in its housing and the raised contact pads on the backing plate are not grooved. Look at the friction surface inside the drum or rotor hat for scoring, heat cracks or a deep wear lip, and measure it against the service limit.
Install and restore the system
Clean the backing plate with brake cleaner and apply a thin film of high-temperature brake lubricant to the shoe contact pads and adjuster threads. Keep lubricant, fingerprints and cleaner residue off the new friction material. Transfer the parking brake lever if the new shoes do not include one, using a new retaining clip when supplied. Check orientation carefully: shoes and adjusters are often side-specific, and an adjuster installed on the wrong side can loosen itself instead of compensating for wear. Reconnect the cable, fit the hold-down springs, install the adjuster and strut, then hook the return springs in the positions shown in your photos.
Set the initial shoe adjustment by turning the star wheel until the drum or rotor slides on with a light drag, or measure with a brake shoe gauge if the service information specifies it. Reinstall the rotor, caliper bracket and caliper, tightening fasteners to the specified torque. Adjust the shoes first and the parking brake cable afterward, following the published procedure. Many drum-in-hat systems call for a burnishing or bedding procedure, such as gentle low-speed applications of the parking brake, to seat the new linings. Electronic systems may need the scan tool to exit service mode and recalibrate. If the caliper was removed, pump the brake pedal until it is firm before moving the vehicle.
Check the completed work
With the parking brake released, each rear wheel should turn by hand without heavy drag. Apply the parking brake and confirm that lever or pedal travel matches the service information, and that the system holds the vehicle on a safe incline. The parking brake warning light should go out when released. After a short, slow test drive, carefully check the rear wheels for uneven heat, which points to a dragging shoe, and confirm the service brake pedal remains firm.
Further diagnosis is needed if the parking brake still will not hold after bedding, one side holds much better than the other, a wheel drags or overheats, you hear grinding or scraping, a warning light stays on, or the brake pedal feels low or brake fluid is being lost. Any of these can indicate incorrect assembly, a seized cable, a damaged rotor or a hydraulic fault. If braking performance is compromised, stop using the vehicle and have it inspected by a qualified brake technician.