Graco Car Seat Forward-Facing Installation: How It Works and What to Check
Installing a Graco car seat forward-facing follows the same core principles that apply to most US child restraints. You secure the seat with either the vehicle's lower anchors or its seat belt, attach the top tether, tighten the seat until it barely moves at the belt path, and adjust the harness to fit the child. The exact steps, belt routing, recline settings and weight or height limits depend on the specific Graco model, so the manual and labels for your seat and the owner's manual for your vehicle are the final authority.
The Short Answer
For a forward-facing installation, choose one attachment method: the lower anchor connectors (part of the LATCH system, short for Lower Anchors and Tethers for Children) or the vehicle seat belt. Do not use both at the same time unless your Graco manual explicitly allows it. In either case, connect the top tether to the vehicle's tether anchor, because the tether reduces how far the child's head moves forward in a crash. Route the belt or lower anchor strap through the forward-facing belt path, which is a separate path from the rear-facing one on convertible seats. Then confirm the seat is tight and the harness fits correctly.
Which Graco Seats This Applies To
Graco sells several kinds of seats that can be used forward-facing with a harness. Convertible seats install rear-facing first and then forward-facing. All-in-one seats add a booster mode later. Harness-to-booster combination seats are forward-facing only. Each type uses a forward-facing belt path and a top tether in harnessed mode, but the location of the belt path, the recline positions available and the hardware differ between product lines and model years. Some Graco models include built-in belt lock-offs or tensioning features meant to simplify seat belt installation, while others rely on locking the vehicle's own seat belt. Check which features your seat has before you start.
Before You Install: Confirm the Child Is Ready
US safety guidance from NHTSA and the American Academy of Pediatrics recommends keeping children rear-facing as long as possible, until they reach the maximum rear-facing weight or height allowed by their seat. Turning a convertible seat forward-facing early gives up protection. Before switching, read the rear-facing and forward-facing limits printed on your seat's labels and in its manual. These limits vary by model, and no model-specific figures were available for this article.
Choosing Lower Anchors or the Seat Belt
Neither method is inherently safer when done correctly. The better choice is whichever gives a tight, correct installation in your vehicle. Lower anchors are often easier to tighten, but they have a weight limit. US-certified seats are labeled with the maximum child weight at which the lower anchors can be used, and past that point you must switch to a seat belt installation while keeping the top tether attached. Your Graco manual and seat labels state this limit for your model.
A seat belt installation works in any seating position with a lap-and-shoulder belt that the vehicle manufacturer approves for a child seat. The belt must be locked so it holds the seat firmly. Depending on the vehicle and the Graco model, you may do this by switching the retractor into locking mode, using a locking latch plate, or using a lock-off built into the car seat. Your vehicle owner's manual explains how its belts lock.
General Installation Steps
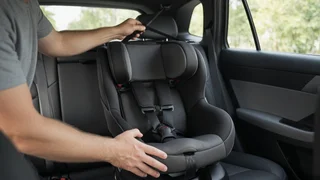
1) Read the forward-facing section of your Graco manual and the child seat section of your vehicle owner's manual. 2) Pick a seating position that has a top tether anchor and, if you are using LATCH, lower anchors. Some center seats lack dedicated lower anchors, and borrowing anchors from the outboard positions is allowed only if both manuals permit it. 3) Set the seat to the recline position the manual specifies for forward-facing use. 4) Loosen the top tether and place the seat flat against the vehicle seat, facing forward. 5) Route the lower anchor strap or vehicle seat belt through the forward-facing belt path only. Make sure the strap or belt is not twisted. 6) Attach the lower anchor connectors to the vehicle's anchors, or buckle and lock the seat belt. 7) Press down and back into the seat while pulling the strap or belt tight to remove slack. 8) Connect the top tether hook to the correct tether anchor and tighten the tether strap. 9) Check tightness at the belt path, then adjust the harness for the child.
Locating the Top Tether Anchor
Tether anchor locations vary widely by vehicle. They are commonly found on the rear of the seatback, on the rear shelf behind the headrests in sedans, or on the floor or ceiling in some SUVs, minivans and trucks. They are usually marked with a child seat tether symbol. Cargo tie-down hooks look similar but are not designed for crash loads, so confirm the location in your vehicle owner's manual.
Checking That the Seat Is Tight
Widely used US guidance says a correctly installed seat should not move more than about one inch side to side or front to back. Test it by gripping the seat at the belt path, where the belt or lower anchor strap passes through, not at the top of the seat. If it moves more than that, remove slack again while pressing the seat into the vehicle cushion. Movement at the top of a forward-facing seat is limited by the tether, so make sure the tether strap is snug as well.
Adjusting the Harness for Forward-Facing Use
Shoulder straps should come from slots or a headrest position at or slightly above the child's shoulders when forward-facing. This is the opposite of the rear-facing rule. The chest clip should sit at armpit level. The harness should be snug enough that you cannot pinch a horizontal fold of strap material at the child's collarbone. Avoid bulky coats under the harness, because they compress in a crash and leave slack. The crotch buckle position, if adjustable, should follow the manual's guidance for the child's size.
Common Mistakes to Avoid
Leaving the top tether unattached in a forward-facing installation. Routing the belt or strap through the rear-facing belt path. Using the lower anchors and the seat belt together when the manual does not allow it. Continuing to use lower anchors after the child passes the labeled lower anchor weight limit. Forgetting to lock the vehicle seat belt. Testing tightness at the top of the seat instead of at the belt path. Leaving shoulder straps below the child's shoulders after turning the seat forward.
What This Article Cannot Confirm
No model-specific Graco evidence was available for this guide. It therefore does not state weight or height limits, lower anchor limits, recline settings, belt path designs or feature names for any particular seat. Those details differ by model and model year and are listed in the manual and on the labels attached to the seat. If you are unsure about your installation, a certified Child Passenger Safety Technician can check it in person. Many US communities offer this service through local fire departments, hospitals or safety organizations.