Graco 4-in-1 Car Seat Forward-Facing Installation: Step-by-Step Guide
Installing a Graco 4-in-1 car seat forward-facing comes down to four things. Set the seat to its forward-facing configuration. Secure it with either the vehicle's lower anchors or its seat belt, but not both unless the manual allows it. Always connect the top tether. Then adjust the harness to fit your child. This guide explains each step and how to check the result. Details vary between Graco 4-in-1 models and production years, so the labels on your seat and its manual have the final word on limits, belt paths and recline settings.
What Forward-Facing Mode Means on a 4-in-1 Seat
A Graco 4-in-1 is an all-in-one restraint that converts between four modes: rear-facing with a harness, forward-facing with a harness, high-back belt-positioning booster and backless booster. Forward-facing harness mode is the second stage. The seat faces the front of the vehicle, the built-in five-point harness holds the child, and the seat is attached to the vehicle with lower anchors or the seat belt plus the top tether.
Child safety organizations in the US recommend keeping children rear-facing as long as their seat allows. Switch to forward-facing only once your child exceeds the rear-facing weight or height limit printed on the seat, or when they meet the seat's forward-facing minimums and you choose to transition. The exact limits differ by model, so read them from the seat's labels rather than from general advice.
Before You Start
Find the Graco manual for your exact model and the child restraint section of your vehicle owner's manual. Both matter. Check the labels on the seat for forward-facing weight and height limits, the lower anchor weight limit and the expiration date. Pick a seating position where your vehicle allows a forward-facing child seat and provides a top tether anchor. Confirm the seat has no crash history, missing parts or visible damage. Have your child nearby so you can adjust harness height and fit once the seat is installed.
Lower Anchors or Seat Belt: Choosing an Installation Method
Both methods are equally safe when done correctly. Choose whichever gives you a tight, correct installation in your vehicle. Many Graco manuals say not to use the lower anchors and the seat belt at the same time. Check yours before combining them.
Factor | Lower anchors | Vehicle seat belt; Where available | Seating positions with lower anchor bars, often the outboard rear seats | Any seating position the vehicle approves for a child seat; Weight restriction | Limited by the lower anchor weight limit on the seat label; switch to the seat belt once exceeded | Usable up to the seat's maximum forward-facing harness weight; Locking | Connectors lock to the anchor bars | The seat belt must be locked, either at the retractor or with a built-in lock-off on the car seat if your model has one; Top tether | Required in forward-facing harness mode | Required in forward-facing harness mode
Step-by-Step Forward-Facing Installation
1) Prepare the Seat
If the seat was used rear-facing, remove the lower anchor strap or belt from the rear-facing belt path. Set the recline to the forward-facing position shown in your manual or on the seat's recline label. Forward-facing usually calls for a more upright setting than rear-facing. Move the harness straps to a slot or headrest height at or slightly above your child's shoulders. This is the opposite of rear-facing, where straps sit at or below the shoulders. Loosen the harness fully and unbuckle it so it stays out of the way during installation.
2a. Install With Lower Anchors
Route the lower anchor strap through the forward-facing belt path, which runs behind the child's back area. Graco marks belt paths with colored labels; follow the forward-facing marking on your seat. Place the car seat flat against the vehicle seat back and bottom, facing forward. Attach each connector to the vehicle's lower anchor bars. You should hear or see each one lock, depending on the connector style. Press down and back into the seat with your knee or hand while pulling the strap's free end to remove slack. Pulling the tail back toward the belt path, from inside the seat, often helps. Store any unused tail so it can't interfere with the harness.
2b. Install With the Vehicle Seat Belt
Stow the lower anchor connectors in their storage spots on the seat so they won't rattle or contact the child. Route the lap and shoulder belt through the forward-facing belt path, following the color-coded labels. Make sure the belt isn't twisted. Buckle the belt and push the car seat firmly into the vehicle seat while removing slack. Lock the seat belt. Many vehicles lock the belt when you pull it all the way out and let it retract, which you can hear as a ratcheting sound. If your Graco model has a built-in belt lock-off, the manual will explain whether to use it instead. Recheck that the buckle hasn't shifted into the belt path in a way the manual prohibits.
3) Attach and Tighten the Top Tether
The top tether is a strap from the top of the car seat to a dedicated anchor in the vehicle. It reduces how far the child's head moves forward in a crash, so it should be used for every forward-facing harness installation, whichever method you used in step 2.
Find the tether anchor using your vehicle manual. It may be on the rear deck, the back of the seat, the floor, the ceiling or the cargo area. Cargo tie-down hooks are not tether anchors. Route the tether over the vehicle seat back, under or around the head restraint as the vehicle manual directs. Clip the hook to the anchor with the opening facing the correct way, then pull the tether snug after the main installation is tight.
Checking the Installation
Hold the car seat at the belt path, where the lower anchor strap or seat belt passes through, and tug side to side and front to back. A correct installation moves less than one inch in any direction. Movement at the top of the seat is normal; only movement at the belt path counts. If it moves more, loosen the strap or belt, reposition, apply more pressure into the seat and tighten again.
The seat moves less than one inch at the belt path. The correct forward-facing belt path is used, and the belt or strap is flat, not twisted. The seat belt is locked, or the lower anchor connectors are fully latched. The top tether is attached to a proper anchor and pulled snug. The recline is set to a forward-facing position allowed by the manual.
Adjusting Harness Fit for Your Child
A tight installation protects only if the harness also fits well. Harness fit means the straps sit at the right height and are tight enough to hold your child against the seat.
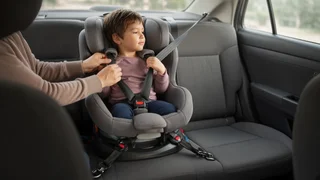
Shoulder straps come from at or slightly above the child's shoulders in forward-facing mode. Buckle both tongues and pull the harness adjuster strap until the harness is snug. Position the chest clip at armpit level, not on the belly or neck. Do the pinch test: try to pinch a horizontal fold of harness webbing at the collarbone. If you can pinch a fold, tighten further. Remove bulky coats or thick layers before buckling. They compress in a crash and leave the harness loose. Put a blanket or coat over the buckled harness instead. Recheck strap height as your child grows, and stop using harness mode once they exceed any forward-facing limit on the seat label.
Common Mistakes to Avoid
Leaving the restraint in the rear-facing belt path after turning the seat around. Skipping the top tether or attaching it to a cargo hook. Using lower anchors after your child has passed the lower anchor weight limit on the label. Using lower anchors and the seat belt together when the manual doesn't permit it. Forgetting to lock the seat belt. Setting harness straps below the shoulders in forward-facing mode. Leaving the chest clip too low or the harness too loose.
When to Get Hands-On Help
Get an in-person check if you can't get under one inch of movement, the belt path is unclear, your vehicle's tether anchor location is confusing, or the manuals seem to conflict. Certified Child Passenger Safety Technicians (CPSTs) inspect installations and teach parents to install the seat themselves, often for free through local programs. Contact Graco customer service with questions specific to your model, and use your vehicle manual for anything about the vehicle's anchors and seat belts.
Key Takeaways
For a forward-facing Graco 4-in-1 installation, check that your child meets the seat's forward-facing limits. Set the forward-facing recline and harness height. Secure the seat through the forward-facing belt path with lower anchors or a locked seat belt, then connect and tighten the top tether. Confirm less than one inch of movement at the belt path and finish with a snug harness, the chest clip at armpit level and a passed pinch test. Your seat's labels and manual set the exact limits for your model.