Graco 4Ever Car Seat Forward-Facing Installation: What to Do and What to Check
The short answer
To install a Graco 4Ever forward-facing with its five-point harness, choose one installation method: either the vehicle's lower anchors (LATCH) or the vehicle seat belt. Route it through the seat's forward-facing belt path, set a recline position the seat marks as approved for forward-facing, and always attach and tighten the top tether. Then confirm the seat does not shift noticeably at the belt path, and adjust the harness to fit your child.
One qualification changes the details. Graco sells several versions under the 4Ever name, such as DLX and Extend2Fit variants, and model years differ in features and limits. Weight and height limits, recline settings, lower anchor limits and lock-off hardware can all vary by version. The steps below follow general principles that apply across the family. For the exact numbers, use the labels on your seat and the manual for your model. This article does not list them because no verified specifications were available.
Before you switch to forward-facing
The 4Ever is an all-in-one seat. It moves from rear-facing to forward-facing with a harness, and later to booster modes. US child safety guidance generally recommends keeping a child rear-facing until they reach the rear-facing weight or height limit on their seat's labels. Check that your child has reached that limit and meets the forward-facing harness minimums before you change modes.
Choose one installation method
Lower anchors and the seat belt are alternatives, not a pair. Unless your manual explicitly allows both at once, use one or the other. Both methods are designed to be equally safe when done correctly. The better choice is whichever gives a tight installation in your vehicle's seating position.
Lower anchors have a child-weight limit. Once your child exceeds the lower anchor limit printed on the seat label, switch to a seat belt installation and keep using the top tether.
Step-by-step overview
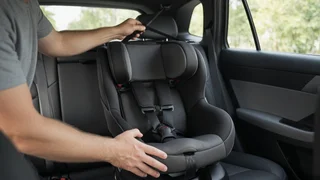
1) Read the vehicle owner's manual to find which seating positions have lower anchors and top tether anchors, and whether lower anchors can be used in the center seat. 2) Set the car seat's recline to a position labeled for forward-facing use. 3) Move the lower anchor connectors or the seat belt to the forward-facing belt path. On many all-in-one seats, this path runs behind the seat pad, which you lift to reach it. 4) Make sure the straps or belt are not twisted. 5) If using lower anchors, click both connectors onto the vehicle's lower anchor bars. 6) If using the seat belt, buckle it through the forward-facing belt path. Then lock it, either with the seat's built-in lock-off if your version has one, or with the vehicle belt's locking mechanism as the vehicle manual describes. 7) Press down firmly into the car seat while pulling the anchor strap or seat belt tight. 8) Attach the top tether hook to the vehicle's designated tether anchor and pull the tether snug. 9) Check the installation at the belt path, as described below.
Why the top tether matters
The top tether is the strap at the top rear of the car seat. It hooks to an anchor in the vehicle, usually on the seatback, rear shelf, floor or ceiling depending on the vehicle. In a forward-facing installation, it limits how far the seat and the child's head move forward in a crash. Use it with both lower anchors and seat belt installations, and use only the anchor point your vehicle manual identifies as a tether anchor. Cargo hooks are not tether anchors.
Checking for a tight installation
Hold the car seat at the belt path, where the lower anchor strap or seat belt passes through, and tug side to side and front to back. A widely used guideline from US child passenger safety programs is that a correctly installed seat should not move more than about an inch in either direction at that point. Movement at the top of the seat is expected and is not a sign of a loose installation. If the seat shifts too much, uninstall it and tighten again, pressing the seat into the vehicle cushion as you pull.
Adjusting the harness for forward-facing
Shoulder strap height: for forward-facing, the harness straps should come from at or just above the child's shoulders. The 4Ever adjusts this through its headrest and harness height adjuster. Chest clip: position it at armpit level. Tightness: after buckling and tightening, try to pinch a horizontal fold of harness webbing at the child's collarbone. If you can pinch a fold, tighten further. Bulky clothing: thick coats can compress in a crash and leave the harness loose. Remove them before buckling and place a blanket over the harness instead.
Common mistakes to avoid
Leaving the lower anchors or seat belt in the rear-facing belt path after switching directions. Using a recline position intended only for rear-facing. Skipping the top tether. Using lower anchors and the seat belt together when the manual does not permit it. Continuing to use lower anchors after the child exceeds the labeled lower anchor limit. Leaving shoulder straps below the child's shoulders in forward-facing mode.
Gaps and next steps
This guide does not state weight or height limits, the number of recline positions, or version-specific hardware for any 4Ever model, because none could be confirmed for this article. Your seat's labels and manual are the authority for those details, and the vehicle manual is the authority for anchor locations. If you are unsure whether your installation is correct, a certified child passenger safety technician can inspect it with you. In the US, these checks are often available free through local fire departments, hospitals and safety organizations.