How to Install a Cosco Car Seat Forward-Facing
Installing a Cosco car seat forward-facing follows the same core steps as most convertible and combination seats. You secure the seat to the vehicle with either the lower anchors or the vehicle seat belt, attach the top tether, tighten until the seat barely moves at the belt path, and then adjust the harness to fit your child. The details differ between Cosco models, so the labels on your seat and the manufacturer instructions that came with it decide the specifics: the forward-facing belt path, weight and height limits, lower anchor limits and recline setting. This guide explains the general process and what each check is for, so you can follow your own seat's manual with confidence.
Before You Switch: Is Your Child Ready to Face Forward?
Forward-facing is a stage your child moves into, not an upgrade to rush. US child passenger safety guidance generally advises keeping children rear-facing as long as possible, until they reach the maximum rear-facing weight or height allowed by their convertible seat. Rear-facing spreads crash forces across the child's back and head. A forward-facing harness concentrates those forces at the shoulders and hips.
Turn the seat around only when two things are true. First, your child has outgrown the seat's rear-facing limits. Second, your child meets the seat's minimum forward-facing requirements. Cosco convertible seats such as the Scenera Next and the MightyFit line, and combination harness-to-booster seats such as the Finale, each list their own forward-facing ranges on the side or back label. Read your model's label rather than relying on a figure from another seat.
What You Need to Check First
The forward-facing weight and height limits printed on the seat's label; The maximum child weight for using the lower anchors, also on the label; The seat's expiration date, usually molded into the shell or printed on a sticker; The vehicle owner's manual section on child restraints, which identifies lower anchor and tether anchor locations and any seating positions where a car seat should not go; The car seat's manual, especially the forward-facing belt path and recline instructions
Do not use a seat that has passed its expiration date. Do not use a seat that has been in a crash unless the manufacturer's crash-replacement guidance clearly permits it. If you bought the seat secondhand and do not know its history, replacement is the cautious choice.
Choosing a Seating Position
Always install the seat in the back seat. Never put it in front of an active front airbag. The center rear seat is often recommended because it sits farthest from side impacts. However, many vehicles have no dedicated lower anchors in the center, and some center seats are too narrow or contoured for a solid fit. The best position is the one where you can get a tight, correct installation every time. Check the vehicle manual to confirm whether borrowing the inner lower anchors from the outboard positions is allowed. Many automakers do not allow it.
Lower Anchors or Seat Belt: Pick One
Both methods are equally safe when done correctly. Use one or the other, not both at once, unless your specific seat's manual explicitly permits it. Most car seat manufacturers prohibit combining them.
Method | How it works | When to use it; Lower anchors (LATCH) | Connectors on a strap from the car seat clip onto metal bars in the vehicle seat crease | When your child's weight is under the lower anchor limit on the seat's label and the seating position has lower anchors; Vehicle seat belt | The lap and shoulder belt is threaded through the seat's forward-facing belt path and locked | When your child exceeds the lower anchor limit, the position lacks anchors, or you get a tighter fit this way
The lower anchor limit exists because the anchors are rated for a combined load of child plus car seat. Once your child reaches the weight listed on the label, switch to a seat belt installation. Keep using the top tether.
Step-by-Step Forward-Facing Installation
1) Set up the seat
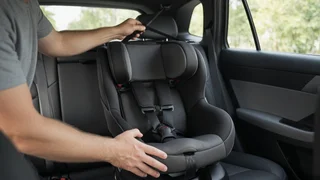
Put the seat in its forward-facing configuration. This usually means setting the recline to the position the manual specifies for forward-facing, which on many seats is the most upright setting. Some Cosco convertibles have a removable or adjustable base or foot that must be positioned a certain way when facing forward. Confirm this in the manual.
2) Route the strap or belt through the forward-facing belt path
Convertible seats have separate rear-facing and forward-facing belt paths. The forward-facing path usually runs behind the child's back, through the shell, and is often marked with a color code or label. If the lower anchor strap was stored in or routed through the rear-facing path, move it to the forward-facing path. Make sure the strap or belt lies flat and is not twisted.
3a. If using lower anchors
Clip each connector onto the vehicle's lower anchor bars until you hear or feel it latch. Then pull the adjuster strap to remove slack. Some seats tighten more easily if you pull the strap back toward the center of the car seat from inside the shell, rather than straight out to the side.
3b. If using the vehicle seat belt
Thread the lap and shoulder belt through the forward-facing belt path and buckle it. The belt must then be locked so it cannot loosen in normal driving. Most US vehicles from recent decades have seat belts that switch to a locking mode when you pull the belt all the way out of the retractor and let it feed back in. You will hear a ratcheting sound as it retracts. Some car seats instead have a built-in lock-off. Your vehicle manual and car seat manual explain which option applies. Use a locking clip only if your manuals call for it.
4) Tighten
Press firmly into the car seat with your hand or knee, putting weight into the seat back and bottom. While pressing, pull the anchor strap or feed the seat belt back into the retractor to remove slack. Then test the installation by gripping the seat at the belt path, where the strap or belt passes through, and tugging side to side and front to back. Widely used guidance is that the seat should move less than one inch in any direction at that point. Movement at the top of the seat is normal and is limited by the tether, so test at the belt path only.
5) Attach and tighten the top tether
The top tether is a strap from the top of the car seat that hooks to a dedicated anchor in the vehicle. Depending on the vehicle, the anchor may be on the rear deck, the back of the seatback, the floor or the ceiling. The tether reduces how far your child's head moves forward in a crash. Use it for every forward-facing harnessed installation, whether you chose lower anchors or the seat belt. Find the correct anchor using the symbol or the vehicle manual. Do not confuse it with a cargo hook, which is not designed for crash loads. Route the tether as your manuals describe, attach it and pull it snug.
Getting Harness Fit Right
A tight installation protects your child only if the harness fits. Check harness fit each time you buckle your child in, and readjust as they grow.
Harness height: for forward-facing, the shoulder straps should come from slots or a headrest position at or slightly above your child's shoulders. This is the opposite of rear-facing. Buckle: fasten the crotch buckle and listen for the click. Use the crotch strap slot the manual specifies for your child's size, if your seat offers more than one. Chest clip: position it at armpit level, across the breastbone, not down on the belly or up at the neck. Tightness: after pulling the harness snug, try to pinch a horizontal fold of strap at the collarbone. If you can pinch any webbing, tighten further. Clothing: avoid bulky coats or snowsuits under the harness. They compress in a crash and leave the straps loose. Buckle your child in normal clothing and lay a blanket or coat over the harness.
Your child has outgrown the forward-facing harness when they reach the seat's weight or height limit, or when their shoulders rise above the top harness position. The label and manual define these limits. At that point, a combination seat can be converted to booster mode if your model supports it. Otherwise it is time for a separate booster seat.
Common Mistakes to Avoid
Leaving the lower anchor strap or seat belt in the rear-facing belt path after turning the seat around; Using lower anchors after the child exceeds the lower anchor limit on the label; Skipping the top tether, or hooking it to a cargo anchor; Forgetting to lock the vehicle seat belt; Testing tightness at the top of the seat instead of at the belt path; Harness straps below the shoulders, a loose harness, or a chest clip sitting too low; Keeping the rear-facing recline angle when the manual calls for a forward-facing setting
Where to Get a Hands-On Check
If you are unsure about your restraint installation, a certified Child Passenger Safety Technician (CPST) can inspect it and teach you to install the seat yourself. Car seat check events and inspection stations are commonly offered through local fire departments, hospitals and community safety programs in the US, often at no cost. For questions specific to your model, such as compatibility with an unusual seating position, contact Cosco's customer support. Have the model number and manufacture date from the seat's label ready.
The Short Version
To install a Cosco seat forward-facing, confirm your child has outgrown rear-facing and meets the forward-facing limits on the label. Then route either the lower anchor strap or the locked vehicle seat belt through the forward-facing belt path, and tighten until the seat moves less than an inch at the belt path. Always attach the top tether. Finish by setting the harness at or above the shoulders, with the chest clip at armpit level and no slack at the collarbone. Your seat's own manual and labels have the final word on every limit and setting.