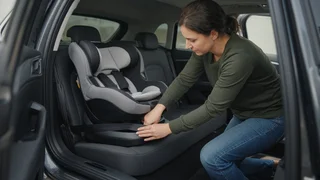
How to Install a Cosco Scenera Car Seat Rear-Facing
The Cosco Scenera is a lightweight convertible car seat. Convertible means it can be installed rear-facing for babies and toddlers and later turned forward-facing. To install it rear-facing, place it in a back seat facing the rear of the vehicle and set the recline so the angle indicator reads correctly. Then secure it through the rear-facing belt path with either the vehicle's lower anchors or the vehicle seat belt, not both. Tighten it until it moves less than one inch side to side or front to back at the belt path. Finally, adjust the harness so the straps come from at or below the child's shoulders. Those steps describe how rear-facing convertible seats generally work, and they match the Scenera's basic design. Details vary by version and production date, including the original Scenera, the Scenera NEXT and later updates. These details include weight and height limits, the lower anchor weight limit, recline indicator markings, and whether a locking clip is included. The labels on the seat's shell and the instruction booklet for your specific seat are the authority on those points. Your vehicle owner's manual shows where anchors and approved seating positions are located.
Before You Start
Find the instruction booklet, which is usually stored in a compartment on the seat. Also check the stickers on the shell for the rear-facing weight and height limits for your model. Check the vehicle owner's manual for which seating positions allow a car seat, where the lower anchors are, and how to lock the seat belt. Never place a rear-facing seat in front of an active frontal airbag. The back seat is the right place. Decide on the seating position. The center rear seat is often the safest spot if a secure installation is possible there. Many vehicles do not have lower anchors in the center, though, so a seat belt installation may be needed.
Step 1: Position the Seat and Set the Recline
Place the Scenera on the vehicle seat with the child's feet end against the vehicle seat back. Rear-facing seats must recline enough that a baby's head does not fall forward and block the airway. The Scenera uses a level line or angle indicator on the side of the shell, depending on the version. The seat should sit so the indicator reads correctly for the child's age or weight, as described in your booklet.
Vehicle seat cushions slope differently, so the indicator may not read correctly on the first try. Some Cosco instructions allow a tightly rolled towel or a firm foam tube under the seat's front edge, where the child's feet go, to correct the angle. Use this only if your booklet permits it, and recheck the angle after the seat is tightened, because tightening often changes it.
Step 2: Choose Lower Anchors or the Seat Belt
Both methods are safe when done correctly. The better choice is whichever gives a tight, correct installation in your vehicle. Use only one method unless your manual specifically says otherwise; most convertible seats do not allow lower anchors and the seat belt together.
Method | How it attaches | Things to watch; Lower anchors (LATCH) | Connectors on the seat's strap clip onto metal bars in the vehicle seat bight, the crease between cushion and backrest | Lower anchors have a combined child-plus-seat weight limit shown on the car seat label. Once a child exceeds it, switch to the seat belt. Many center positions lack dedicated anchors. Vehicle seat belt | Lap-shoulder or lap belt routed through the rear-facing belt path and locked | The belt must be locked to hold the seat tight. Check the vehicle manual for whether the retractor locks or a locking clip is needed. Make sure the buckle does not rest on the belt path frame.
Step 3: Route Through the Rear-Facing Belt Path
On the Scenera, the rear-facing belt path runs through the shell under the area where the child's legs rest. It is separate from the forward-facing belt path behind the child's back. Labels on the shell typically color-code or mark the rear-facing path. Using the forward-facing path while rear-facing is a serious installation error, so confirm you are using the correct one.
For a lower anchor installation, move the lower anchor strap to the rear-facing belt path if it is stored elsewhere. Thread it through so it lies flat without twists, and clip each connector onto its anchor bar. For a seat belt installation, thread the lap-shoulder belt or lap belt through the same rear-facing path, buckle it, and check that it lies flat.
Step 4: Tighten and Lock
Press down firmly into the seat near the belt path with a hand or knee. At the same time, pull the free end of the lower anchor strap or the shoulder portion of the seat belt to remove slack. Pulling the strap back toward the inside of the car seat, rather than straight out, often gives better leverage.
With a seat belt installation, the belt must be locked so it cannot loosen. Many vehicles let you pull the shoulder belt all the way out to switch the retractor into a locking mode, then feed it back in while tightening. Some belts lock at the latch plate instead. Older vehicles may require a locking clip, which earlier Scenera versions sometimes included. The vehicle manual and your car seat booklet explain which approach applies.
Step 5: Check the Installation
Grip the seat at the belt path, not the top of the shell. Firmly tug side to side and front to back. It should move less than one inch. Recheck the recline indicator. If tightening shifted it out of range, loosen the seat, adjust the angle and reinstall. Confirm that the lower anchor strap or seat belt is not twisted and passes only through the rear-facing path. Make sure the car seat is not resting against a front seat in a way your booklet prohibits. Some manufacturers allow light contact and others do not.
What About the Top Tether?
A top tether is a strap at the top back of a car seat that hooks to an anchor in the vehicle. In the US, most convertible seats, including Cosco's, use the tether only in forward-facing mode. Rear-facing, the Scenera generally relies on the lower anchors or seat belt alone. If your booklet does not describe a rear-facing tether method, do not improvise one. Keep the tether stowed so it does not hit anyone in a crash.
Step 6: Adjust the Harness Fit
A well-installed seat still needs a correctly fitted harness. Rear-facing, the shoulder straps should come out of the slots at or just below the child's shoulders. On the Scenera, you change strap height by rethreading the straps through different shell slots, not with a no-rethread headrest. Follow the booklet's diagram so the straps reconnect correctly at the back.
Buckle the harness and position the chest clip at armpit level. Tighten the harness until you cannot pinch a horizontal fold of strap at the child's collarbone. This is called the pinch test. Avoid bulky coats or snowsuits under the harness. They compress in a crash and leave the straps loose. Put a blanket or coat over the buckled harness instead. Check that the crotch strap position is appropriate for the child's size, if your version offers more than one.
When to Stop Riding Rear-Facing
US safety guidance recommends keeping children rear-facing as long as possible, until they reach the seat's rear-facing weight or height limit. Reaching age one or two is not a reason to turn the seat around. Cosco sets the Scenera's limits by version, and they are printed on the shell label. Many rear-facing height rules also require at least a set distance between the top of the child's head and the top of the shell; your booklet defines it. Bent legs touching the vehicle seat back are normal and are not a reason to turn the seat forward.
Getting a Second Check
If the seat will not tighten, the recline cannot be reached, or the belt path seems unclear, a certified Child Passenger Safety Technician (CPST) can inspect your installation and teach you to do it yourself. Many fire departments, hospitals and community safety programs host car seat check events. Bring the car seat booklet and the vehicle owner's manual. Answers to model-specific questions, such as limits or permitted accessories, come from those two documents, and a technician will rely on them too.