Why Does a Headlight Lens Turn Yellow? Causes and Restoration
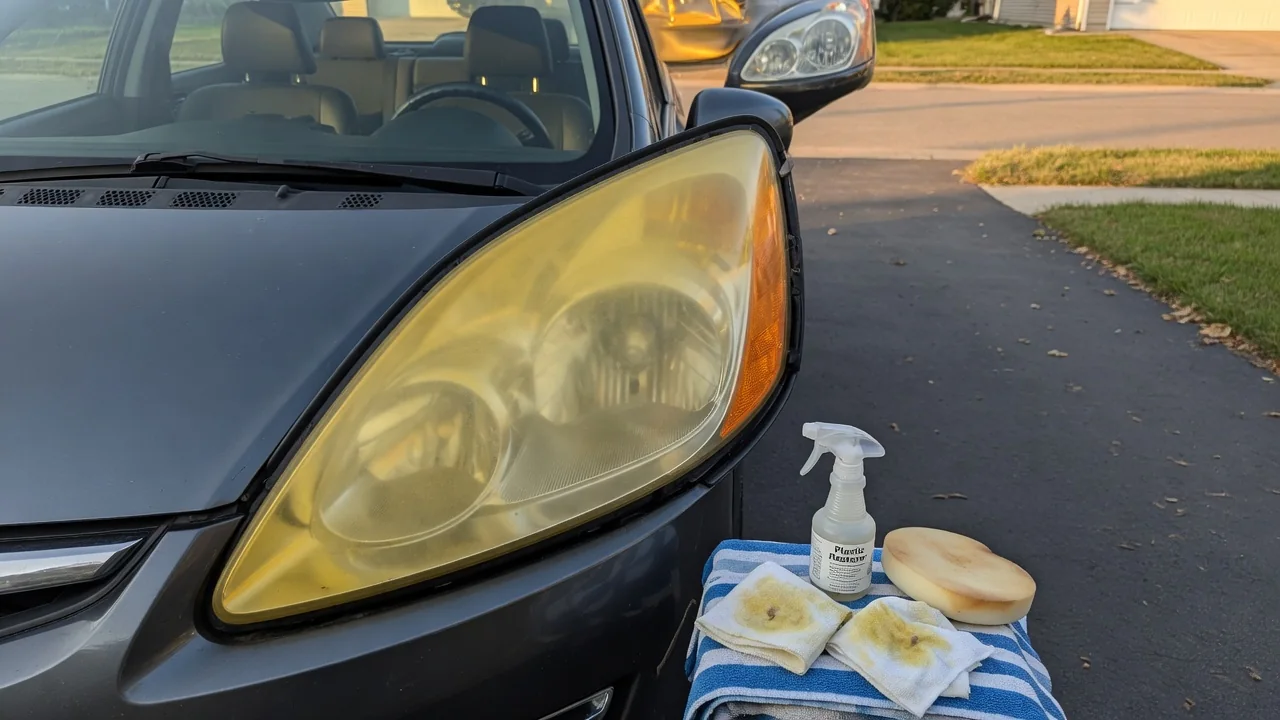
A headlight lens that starts out crystal clear can gradually take on a yellow, cloudy cast that dims the beam and ages the look of the whole car. The change is not dirt that washes off. It is a slow chemical and physical breakdown of the lens surface. Why a headlight lens turns yellow comes down to three connected factors: ultraviolet exposure, the condition of the factory surface coating, and how far restoration can reverse the damage.
UV Exposure and Polycarbonate Breakdown
Most modern headlight lenses are molded from polycarbonate. Manufacturers choose this plastic because it is light, resists impacts, and can be shaped into the complex forms that current headlamp designs require. Its weakness is sunlight. Ultraviolet radiation carries enough energy to break chemical bonds in the polymer chains near the surface. When this happens in the presence of oxygen, a process called photo-oxidation begins. It creates new chemical groups that absorb blue and violet light. With those wavelengths absorbed, the light that passes through or reflects off the lens looks yellow. This is the core mechanism behind polycarbonate headlight yellowing.
The damage builds up over time and is concentrated in the outermost layer of the material. Heat speeds it up. A lens often sits in direct sun for long periods, and in some designs the lamp itself warms the plastic during operation. Moisture, airborne pollutants, and repeated heating and cooling add stress. That stress helps the degraded layer develop fine surface cracks, often called crazing. As the surface roughens, it scatters light instead of passing it through cleanly, so yellowing usually comes with haze. How quickly this happens depends on climate, where the car is parked, and the materials the manufacturer used. That is why two cars of similar age can look very different.
The Role of the Factory Surface Coating
Because bare polycarbonate is vulnerable, manufacturers apply a clear protective hard coat to the outer face of the lens. This coating is designed to absorb or block much of the incoming UV radiation and to resist scratching, which shields the polycarbonate underneath. As long as the coating stays intact, the lens beneath it can remain clear for many years. Yellowing typically begins when this protective layer starts to fail.
Coatings wear down in several ways. UV exposure gradually uses up the absorbers in the coating itself, so it protects less over time. Sand, grit, and small stones thrown up from the road wear away the surface at highway speed. Automatic car wash brushes, abrasive cleaning pads, and harsh chemicals such as some solvents or strong degreasers can also erode or soften it. Once the coating is thin, cracked, or peeling, sunlight reaches the polycarbonate directly and photo-oxidation speeds up. Often the visible yellow film is partly degraded coating and partly oxidized plastic just beneath it. That distinction matters when choosing how to repair the lens.
How Headlight Restoration Works
Restoration treats external yellowing by removing the damaged material and then replacing the protection that was lost. The usual sequence starts with cleaning the lens and masking the surrounding paint and trim. Next the surface is wet-sanded. A coarser abrasive cuts through the failed coating and oxidized polycarbonate, and progressively finer grits remove the scratches left by each previous step. Once the sanding marks are fine enough, polishing compound brings the surface back to optical clarity.
The final step is the one most often skipped, and it largely decides how long the result lasts. Sanding strips away whatever remained of the original UV-protective layer, which leaves fresh, unprotected polycarbonate exposed to the sun. Without a new protective coating, that bare plastic can start yellowing again fairly quickly. For this reason, restoration kits and professional services typically finish with a UV-resistant clear coat or sealant. Products differ in durability, so it is important to follow the manufacturer's application and curing instructions. Quick fixes that only polish the surface, including household abrasive pastes, may improve the look briefly but do not restore protection.
Practical Implications and Limits
Yellowed lenses are more than a cosmetic issue. The discoloration absorbs part of the light output, and the haze scatters what remains. Together these effects can shorten how far the beam usefully reaches and send stray light where it does not belong. Scattered light can blur the beam pattern and may add glare for other drivers. Rules for headlight condition and aim vary by jurisdiction, so owners who are unsure whether their lenses meet local standards should check the applicable inspection requirements.
Restoration also has clear limits. It only works on the outside of the lens. Sanding and polishing cannot reach yellowing, fogging, or discoloration on the inner surface, condensation inside the housing, or a deteriorated reflector. Deep crazing may stay visible even after careful work. Each restoration removes a small amount of material, so repeated sanding is not an unlimited solution, and a sealed housing with internal damage may need replacement rather than repair. If replacement is being considered, the correct part and procedure depend on the vehicle, so the owner's manual or service documentation is the right reference.
Prevention means slowing the same processes that cause the damage. Parking in a garage or shade reduces UV exposure. Gentle washing with suitable car-care products protects the coating. Periodically applying a UV-protective product to restored or aging lenses can help them stay clear longer. These steps do not stop aging completely, but they can delay the point at which a lens needs attention.