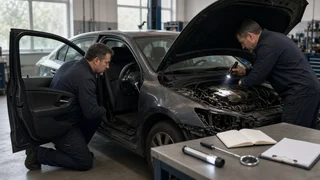
How to Screen a Used Car for Fire Damage
The Short Answer
To screen a used car for fire damage, check the title and history records first, then inspect the car for heat, smoke, soot and repair evidence. Start with the exterior and glass, move to the interior and ventilation, then the engine bay, trunk and underbody. Finish with a full electrical function test, a test drive and an independent pre-purchase inspection. Fire damage is often hidden in the wiring rather than on the surface, so a clean-looking cabin or freshly detailed engine bay does not rule it out.
Two conditions change the answer significantly. First, a car that burned from its own ignition source, such as an electrical fault or fuel leak, usually has damage concentrated around that point. A car damaged by a house fire or garage fire is usually damaged from the outside in, by radiant heat, smoke and firefighting water. Second, hybrids and electric vehicles add a high-voltage battery that can be damaged by heat in ways you cannot see. Any heat exposure near that battery calls for qualified inspection before purchase.
What Fire Does to a Car
A modern car contains a great deal of combustible material: plastics, foam, carpet, rubber, fluids and wiring insulation. Even a fire that is put out quickly can leave damage that matters for safety and reliability long after the visible marks are cleaned away.
Heat damage: melted or brittle plastic, warped trim, softened wiring insulation, cracked rubber seals and hoses, and blistered or discolored paint. Smoke and soot: fine, often acidic residue that settles in vents, headliners, seat foam, connectors and crevices. It can cause lingering odor and gradual corrosion of electrical contacts. Firefighting damage: water, foam or dry chemical agents can enter the cabin, electronics and engine, adding water-damage and corrosion concerns on top of the heat damage. Structural and safety effects: intense heat can affect metal, glass, airbag components, seat belts and fuel or brake lines. These are not reliably judged by eye.
Car Fire Aftermath vs. a Car Damaged by a House Fire
Knowing where the heat came from tells you where to look. In the aftermath of an internal car fire, damage typically radiates from the origin, most often the engine bay, the dashboard area or an aftermarket electrical installation. Look hardest at wiring and components near that zone and at whether the repair replaced everything that was exposed.
A car damaged by a house fire or garage fire often shows heat on the side that faced the flames, smoke penetration throughout the cabin, and possible damage from water or debris. The engine and drivetrain may be untouched, while paint, glass, lights, seals, tires and interior materials are affected. Smoke can enter through vents and door seals even when the car looks fine outside, so odor and soot checks matter as much as visible damage.
Before You Go: What to Bring and What to Gather
The vehicle identification number (VIN), so you can run history checks before traveling. A bright flashlight and, ideally, a small inspection mirror. Disposable gloves and a clean white cloth or tissue for wiping hidden surfaces. An OBD-II scanner if you have one, for reading stored trouble codes on cars that support it. Your phone camera to photograph anything questionable. Permission from the seller to inspect the car cold, meaning it has not been driven recently. This makes hot-plastic smells and heat-related faults easier to judge and makes the engine bay safe to look at.
Step-by-Step Fire Damage Inspection
Step 1: Check the Title and History Records
Read the physical title and compare its VIN with the car's VIN plates and labels. In the US, title brands such as salvage, rebuilt or reconstructed indicate that the vehicle was declared a total loss or rebuilt. Some states also use brands or notations specific to fire damage, but terminology and rules vary by state. Run a vehicle history report and a check that draws on the National Motor Vehicle Title Information System (NMVTIS), which collects title and total-loss data from states and insurers.
A clean report is not proof of a clean car. Fires that were never claimed through insurance, or were repaired privately, may not appear anywhere. Ask the seller directly whether the car has ever been in or near a fire, including a house or garage fire, and note how they answer.
Step 2: Walk Around the Exterior
Paint: look for bubbling, blistering, dull patches, color mismatch between panels, or overspray on rubber trim, glass edges and badges. Fresh paint on one side or on the hood can indicate repair after heat exposure. Plastic parts: check bumpers, mirror housings, grilles and trim for warping, sagging or a slightly melted texture. Lights: headlight and taillight lenses that are hazed, distorted or noticeably newer on one side than the other deserve a closer look. Glass: look for heat cracks, discoloration or replacement glass with markings from a different supplier than the rest of the car. Rubber seals and tires: door seals, window seals and tire sidewalls that are cracked, hardened or deformed on one side can point to radiant heat.
Step 3: Check Smell and Ventilation
Open the doors and smell the cabin before the seller starts the car. Smoke odor is very difficult to remove completely, and heavy air freshener or an ozone-treated smell can be an attempt to mask it. Then, with the engine running, turn the heating and air conditioning on at several fan speeds and in both fresh-air and recirculation modes. A smoky or burnt smell coming from the vents suggests soot in the ductwork or cabin air filter. If the seller allows it, look at the cabin air filter for soot or ash.
Step 4: Inspect the Interior Closely
Headliner: look for yellowing, gray staining or a sooty film, especially near the edges and around lights and grab handles. Vents and crevices: wipe inside air vents, seat rails, seat belt anchors and door jamb edges with a white cloth. Black, greasy residue is a warning sign. Seat belts: pull each belt fully out and inspect the section that normally stays rolled up. Soot, discoloration, stiffness or a smoky smell on hidden webbing is hard to fake. Plastics and dashboard: check for warping, brittle surfaces or replaced panels that do not match the surrounding trim in color or texture. Carpet and upholstery: new carpet or seat covers in an otherwise worn car invite questions. Lift floor mats and, where possible, the edge of the carpet to look for soot, water staining or rust underneath.
Step 5: Inspect the Engine Bay
Hazard: do this with the engine off and cool, the key removed or the car switched off, and your hands clear of the cooling fan, which can start on some cars even with the engine off. Do not pull on wiring, unplug connectors or disconnect the battery on someone else's car. Electrical isolation work belongs to the seller or a technician, not a buyer on a viewing.
Wiring harnesses: look for melted, cracked, discolored or bubbled insulation, and for sections wrapped in new tape, mismatched conduit or crimped splices. A clean new section in one area of an otherwise aged harness suggests repair. Connectors and fuse boxes: look for melting, scorching or green and white corrosion on terminals. Plastic components: check reservoirs, covers, intake parts and the underside of the hood for warping, scorching or soot. Hood insulation: if fitted, check whether it is scorched, missing or replaced. Surfaces: look for black residue in crevices, or an unusually fresh coat of dressing or paint that could be covering heat marks. Battery and cables: look for melted terminal covers or heat-damaged cable insulation.
Step 6: Check the Trunk and Underbody
Lift the trunk floor and look in the spare wheel well and behind side trim where you can do so without tools. Soot, ash, debris or water staining there is significant because these areas are rarely cleaned. Underneath, if you can see safely without lifting the car yourself, look for melted plastic shields, heat-damaged rubber bushings and mounts, and blistered undercoating. Do not touch or bend fuel and brake lines; if anything near them looks heat-affected, have it inspected on a lift.
Step 7: Test Every Electrical Function
Fire and smoke damage often appears as intermittent electrical faults. Switch the ignition on and confirm that warning lights illuminate and then go out as expected, especially the airbag and supplemental restraint lights. Then test the windows, locks, mirrors, lights, wipers, horn, infotainment, climate controls, power seats, parking sensors and cameras. If you have an OBD-II scanner, read stored and pending trouble codes; a cluster of communication or circuit codes can point to wiring damage. A recently cleared code memory, where the scanner shows monitors not yet ready, is worth asking about.
Step 8: Take a Test Drive
Drive long enough for the engine and cabin to warm fully, since heat can bring out smells and faults that a cold car hides. Watch for flickering gauges, warning lights, electrical cutouts or a burning plastic or electrical smell.
Stop condition: if you see smoke or smell burning during the drive, pull over safely, switch the car off, get everyone out and move well away from the vehicle. Safe evacuation comes before anything else. Call emergency services if there are flames or the smoke persists. Do not open the hood to investigate, because doing so can feed air to a fire. A small fire extinguisher rated for vehicle use is useful to carry generally, but fighting a vehicle fire is not a buyer's job.
Step 9: Get an Independent Pre-Purchase Inspection
Arrange an inspection by a technician you choose, not one chosen by the seller. Tell them specifically that you suspect fire, heat or smoke exposure. A shop can put the car on a lift, remove trim, inspect harnesses along their length, check fuel and brake lines, scan all control modules rather than only engine codes, and judge whether any repair was done properly. Safety systems such as airbags and seat belt pretensioners, and anything affecting structure, brakes or fuel delivery, require qualified assessment.
Extra Caution for Hybrids and Electric Vehicles
A lithium-ion traction battery that has been exposed to heat, fire or firefighting water can be internally damaged without visible signs, and damaged cells can overheat or reignite later. High-voltage cables are typically orange; never touch, unplug or probe them. If there is any indication that a hybrid or EV was in a fire, a house fire or a flood from firefighting, have the high-voltage system assessed by a technician trained for that vehicle before you commit. Battery replacement can be expensive, so heat exposure near the pack should weigh heavily in your decision.
Reading the Signs
Sign | What it may indicate | How to treat it; Smoke smell from vents or seats | Soot in ductwork or foam | Serious; odor and corrosion can persist; Soot on hidden seat belt webbing | Smoke filled the cabin | Serious; suggests significant exposure; Melted or spliced wiring | Heat damage, possible incomplete repair | Serious; needs professional assessment; One-sided paint, seal or light damage | Radiant heat from an outside source | Investigate; ask about house or garage fire; New carpet or headliner in a worn car | Possible cover-up of fire or water damage | Investigate before proceeding; Airbag or multiple warning lights | Damaged sensors, modules or wiring | Serious; safety-critical; Overspray on trim or glass | Refinishing after damage | Investigate the reason for repainting; Salvage or rebuilt title brand | Previous total loss | Proceed only with full repair records and inspection
When to Walk Away
The seller denies fire history but you find clear soot, heat damage or a fire-related title brand. Wiring damage is present and the extent of repair cannot be documented. Airbag, restraint or multiple electrical warning lights stay on. A persistent smoke smell remains in the cabin or ventilation. A hybrid or EV shows any sign of heat exposure near the battery and has not been cleared by a qualified technician. The seller refuses an independent inspection.
Not every past fire rules a car out. A small, well-documented engine-bay fire that was repaired professionally, with affected parts replaced rather than cleaned, may be acceptable if the price reflects the history and your inspector agrees. The deciding factors are how far the heat and smoke reached, whether the repair addressed everything exposed, and whether that can be proven.
Completion Check
Title VIN matches the car, and title brands and history reports have been reviewed. The seller has answered directly about fire, smoke and nearby house or garage fires. Exterior, glass, lights, seals and tires show no unexplained heat damage. Cabin and vents are free of smoke odor and soot, including hidden seat belt sections. Engine bay wiring, connectors and plastics show no melting, scorching or unexplained splices. Trunk wells and visible underbody areas are free of soot, ash and heat damage. All electrical functions work and no unexplained warning lights or trouble codes remain. The test drive was completed with no burning smells or electrical faults. An independent technician has inspected the car with fire damage specifically in mind.
If every item checks out, you have done a thorough screen. If any item fails, either get a qualified explanation and documentation for it or move on to another car.