Motorcycle Highway Pegs for a Relaxed Leg Position: What to Check Before You Buy
The short answer
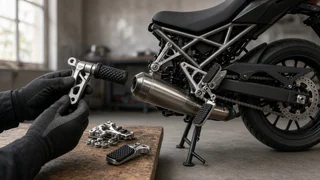
Highway pegs are auxiliary footrests mounted forward of the stock foot controls, usually on an engine guard (crash bar) or a frame bracket. They let you stretch your legs on long, steady stretches of road, which can ease knee and hip stiffness. They are a good fit if your bike has a suitable mounting point and you ride long distances at constant speed. Fit depends on your specific model, model year, market and trim, because engine guard designs, frame mounting points and exhaust routing can differ even within one model line. Your leg length and riding style matter just as much as the hardware.
One condition changes how you should use them: when your feet are on highway pegs, they are away from the rear brake pedal and gear shifter. Treat highway pegs as a cruising position for open road, not for traffic, junctions or twisty sections.
What highway pegs do and who benefits
Stock footpeg positions are a compromise between control, cornering clearance and comfort. On a long ride, holding your knees at one bend angle can cause stiffness or numbness. Highway pegs give you a second position further forward, so you can switch between them and the stock pegs and spread the load across different muscles and joints.
They are most common on cruisers and touring bikes, which often already have engine guards. Some adventure and sport-touring riders add them too, usually through frame-mounted brackets or crash bar clamps. Riders with longer legs, or riders whose stock controls feel cramped, tend to notice the biggest difference. If your bike already has forward controls and an open-legged riding position, the gain may be smaller.
Main mounting styles
Mounting style | How it attaches | Main advantage | Main thing to check; Engine guard clamp | Clamps around the crash bar tube | Simple, widely available, adjustable along the bar | Tube diameter and shape must match the clamp; Frame-mounted bracket | Bolts to existing frame or engine mounting points | Does not need a crash bar; often a cleaner look | Bracket must be made for your exact model and year; Integrated guard with peg mounts | Engine guard with built-in peg brackets | Fixed, solid mounting point | Usually means replacing or adding the guard itself; Floorboard or footrest extension | Mounts near or onto existing floorboards or controls | Small position change without a separate peg location | Offers less stretch than a forward highway peg
Fit and compatibility checks
Confirm the exact model, model year, market and trim the product lists. Engine guards and frame points can change between generations, and a listing that names only the model is not enough. For clamp-on pegs, measure your engine guard tube diameter and check that the clamp size matches. Clamps are sold in different sizes, and shims or adapters do not suit every combination. Check the shape of the bar where you want to mount. Clamps need a straight, round section of tube; bends and flattened sections may not allow a secure grip. For frame brackets, check which bolts the bracket reuses and whether longer hardware is included or needed. Check clearance from the exhaust, cylinder heads, radiator, fairing lowers and any heat shields with your foot in place, not just the peg itself. If you have aftermarket exhaust, lowers, lights or a different engine guard than stock, assume the product listing may not cover your setup and check physically.
Getting the leg position right
The goal is a relaxed bend at the knee, not a fully locked leg. A straight leg can be uncomfortable over bumps and makes it harder to bring your feet back to the controls quickly. Before buying, sit on the bike in your normal riding posture and have someone note roughly where your feet naturally want to rest when your legs are extended comfortably. That gives you a target zone for peg height and reach.
Reach: how far forward the peg sits. Adjustable or offset mounts let you fine-tune this. Height: whether the peg sits level with, above or below the stock peg. Higher pegs bend the knee more; lower pegs reduce bend but cost ground clearance. Angle and swivel: some pegs pivot or fold, which can help with ankle comfort and reduces damage if the peg touches the road. Peg width and surface: wider pegs spread pressure under the boot. Rubber-covered pegs can reduce vibration felt through the feet, while bare metal or serrated pegs offer more grip but transmit more buzz. Both sides matching: set left and right at equivalent positions so your hips stay square.
Ground clearance and cornering
Pegs mounted low or wide on an engine guard can touch down in corners before the stock pegs or floorboards do. A fixed peg contacting the road can unsettle the bike. When choosing a position, consider whether the peg would sit outside or below the bike's existing lean-angle limiters. Folding pegs reduce the risk of a hard strike, but positioning them higher or tucked in is the better first step. Check clearance at full suspension compression too, especially if you ride two-up or loaded.
Using highway pegs safely
Move your feet back to the stock controls before traffic, intersections, curves, gravel or anywhere you might need to brake or shift. Practice switching positions in a quiet area until it becomes automatic. Make sure your feet cannot slip off the highway pegs into the front wheel area or onto hot engine or exhaust parts. Check that the mounts do not interfere with the shifter, rear brake pedal, side stand or kickstand. Some local rules address footpeg or control positions; check the requirements where you ride if you plan an unusual setup.
Installation and upkeep
Most clamp-on and bolt-on kits can be fitted with basic hand tools. Follow the kit maker's torque values and use a torque wrench where specified; over-tightening can crush or mark a tube, and under-tightening lets the clamp rotate under load. Protect chrome or painted bars from scratches if the clamp lacks a protective liner. After the first ride, and periodically after that, recheck the clamps and bolts, since vibration can loosen hardware. Inspect rubber peg covers for wear and replace them when they lose grip.
Pre-purchase checklist
Product lists your exact model, model year, market and trim, or your mounting point measurements match. Clamp size matches your engine guard tube, or a frame bracket exists for your bike. The adjustment range covers the leg position you measured on the bike. Foot and peg clearance from exhaust, engine and bodywork is confirmed for your setup. Cornering clearance is acceptable at the chosen height and width. Peg style (rubber, metal, folding, swivel) suits your vibration and comfort priorities. All needed hardware and installation instructions are included. The finish matches the rest of your bike if appearance matters to you.
Choosing your next step
If your bike has a stock or aftermarket engine guard, start by measuring the tube and choosing an adjustable clamp-on set, since it gives the most flexibility in positioning. If it has no guard, look for a frame-mounted bracket specific to your model and year, or decide whether adding an engine guard with peg mounts makes sense for protection as well as comfort. In either case, measure your preferred leg position on the bike first, then shop for hardware that can reach it without compromising clearance or access to the controls.