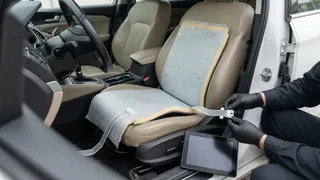
How to Replace a Passenger Seat Occupancy Sensor
A passenger seat occupancy sensor helps the restraint system decide whether the front passenger airbag should be active for that seating position. When the sensor fails, the airbag warning light may stay on, the passenger airbag indicator may behave incorrectly, or a diagnostic trouble code may point to the occupancy detection circuit. Replacement typically involves gaining access beneath the seat cushion, disconnecting the electrical connector, removing the failed sensor mat or module, and installing the new component. Because this sensor affects airbag deployment logic, the job requires careful preparation and a verification step before the vehicle returns to normal use.
Direct answer
The essential answer is that replacing the sensor usually means working inside the passenger seat base rather than replacing the entire seat assembly. In many vehicles the occupancy sensor is a thin pressure-sensitive mat or a module located between the seat foam and the lower seat frame. The replacement process begins by disconnecting the battery and allowing the restraint system to discharge, then removing the seat or lifting the cushion enough to reach the sensor without straining the wiring.
The exact procedure depends on the vehicle configuration and how the sensor is mounted. Some designs use a mat bonded into the seat cushion, while others use a control module below the seat track or a strain-based element in the seat mounting. The repair is not finished when the new part is fitted. The restraint system must be scanned after reconnection to confirm that the occupancy signal changes correctly between an empty seat and a seated passenger, and that no new fault code remains.
How to proceed
Proper preparation starts with a service-grade scan tool capable of reading supplemental restraint system codes and, where supported, performing occupancy sensor calibration. Disconnect the negative battery cable and wait the vehicle-specific period before handling airbag-related wiring. Move the seat to a position that exposes the front mounting bolts, but avoid pinching harnesses under the seat track. Support the backrest and protect the head restraint area if the seat must be tipped for access.
After exposing the sensor, disengage the connector carefully rather than pulling on the harness. Remove the old mat or module without damaging the seat foam or heating element if the seat is heated. Fit the new sensor in its designated location, making sure the routing follows the original path and is not trapped by the seat adjustment mechanism. Reconnect the battery only after the seat and connectors are secure, then clear the stored codes and use live data to verify that the occupancy state changes when pressure is applied to the cushion.