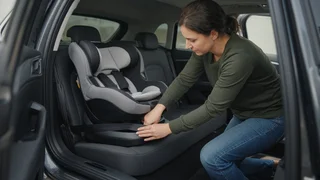
Install a Cosco Scenera Extend car seat
The short answer
A Cosco Scenera-family convertible car seat is installed the same basic way as most convertible seats sold in the US. You secure it to the vehicle with either the lower anchors (LATCH) or the vehicle seat belt, routed through the belt path marked for the direction you are using: rear-facing or forward-facing. You then confirm the seat is tight and correctly reclined, and adjust the harness to fit the child. When forward-facing, you also attach the top tether.
One qualification matters. No confirmed specifications for a model sold specifically as the Scenera Extend were available for this guide. That includes weight and height limits, belt-path layout, recline settings, and whether lower anchors and seat belt may be used together. Cosco has sold more than one Scenera version, and these details can differ between versions and production dates. The instruction manual and labels on your seat are the authority. Where they disagree with any general advice, including this article, follow the manual.
Before you start
Find the instruction manual and read the labels on the seat shell. They show the model number, manufacture date, usage limits and belt-path markings. Check the expiration date printed on the seat. Do not use an expired seat or one that has been in a crash, unless the manufacturer's guidance says otherwise. Read the child-restraint section of your vehicle owner's manual. It shows where the lower anchors and top tether anchors are and which seating positions can take a car seat. Register the seat with the manufacturer so you are notified of any recall. Choose the direction based on the child's size and the limits in the manual. US safety guidance recommends keeping children rear-facing as long as the seat's rear-facing limits allow.
Key terms
LATCH stands for Lower Anchors and Tethers for Children. Lower anchors are metal bars in the gap between the vehicle's seat cushion and seatback. The seat's lower anchor connectors clip onto them. A top tether is a strap from the top of the car seat to a dedicated anchor in the vehicle, often on the seatback, rear shelf, cargo floor or ceiling. The belt path is the opening or channel on the car seat where the LATCH strap or vehicle seat belt passes. Convertible seats usually have separate paths for rear-facing and forward-facing use.
Choosing LATCH or the seat belt
Both methods are considered equally safe when done correctly. Use whichever gives a tight, correct installation in your vehicle and seating position. Most car seat makers tell you to use one method or the other, not both at once, unless the manual specifically allows it. The lower anchors have a maximum child weight, shown on the seat label or in the manual. Once the child exceeds it, switch to a seat belt installation. Some center seating positions have no dedicated lower anchors. Do not borrow the inner anchors from the outboard seats unless both the vehicle manual and the car seat manual permit it.
Rear-facing installation: general steps
Place the seat rear-facing on the vehicle seat. Never put a rear-facing seat in front of an active front airbag. Set the recline as the manual directs, using the seat's recline indicator or level line for rear-facing use. Route the LATCH strap or the vehicle seat belt through the rear-facing belt path only, as labeled on the seat. If using LATCH, attach both connectors to the lower anchors and pull the adjuster strap to tighten. If using the seat belt, buckle it and lock it. Most vehicle belts lock when you pull the belt fully out, then let it retract. Some vehicles or seats use a different method, so check both manuals. Press down firmly into the seat while tightening to remove slack. Recheck the recline indicator, because tightening can change the angle.
Forward-facing installation: general steps
Confirm the child meets the forward-facing requirements in the manual before turning the seat around. Set the seat to the forward-facing position or recline the manual specifies. Route the LATCH strap or the vehicle seat belt through the forward-facing belt path only. Tighten as you would for rear-facing, pressing the seat into the vehicle cushion to remove slack. Attach the top tether to the vehicle's designated tether anchor and remove its slack. The tether reduces how far the child's head moves forward in a crash. Do not attach it to cargo hooks or other points the vehicle manual does not identify as tether anchors.
How to check the installation
Movement test: hold the seat at the belt path you used and pull side to side and front to back. A common standard is that it should move less than about one inch at that point. Recline check: the indicator should show the correct range for the direction in use. Harness height: for rear-facing, the shoulder straps usually come from slots at or below the child's shoulders. For forward-facing, usually at or above. Confirm this in your manual. Harness tightness: after buckling, you should not be able to pinch a horizontal fold of strap material at the child's collarbone. Chest clip: position it at armpit level. Twists: make sure no harness strap, LATCH strap or seat belt is twisted.
Common problems
If you cannot get the seat to move less than about an inch, try the other installation method or a different seating position. Recheck that the belt is locked and that you are using the correct belt path for the direction. Some manuals allow a rolled towel or foam pool noodle to correct the rear-facing angle on sloped vehicle seats. Use one only if your seat's manual permits it. Avoid add-on products not supplied or approved by the manufacturer, such as extra padding, mats under the seat, or harness covers.
Getting the installation checked
A certified Child Passenger Safety Technician (CPST) can inspect your installation and show you how to do it in your own vehicle. These checks are often offered free through hospitals, fire departments and community safety programs. This is especially useful if your seat's manual is missing, if you are unsure which Scenera version you have, or if your vehicle's anchor layout is unusual.
What this guide could not confirm
This guide does not state model-specific figures for the Scenera Extend, because none could be verified. Those include rear-facing and forward-facing weight and height limits, the lower anchor weight limit, recline positions, the seat's lifespan, and harness slot heights. It also does not cover price, test results or recall status. Look up these details in your seat's manual and labels, or get them from the manufacturer, before relying on them.