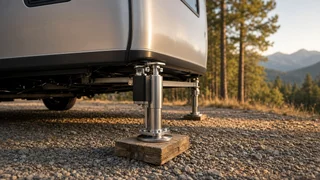
How to Level an RV with Power Jacks
The Short Answer
To level an RV with power jacks, park on the firmest and flattest spot available, secure the vehicle, place pads under each jack on soft or hot surfaces, then run the automatic leveling cycle or lower the jacks manually. Raise the low side until a level placed inside the RV reads level both side to side and front to back. Power jacks are motorized hydraulic or electric legs mounted to the chassis or frame. They extend to the ground and lift part of the RV so the living area sits level.
Some factors change the procedure. A motorhome usually has to be in park with the parking brake set and sometimes the engine running. A fifth wheel or travel trailer may need to be hitched or unhitched before leveling, depending on the system. A very uneven site may be beyond what the jacks can safely correct. Your system's owner manual is the final authority on sequence, interlocks and limits, because these vary between manufacturers and model years.
Leveling Jacks vs. Stabilizer Jacks
Not every powered jack is meant to lift the RV. Leveling jacks are built to raise part of the coach's weight and correct its attitude. Stabilizer jacks only firm up an RV that is already level, which reduces bounce and sway when people move around inside. Using stabilizers to lift the RV can bend them or damage their mounts. If you are unsure which type your RV has, check the system's labeling or manual before you try to level with it.
Type | Purpose | Typical setting; Hydraulic leveling jacks | Lift and level the RV using a pump, fluid reservoir and cylinders | Motorhomes and larger fifth wheels; Electric leveling jacks | Lift and level the RV using electric motors and screw or gear drives | Fifth wheels, travel trailers and some motorhomes; Powered stabilizer jacks | Reduce movement once the RV is level; not designed to lift | Travel trailers and as supplements on many RVs; Automatic leveling systems | A controller with level sensors that extends the jacks in sequence until level | Optional or standard on many hydraulic and electric systems
Before You Start
Know your system: whether it is automatic or manual, hydraulic or electric, and whether the RV must be hitched or unhitched to level. Jack pads: solid, wide pads that spread the load on gravel, grass, dirt or hot asphalt. Wheel chocks, especially for trailers, which have no parking brake. A bubble level or a level app on a phone, used on a flat interior surface. This is useful for checking the result even with automatic systems. Adequate battery charge, because many leveling systems refuse to run or behave erratically on low voltage. A clear view of the ground under each jack location, with no utility hookups, sewer connections, rocks, stumps or drop-offs.
Step-by-Step: Leveling with Power Jacks
1) Choose and approach the site
Pick the most level, firm part of the site you can. The less the jacks have to lift, the more stable the RV will be. On a noticeable slope, try to park so the front faces downhill or across the slope as the site allows. Every inch of correction you avoid at this stage makes the result more stable. Position the RV so you can still reach hookups and extend slide-outs without hitting trees, posts or utility pedestals.
2) Secure the vehicle
For a motorhome, shift into park and set the parking brake. Many systems will not operate until the brake is set. Some hydraulic systems also require the engine to be running, either to supply power or to unlock the controls, so follow your manual on this point. For a travel trailer, chock the wheels on both sides before lowering anything. For a fifth wheel, follow the system's sequence for the landing gear and whether to level before or after unhitching. Some automatic systems handle the front landing legs as part of the cycle.
3) Place pads under the jack locations
On anything other than solid concrete, set a pad where each jack foot will land. Pads keep jacks from sinking into soil, gravel or sun-softened asphalt, which can throw the RV out of level overnight. If a jack can't reach the ground before running out of travel, a sturdy block under the foot can help. Keep any stack low, flat and stable, and use blocks designed for the purpose rather than loose scraps of wood.
4) Check slide-out instructions
Many manufacturers want the RV leveled before slide-outs are extended, because extending slides on an unlevel or unsupported coach can stress the slide mechanism and frame. Some instructions differ, so follow yours. Unless your manual says otherwise, keep slides retracted until leveling is done.
5a. Automatic leveling
If your system has an auto-level function, start it from the control panel and stay with the RV while it runs. The controller reads its built-in level sensor and extends the jacks in sequence, usually by first making ground contact and then lifting the low side. Watch and listen for jacks contacting obstacles or pads shifting. Use the panel's stop or cancel function if anything looks wrong. When the cycle finishes, the panel normally reports success or shows a fault.
5b. Manual leveling
Lower all jacks until they just touch the ground or pads, without lifting yet. This makes the next adjustments more predictable. Check the level indicators on the panel, or a bubble level inside the RV, to find which side is low. Correct the axis that is farthest out of level first. Some manuals specify front-to-rear first and others side-to-side, so use your system's order if it gives one. Raise the low side rather than lowering the high side. Lifting from the low side keeps the RV as close to the ground as possible. Make small adjustments and recheck after each one. Bounce between axes as needed, since correcting one can slightly change the other. Once level, make sure every jack is firmly loaded. On many systems you then bring any remaining jacks down to firm contact, so none is left hanging.
6) Watch the lift limits
Stop and rethink the setup if any jack reaches the end of its travel, if the RV feels unstable, or if wheels lift well clear of the ground. Many manufacturers advise against raising the wheels off the ground. A coach balanced on its jacks alone is less stable, and a motorhome with its braked wheels in the air may lose the holding effect of the parking brake. The fix is usually to reposition the RV, drive the low-side tires onto leveling blocks, or add blocks under the jack feet.
7) Verify the result
Confirm level with a bubble level on a flat interior surface such as a counter, floor or the freezer compartment, checking both directions. Practical signs also help: the entry door and cabinet doors should not swing open or shut on their own, and water in the shower should drain normally. Getting the RV level matters for comfort and for appliances. Absorption refrigerators in particular need to be reasonably level to cool properly. After that, extend the slides and walk around once more to confirm all jacks and pads are firmly seated.
Safety Rules While Leveled
Never crawl under an RV supported only by its leveling jacks. They are not designed as safety stands for working beneath the vehicle. Do not use leveling jacks to lift a wheel off the ground for a tire change unless your manual specifically allows it. Recheck the level and pads after heavy rain, thaw or a hot day, since the ground can soften and let a jack sink. Keep children and pets away from jack locations while the system is moving.
Retracting the Jacks Before Leaving
Retract all slide-outs first, unless your manual says otherwise. Use the retract-all function or raise each jack fully from the panel. On fifth wheels, follow the hitching sequence the system requires. Walk around and visually confirm that every jack is fully up and that no pads or blocks remain on the ground or stuck to jack feet. Confirm the panel's jacks-down warning has cleared before moving. Driving with a jack down can cause severe damage to the jack, the frame and the ground. Remove wheel chocks last, after the RV is hitched or the parking brake is set.
Common Problems and What They Mean
Symptom | Likely cause | What to do; System won't start | Parking brake not set, engine not running when required, low battery voltage or other interlock | Check interlock requirements in the manual and charge the battery; Auto-level gives an out-of-range fault | Site too steep for the jacks' travel | Reposition the RV or use blocks under the tires or jacks; RV drifts out of level over time | Jacks sinking into soft ground, or an internal leak in a hydraulic system | Add or enlarge pads; if it continues on firm ground, have the system inspected; Panel reads level but the RV is visibly not | Level sensor needs recalibration or was mounted or set incorrectly | Recalibrate per the manual if the system allows it; otherwise have it serviced; A jack won't retract | Electrical fault, low fluid or a mechanical problem | Use the manual retract or override procedure only if your manual describes one, then seek service; Visible fluid leak, grinding, or a bent jack | Hydraulic or mechanical damage | Stop using the system and have it repaired
When to Call a Qualified Technician
Basic leveling, pad placement and recalibration routines described in the owner manual are normal owner tasks. Hydraulic fluid leaks, a jack that won't retract, repeated error codes, burnt electrical smells, damaged mounts or a pump or motor that won't run should go to an RV service technician familiar with your leveling system. Do the same for any manual override that involves opening hydraulic valves or releasing stored pressure, unless your manual walks you through it. Faults that stop the jacks from retracting can leave the RV unable to travel safely, so get them diagnosed before the next trip.