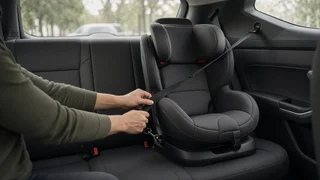
How to Fit and Install a Child Car Seat Correctly
The short answer
A child car seat is installed correctly when it is secured with either the vehicle's lower anchors or its seat belt (not usually both), it moves no more than about one inch side to side or front to back when you pull at the belt path, it sits at the recline angle its indicator requires, and the child's 5-point harness is snug with the chest clip at armpit level. Rear-facing seats must never sit in front of an active front airbag. Forward-facing harnessed seats should also use the top tether. The exact routing, weight limits and recline settings come from two documents: the car seat's instructions and the child restraint section of your vehicle owner's manual. When they differ, follow the stricter instruction, and if they conflict, contact the manufacturers or a certified technician before driving.
Key terms
LATCH (Lower Anchors and Tethers for Children): the US system of built-in metal bars in the seat crease plus a top tether anchor, used to attach a car seat without the seat belt. Lower anchors: two small metal bars where the seat back meets the cushion. Car seat connectors clip onto them. Top tether: a strap from the top of a forward-facing seat to an anchor point in the vehicle, usually on the seat back, rear shelf, ceiling or cargo floor. It reduces how far the child's head moves forward in a crash. Belt path: the slots or channels on the car seat where the seat belt or LATCH strap passes through. Rear-facing and forward-facing modes use different belt paths. Lock-off: a clamp built into some car seats that holds the seat belt tight, so the belt itself does not need to be locked. Locking retractor: a seat belt mode, activated on most modern US vehicles by pulling the belt all the way out, after which the belt only retracts and will not loosen. 5-point harness: the car seat's own straps, two over the shoulders, two at the hips and one between the legs, that hold the child in the seat.
Before you start
The car seat's instruction manual and the child restraint section of your vehicle owner's manual. The child's current weight and height, compared with the limits printed on the car seat's labels for the mode you plan to use. A check of the seat's expiration date, usually on a label or molded into the shell. Do not use an expired seat, a seat with an unknown history, or one that has been in a moderate or severe crash unless its manufacturer says it can be reused. Confirmation that the seat has not been recalled. Registering the seat with its manufacturer means you will be notified of future recalls. A rolled towel or foam pool noodle, only if the car seat manual allows it for adjusting recline. Time in good light with the vehicle parked on level ground, which matters for reading recline indicators.
Choose the seating position
Children are safest in the back seat. The center rear seat is furthest from a side impact, but it is only a good choice if you can get a tight installation there. Many vehicles do not have lower anchors in the center, and the vehicle manual may prohibit borrowing the inner anchors from the outboard seats. A solid installation in a side seat is better than a loose one in the middle. Stop and do not proceed if the only available position is the front passenger seat with an active airbag and you are installing a rear-facing seat. If a child must ride in front, the vehicle manual explains whether and how that is permitted.
Decide between LATCH and the seat belt
Both methods are equally safe when done correctly. Choose the one that gives you the tighter fit in your vehicle. Use one method, not both, unless your car seat manual specifically allows it. Lower anchors have a weight limit that combines the child and the car seat. That limit is printed on the car seat label and in its manual. Once your child exceeds it, switch to a seat belt installation, still using the top tether for a forward-facing seat.
Installing an infant car seat
Infant seats are rear-facing only and usually consist of a carrier that clicks into a base left in the car. The base is what you install. Most carriers can also be installed without the base using the vehicle seat belt, which is useful in taxis or a second car.
Base with lower anchors
1) Place the base on the vehicle seat facing the rear of the car. 2) Set the recline foot or adjuster so the base's level indicator shows the correct angle for a newborn or for your child's weight, as the manual specifies. 3) Locate the vehicle's lower anchors. Extend the base's LATCH strap and click both connectors onto the anchors, so that the hooks face the correct way and the strap is not twisted. 4) Press down firmly on the base with one hand or a knee near the belt path while pulling the tightening strap to remove slack. 5) Check movement at the belt path. If it moves more than about an inch, tighten again. 6) Recheck the recline indicator, since tightening can change the angle. 7) Click the carrier into the base and pull up on it to confirm it is locked.
Base with the seat belt
1) Position the base and set the recline as above. 2) Route the lap and shoulder belt through the base's marked belt path and buckle it. Make sure the belt is flat and not twisted. 3) Lock the belt, either by closing the base's lock-off or by switching the retractor to locking mode, depending on what the car seat manual says. You will hear a ratcheting sound as the belt retracts. 4) Press down into the base and feed slack back into the retractor or tighten through the lock-off. 5) Do the one-inch movement test and recheck the recline indicator. 6) Attach the carrier and confirm it is latched.
Carrier without the base
Place the carrier rear-facing and route the lap portion of the belt through the guides on the carrier, usually near the child's hips. Some carriers also route the shoulder belt around the back of the shell, which is often called European belt routing. Buckle, lock the belt, tighten and confirm the recline line on the carrier is parallel to the ground or as the manual describes. If the vehicle belt cannot be routed the way the carrier requires, do not use that seating position.
Installing a convertible seat rear-facing
A convertible seat installs directly in the vehicle without a separate base. Set it to its rear-facing recline position, use the rear-facing belt path, which is normally under the child's legs, and follow the same LATCH or seat belt steps described for an infant base. Because convertible seats are larger, kneeling in the seat while tightening is often the easiest way to get it firm. Keep your child rear-facing until they reach the highest rear-facing weight or height limit on the seat's label. This is current US safety guidance because rear-facing seats spread crash forces across the child's back and head.
Installing a forward-facing 5-point harness seat
1) Confirm your child meets the seat's minimum requirements for forward-facing and has outgrown rear-facing limits. 2) Adjust the seat to its forward-facing recline position, which is usually more upright. 3) Route the LATCH strap or seat belt through the forward-facing belt path, behind the child's back. 4) Connect, lock and tighten as with other installations, pressing the seat back and down into the vehicle cushion. 5) Find the vehicle's tether anchor, using the owner's manual. Do not confuse it with a cargo tie-down hook. Attach the top tether hook and tighten the strap until it is snug. 6) Do the one-inch movement test at the belt path, not at the top of the seat. 7) Keep using the harness until your child exceeds its weight or height limit, or the tops of their ears reach the top of the shell, as the manual describes.
Securing your child in the harness
Harness height: for rear-facing, the straps should come from slots at or just below the shoulders. For forward-facing, they should come from at or just above the shoulders. Clothing: remove bulky coats and snowsuits. They compress in a crash and leave the harness loose. Put a blanket or the coat on backward over the buckled harness instead. Buckle: fasten the crotch buckle and both harness tongues, and make sure the straps are not twisted. Tighten: pull the harness adjuster strap until it is snug. Pinch test: try to pinch a horizontal fold of strap at the child's collarbone. If you can, tighten more. Chest clip: slide it up to armpit level. Too low, and the straps can slip off the shoulders. Accessories: avoid aftermarket inserts, strap covers or mirrors that did not come with the seat or are not approved by its manufacturer.
Final check
Check | Correct result; Movement at belt path | No more than about one inch side to side or front to back; Recline indicator | Within the range for the child's age, weight or mode; Installation method | LATCH or seat belt, not both unless the manual permits it; Belt or LATCH strap | Flat, untwisted, locked, through the correct belt path; Top tether (forward-facing) | Attached to a designated anchor and snug; Harness height | At or below shoulders rear-facing, at or above forward-facing; Harness tightness | Passes the pinch test at the collarbone; Chest clip | At armpit level; Front airbag | Rear-facing seat is not in front of an active airbag
When to stop and get help
Stop and seek help if you cannot get the seat to move less than about an inch, if the recline indicator cannot be satisfied in your vehicle, if the vehicle or car seat manual prohibits the position or method you are trying, or if the seat belt does not lock or will not route through the belt path. A certified Child Passenger Safety Technician (CPST) can check your installation and teach you to do it yourself. Many fire stations, hospitals and community events offer these checks, often free of charge. Recheck the installation regularly, after moving the seat between vehicles, and whenever your child grows into a new harness slot or mode.