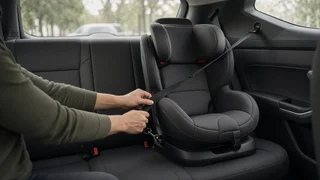
How to Install a Rear-Facing Car Seat with LATCH

The Short Answer
To install a rear-facing car seat with LATCH, locate the lower anchors in the vehicle seat, set the car seat to the recline position its manual specifies for rear-facing use, route the lower anchor strap through the rear-facing belt path, clip the connectors onto the anchors, then press the car seat firmly into the vehicle seat while pulling the strap tight. The installation is complete when the seat does not shift meaningfully at the belt path and the recline indicator shows an acceptable angle.
LATCH stands for Lower Anchors and Tethers for Children. It is the US system of metal anchor bars built into the gap between a vehicle's seat cushion and seatback, plus a top tether anchor, that lets a child seat attach directly to the vehicle without using the seat belt. In most US rear-facing installations only the lower anchors are used; whether a top tether applies rear-facing depends entirely on your specific car seat model.
Two conditions change the answer. First, every LATCH system has a weight limit, and once your child (and in some cases the child plus the seat) exceeds the limit printed on your car seat's label and in its manual, you must switch to a seat belt installation. Second, not every seating position has its own set of lower anchors, so the seat you want to use may not support LATCH at all. Your car seat manual and your vehicle owner's manual are the authorities on both points, and their instructions take priority over any general guide.
Before You Start
Gather both manuals and confirm the following before you begin. If any item cannot be confirmed, resolve it first rather than guessing.
Your car seat is approved for rear-facing use and for LATCH installation, as shown on its labels and in its manual. Your child is within the seat's rear-facing height and weight limits and within its lower anchor weight limit. The seat has not passed its expiration date, which is usually printed on a label or molded into the shell. The seat has not been in a crash that the manufacturer says requires replacement, and it has no missing parts or cracks. You know which vehicle seating positions have lower anchors, as listed in the vehicle owner's manual. The chosen position is not in front of an active frontal airbag. A rear-facing seat must never be placed in front of an active passenger airbag; the back seat is the recommended location.
Equipment needed: the car seat with its lower anchor strap or rigid connectors, both manuals, and possibly a rolled towel or foam pool noodle, but only if your car seat manual permits one to correct the recline angle.
Step-by-Step Installation
1) Find the lower anchors
Locate the two lower anchor bars in the crease where the seat cushion meets the seatback, often called the seat bight. Many vehicles mark them with a small circular symbol showing a child seat, or with tags or plastic guides. Feel for the bars and clear away any debris or buckles in the way.
Stop condition: if the anchors are bent, damaged or cannot be reached, do not use LATCH in that position. Use a seat belt installation instead, or have the vehicle inspected by a dealer or qualified service technician.
Center seat caution: many vehicles do not have dedicated lower anchors for the center rear seat. Do not borrow the inner anchors from the two outboard positions unless both your vehicle manual and your car seat manual explicitly allow it.
2) Prepare the car seat
If your seat has a separate base, follow the manual to decide whether you are installing the base or the carrier without a base; the steps below apply to whichever part attaches to the vehicle. Set the recline position or adjustment foot to the setting your manual specifies for rear-facing use at your child's size. Loosen the lower anchor strap fully so you have slack to work with.
Make sure the lower anchor strap is routed through the rear-facing belt path, not the forward-facing one. Convertible seats have separate belt paths, typically labeled or color-coded, and using the wrong one is a common error.
3) Position the seat
Place the car seat on the vehicle seat facing the rear of the vehicle. Push it back so it rests against the vehicle seatback and is centered between the two anchors. Check your car seat manual about contact with the front seatback; some models allow light contact and others require a gap.
4) Attach the connectors
Attach each connector to its anchor bar. Hook-style connectors clip on and should be oriented as your manual shows; push-on or rigid connectors usually click and display a visual indicator, often green, when locked. Tug each connector to confirm it is latched. Make sure the strap is not twisted.
5) Tighten the strap
Press down firmly into the car seat with one hand or knee, near the belt path, compressing it into the vehicle cushion. While maintaining that pressure, pull the tightening strap to remove slack. Pulling the tail back toward the strap, rather than straight out, often gives better leverage; some seats have a built-in tensioning system instead, which you operate as the manual describes.
Do not also buckle the vehicle seat belt through the car seat unless both manufacturers state that using LATCH and the seat belt together is permitted. Most do not allow it.
6) Check the top tether, if applicable
Most rear-facing seats sold in the US do not use the top tether in rear-facing mode, but some models do, and some anchor it in a specific way. Follow your car seat manual exactly. If it says not to use the tether rear-facing, stow it as directed so it does not dangle loose.
How to Verify the Installation
Movement test: grip the car seat at the belt path where the LATCH strap passes through, not at the top of the seat, and pull side to side and front to back. Widely used US guidance is that it should move less than one inch; confirm against your manual. Movement at the top of a rear-facing seat is normal. Recline check: confirm the angle indicator, level line or bubble shows an acceptable range for your child's size. Recheck it after tightening, since tightening can change the angle. Connector check: both connectors are latched, the strap is flat and untwisted, and any lock indicators show the locked state. Harness check: with the child seated, the harness straps should come from slots at or below the child's shoulders, the harness should be snug enough that you cannot pinch slack at the collarbone, and the chest clip, if fitted, should sit at armpit level.
If the seat still moves too much after a firm second attempt, or the recline indicator cannot reach the acceptable range, stop and uninstall. Try a different permitted seating position, follow any recline adjustments your manual allows, or switch to a seat belt installation. Do not drive with the child in a seat that fails these checks.
When to Switch to a Seat Belt Installation
Change to the vehicle seat belt method when your child reaches the lower anchor weight limit shown on your car seat label, when the chosen seating position has no lower anchors, when the anchors are damaged, or when LATCH does not produce a tight, correctly reclined fit. A correctly done seat belt installation is considered as safe as a correctly done LATCH installation; the better method is whichever gives a secure fit in your vehicle.
Getting a Professional Check
If you are unsure about any step, a certified Child Passenger Safety Technician (CPST) can inspect your installation and teach you to do it yourself. Inspection stations are commonly offered through fire departments, hospitals and local safety organizations. Damaged vehicle anchor hardware should be assessed by a dealer or qualified technician rather than repaired at home.
Information Gaps to Fill from Your Manuals
This guide does not include model-specific specifications because they vary by car seat and vehicle. Look up the following in your own manuals: the lower anchor weight limit and how it is calculated, the correct rear-facing recline setting, whether the top tether is used rear-facing, which seating positions have lower anchors, whether center-seat anchor borrowing is allowed, and the seat's expiration date and crash replacement policy.