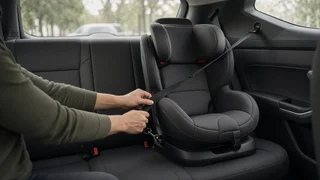
How to Install a Car Seat Using LATCH: Step-by-Step Guide
To install a car seat using LATCH, clip the car seat's lower anchor connectors onto the two metal bars in the vehicle's seat crease, press the car seat firmly into the vehicle seat while pulling the LATCH strap tight, and attach the top tether for a forward-facing seat. Then confirm the seat moves less than about an inch side to side or front to back at the belt path. The two conditions that change this are the weight limit printed on your car seat for lower anchor use and the seating positions your vehicle actually equips with anchors. Once your child passes that limit, or if you want to use a position without anchors, switch to a seat belt installation.
What LATCH Means
LATCH stands for Lower Anchors and Tethers for Children. It is the standardized child restraint attachment system used in US vehicles and car seats. It gives you a way to secure a car seat without routing the vehicle's seat belt through it. The system has two parts.
Lower anchors: a pair of small horizontal metal bars built into the vehicle frame, located in the gap where the seat cushion meets the seatback. Your car seat attaches to them with connectors on a strap or with rigid arms. Top tether: a strap on the top back of a car seat that hooks to a tether anchor in the vehicle, usually on the rear shelf, the back of the vehicle seat, the cargo floor or the ceiling. It reduces forward head movement in a crash and is especially important for forward-facing seats.
LATCH is not inherently safer than a seat belt installation. Both methods are designed to protect your child when done correctly. LATCH is often easier to tighten, which can make a correct restraint installation simpler to achieve. Choose whichever method gives you a secure fit in your vehicle.
Before You Start
Have the car seat's manufacturer instructions and the vehicle owner's manual on hand. The car seat manual covers how its connectors, belt paths, recline settings and tether work. The vehicle manual's child restraint section shows which seating positions have lower anchors and tether anchors and whether any positions can share anchors. Where the two manuals disagree with this guide, follow the manuals.
Check the car seat label for the maximum child weight allowed when installing with lower anchors. This limit differs between models and may differ between rear-facing and forward-facing modes. Find the lower anchors. Look for small circular symbols or tags on the seatback, or feel for the bars in the seat crease. Find the tether anchor for the position you plan to use. It is often marked with an anchor symbol and may sit under a cover. Decide on direction: rear-facing or forward-facing, based on your child's age, weight and height and the car seat's limits. Remove any aftermarket mats, cushions or organizers that are not approved by the car seat manufacturer. Keep the car seat out of any front passenger position with an active frontal airbag when rear-facing. The back seat is the recommended location for children.
Choosing a Seating Position
Many vehicles have lower anchors only in the two outboard rear seats. The center rear seat may have no dedicated anchors. Some vehicles allow you to borrow the inner anchor from each side seat for a center LATCH installation, but only when both the vehicle manual and the car seat manual say this is permitted and the anchor spacing matches what the car seat requires. If they do not explicitly allow it, use the seat belt in the center position or choose an outboard position with anchors. A secure fit in any rear position is more important than which rear position you use.
Rear-Facing LATCH Installation
1) Set the car seat to the rear-facing recline position specified in its instructions. Many seats have a recline foot, adjustable base or angle indicator. 2) Route the LATCH strap through the rear-facing belt path, if your seat requires it. Some seats have a fixed strap or rigid connectors that need no routing. Do not use the forward-facing belt path for a rear-facing installation. 3) Place the car seat on the vehicle seat facing the rear, centered between the two lower anchors. 4) Attach each connector to its lower anchor. Listen for a click and tug each connector to confirm it is latched. Check that the strap is not twisted. 5) Press down and back on the car seat with your hand or knee near the belt path while pulling the tail of the LATCH strap to tighten it. Pulling the strap back toward the center of the seat, or feeding slack through from inside the shell, often helps. 6) Recheck the recline indicator. Tightening can change the angle. If the angle is outside the allowed range, loosen the strap, adjust the recline per the instructions and tighten again. 7) Attach a top tether or use an anti-rebound bar or load leg only if your car seat is designed for it in rear-facing mode and the instructions describe how. Many rear-facing seats do not use a tether.
Stop and reconsider if the car seat cannot reach the required recline angle, if it presses against the front seat in a way the manuals do not permit, or if a connector does not click onto the anchor. Each of these signals a problem with the position, the seat setup or compatibility.
Forward-Facing LATCH Installation
1) Adjust the car seat to its forward-facing configuration and recline setting as listed in its instructions. 2) Route the LATCH strap through the forward-facing belt path, usually located behind the child's back. 3) Loosen the top tether strap fully and drape it over the back of the car seat so it is ready to use. 4) Place the seat facing forward and centered between the lower anchors. 5) Attach both lower anchor connectors and confirm each is latched with a click and a tug. 6) Press the car seat firmly into the vehicle seat back and cushion while pulling the LATCH strap tight. 7) Connect the top tether hook to the correct tether anchor for that seating position. Do not attach it to a cargo hook, seat frame or other point that is not labeled as a tether anchor. 8) Remove slack from the tether until it is snug. Tighten the lower anchors first and the tether second, unless your car seat instructions say otherwise.
Always use the top tether for a forward-facing installation when your vehicle has one. It significantly limits how far the child's head moves forward in a crash. If your vehicle lacks a tether anchor in the position you need, check with the vehicle manufacturer or a dealer about whether one can be added, and avoid improvising an attachment point.
How to Check the Installation
Movement test: hold the car seat at the belt path where the LATCH strap runs and pull side to side and front to back. It should move less than about one inch. Movement at the top of the seat is normal; test only at the belt path. Connectors: both lower connectors are locked onto the anchors, and the strap is flat and untwisted. Angle: for rear-facing seats, the recline indicator reads within the allowed range after tightening. Tether: for forward-facing seats, the tether is attached to a proper anchor and snug, with no twists. Single method: the seat is installed with either LATCH or the seat belt, not both, unless your car seat manual specifically allows both together. No interference: the car seat is not resting on a buckle, and the vehicle seat belt does not get trapped under the car seat.
Checking Harness Fit
A tight restraint installation protects your child only if the harness fits correctly. Check harness fit every ride, especially after clothing changes or growth spurts.
Shoulder strap height: for rear-facing, straps typically come from slots at or below the child's shoulders; for forward-facing, at or above the shoulders. Confirm with your car seat instructions. Chest clip: positioned at armpit level. Snugness: after buckling and tightening, you should not be able to pinch a horizontal fold of harness webbing at the child's collarbone. No bulky clothing: thick coats and snowsuits compress in a crash and leave the harness loose. Buckle the child in regular clothing and place a blanket or coat over the harness.
When to Switch to a Seat Belt Installation
Lower anchors have a weight limit, and as your child grows, a forward-facing seat with a heavy child can exceed the rating shown on the car seat label. When your child reaches that limit, uninstall the lower anchor connectors and install the car seat with the vehicle seat belt. For forward-facing seats, keep using the top tether with the seat belt installation.
For seat belt routing, thread the vehicle belt through the same belt path the LATCH strap used for that direction, buckle it, lock the belt as your vehicle and car seat instructions describe, and tighten it while pressing the seat down. Many vehicle belts lock when you pull them all the way out and let them retract; some car seats have a built-in lock-off. Run the same movement check afterward. Store the unused LATCH connectors in the storage clips or compartment the car seat provides so they do not become loose objects in a crash.
Situation | Recommended method; Child is within the car seat's lower anchor weight limit and the position has anchors | LATCH or seat belt, whichever gives a secure fit; Child exceeds the lower anchor weight limit | Seat belt, plus top tether when forward-facing; Position has no lower anchors and borrowing is not approved by both manuals | Seat belt; LATCH will not tighten enough or will not reach the required recline angle | Try the seat belt or another position
Common LATCH Mistakes
Using lower anchors past the weight limit on the car seat label. Routing the strap through the wrong belt path for the seat's direction. Skipping the top tether on a forward-facing seat. Attaching the tether to a cargo hook or other point that is not a tether anchor. Borrowing anchors for a center position without permission from both manuals. Leaving slack in the strap or measuring movement at the top of the seat rather than the belt path. Using LATCH and the seat belt at the same time without explicit approval from the car seat manufacturer.
Getting the Installation Checked
If you are unsure about the fit, your vehicle and car seat seem incompatible, or the car seat has been in a crash, have the installation reviewed by a certified Child Passenger Safety Technician. They can check your installation, show you how to correct it and help you decide when to move to the next stage. Replace a car seat after a crash according to its manufacturer instructions, and do not use a seat that is past its expiration date or has missing parts or labels.