When and How to Switch a Graco Car Seat to Forward-Facing
Switch a Graco car seat to forward-facing only after your child has outgrown the seat's rear-facing height or weight limit, and only if your child also meets the seat's minimum forward-facing requirements. Turning the seat around early gives up protection. Rear-facing seats spread crash forces across a young child's back, head and neck, which is why child passenger safety guidance recommends keeping children rear-facing for as long as their seat allows. This applies to Graco convertible and all-in-one seats. Graco infant car seats are rear-facing only and can never be turned forward-facing.
Key terms
Convertible or all-in-one seat: a car seat that can be installed rear-facing and later forward-facing with a harness. All-in-one seats can also convert to a booster. Rear-facing limit: the maximum weight and height printed on the seat's labels and in its manual for rear-facing use. Your child has outgrown rear-facing when they reach either one. Lower anchors: the metal bars built into the vehicle seat crease, part of the system often called LATCH, which the car seat's connectors clip onto. Top tether: a strap at the top back of a forward-facing car seat that hooks to a tether anchor in the vehicle. It reduces how far the child's head moves forward in a crash. Belt path: the opening or channel the vehicle seat belt or lower anchor strap passes through. Graco seats have separate belt paths for rear-facing and forward-facing installation.
When it is time to switch
Your child is ready for forward-facing when both of the following are true.
Your child has reached the rear-facing weight limit or the rear-facing height limit on your specific Graco seat. The height rule is often written as a minimum amount of space required between the top of the child's head and the top of the headrest or seat shell. Check your manual for the exact wording. Your child meets every minimum requirement for forward-facing listed on the seat, which typically includes age, weight and sometimes height.
Age alone is not a reason to switch. Reaching a minimum forward-facing age does not mean your child should face forward if they still fit rear-facing. Bent legs or feet touching the vehicle seat back are also not a reason to switch, because that alone does not mean the child has outgrown the seat. Some US states have laws about rear-facing age or size, and these laws vary. Check your state's current requirements, and follow whichever is stricter, the law or the seat's limits.
Before you start
The Graco owner's manual for your exact seat model. If it is lost, find the model number and manufacture date on the label on the seat shell, which lets you get the correct manual. Your vehicle owner's manual, which shows where the lower anchors and top tether anchors are and which seating positions can use them. Confirmation that the seat is not expired, has not been in a crash that requires replacement, and has no recalls. Time to install the seat in a well-lit spot with the vehicle parked.
Install the seat in the back seat. Never place a forward-facing child seat in front of an active front airbag unless your vehicle manual specifically allows that position, and the back seat is still the safer choice whenever one is available.
How rear-facing and forward-facing setups differ
Setting | Rear-facing | Forward-facing; Harness strap height | At or below the child's shoulders | At or above the child's shoulders; Belt path used | Rear-facing belt path | Forward-facing belt path, behind the child's back; Recline position | Rear-facing recline range shown on the seat's indicator | Forward-facing position or positions marked on the seat; Top tether | Usually not used, unless your manual says otherwise | Always use when available; Lower anchor use | Allowed up to the limit on the seat label | Allowed up to a separate limit, after which you switch to seat belt installation
Step-by-step: switching your Graco seat to forward-facing
1) Remove the seat and check it over
Uninstall the seat from the rear-facing position. Unbuckle the lower anchors or vehicle belt, and release any lock-off. Look over the shell, harness and buckle for cracks, fraying or damage. Stop and contact Graco if anything looks damaged.
2) Adjust the harness height for forward-facing
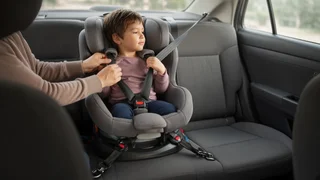
Seat your child in the seat outside the vehicle, or measure against your child before installing. For forward-facing, the harness straps must come out of the seat back at or slightly above your child's shoulders. Many Graco convertible seats have a no-rethread harness that moves up and down with the headrest. Other models require you to unhook the straps from the back of the seat and move them into the correct slots. Follow your manual exactly when rethreading, and make sure the straps are not twisted. If your manual names specific slots that are approved only for forward-facing, use them only in that mode.
3) Set the recline to the forward-facing position
Change the recline to the position your manual approves for forward-facing. Most Graco seats show this on a recline indicator or label. Using a rear-facing recline setting while forward-facing can affect how the seat performs in a crash.
4) Choose lower anchors or the vehicle seat belt
Install the seat with either the lower anchors or the vehicle seat belt, not both, unless your Graco manual specifically allows combined use. Lower anchors have a weight limit, usually listed on the seat label as either the child's weight or the combined weight of the child and the seat. When your child goes over that limit, reinstall the seat with the vehicle seat belt and keep using the top tether. If the middle seat lacks dedicated lower anchors, do not borrow the inner anchors from the outer seats unless both the vehicle manual and the car seat manual permit it.
5) Route the belt or lower anchor strap through the forward-facing belt path
The forward-facing belt path runs through the seat behind where the child's back rests, and it is usually labeled by color or icon. On many Graco seats you must lift or open the seat pad to reach it. If you use lower anchors, move the lower anchor strap from the rear-facing belt path to the forward-facing one if your seat requires that, and check that the strap lies flat. If you use the vehicle seat belt, thread both the lap and shoulder portions through the forward-facing path and buckle it.
6) Tighten the installation
Press down firmly into the seat with your knee or hand while pulling the lower anchor strap or seat belt tight. With a seat belt installation, lock the belt using the seat's built-in lock-off if it has one, or by switching the vehicle belt's retractor to locking mode as described in your vehicle manual. Do not use both locking methods unless the manual says to.
7) Attach and tighten the top tether
Find the correct tether anchor for that seating position using your vehicle manual. It may be on the back of the vehicle seat, the rear shelf, the floor or the ceiling. Cargo hooks are not tether anchors. Route the tether as the vehicle manual directs, clip it on, and pull it snug. Using the top tether is one of the most important parts of a forward-facing installation.
8) Buckle your child and check harness fit
Straps come from at or above the shoulders and are not twisted. The buckle is fastened and the chest clip sits at armpit level. The harness is snug: after tightening, you cannot pinch any slack in the strap at the child's collarbone. Bulky coats or snowsuits are removed. Put a blanket or coat over the buckled harness instead.
Completion check
Hold the seat at the belt path where the belt or lower anchor strap passes through, and tug side to side and front to back. It should move less than about an inch. Movement at the top of the seat is normal; test only at the belt path. The belt or lower anchor strap runs through the forward-facing belt path and nowhere else. The seat belt is locked, or the lower anchors are fully latched and within their weight limit. The top tether is attached to a real tether anchor and pulled snug. The recline matches the forward-facing setting in your manual. Harness height, chest clip position and pinch test all pass with your child in the seat.
If the seat moves too much, uninstall it and try again with more downward pressure, or try the other installation method. Stop and get help if you cannot get a tight installation, if your vehicle has no tether anchor in your chosen position, or if your manual and your vehicle seem to conflict.
Common mistakes to avoid
Leaving the belt or lower anchor strap in the rear-facing belt path after turning the seat around. Forgetting the top tether, or clipping it to a cargo hook. Leaving the harness straps below the shoulders from rear-facing use. Keeping lower anchors in use after your child goes over their weight limit. Using both the seat belt and lower anchors when the manual does not allow it. Adding aftermarket products such as strap covers, inserts or seat protectors that Graco did not supply or approve.
When to get a professional check
Your Graco manual and your vehicle manual are the final authority for your specific seat and car. If either is unclear, or you want confirmation that your installation is correct, a certified Child Passenger Safety Technician (CPST) can inspect the seat and show you how to install it. Inspection events and fitting stations are often available through local fire departments, hospitals and community safety programs. A check is especially worthwhile the first time you switch to forward-facing, after moving the seat to a different vehicle, and when you change from lower anchors to a seat belt installation.