How to Diagnose a Leaking Coolant Reservoir
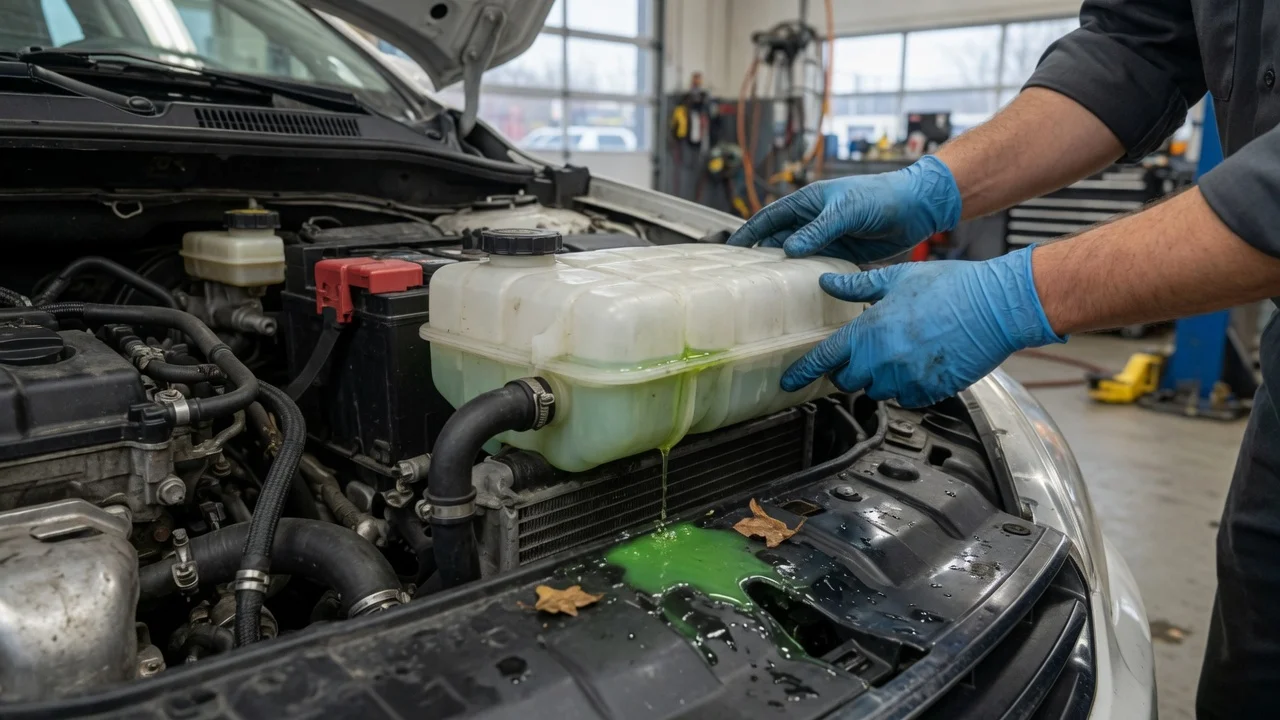
Signs of a leaking coolant reservoir
A coolant reservoir crack often shows up as a small puddle or stain after parking, a low coolant level in the expansion tank, or a sweet chemical odor near the front of the engine bay. You may also see dried residue running down the outside of the tank or wetness around its seams and mounting points. In some cases, the low-coolant warning appears without any obvious overheating yet.
Do not confuse normal evaporation or a slightly low level from a past service with an active leak. Start from a clean, dry engine bay and compare the level only when the engine is fully cold unless the vehicle manual gives another cold-check procedure.
Before you start
Park on a level surface and let the engine cool completely before opening the cooling system. The radiator cap and reservoir cap can release hot, pressurized coolant, so a warm engine needs time to lose pressure and heat. Work with the engine off, the parking brake set, and the key removed.
Have a flashlight, clean shop cloths, gloves, and eye protection ready. If the reservoir must be removed or replaced, you may also need a drain pan, the correct replacement tank for your vehicle, and the coolant type specified by the manufacturer. The diagnosis itself is usually a visual and pressure-based check that does not require removing the tank.
Step-by-step instructions
1) Check the coolant level on a cold engine
Find the translucent coolant expansion tank. Compare the coolant surface with the minimum and maximum marks on the side. A level below the minimum mark can mean an external coolant leak, but it can also reflect a recent top-off error or air that was not fully purged after service.
On many vehicles the correct cold-level reference is the seam or a marked range rather than a single line. If there are no marks, record the level relative to the seam so you can compare it again later under the same cold conditions.
2) Dry and mark the tank before looking for the source
Wipe the outside of the reservoir, its cap, nearby hoses, and the surrounding area with a clean cloth. If the tank is stained from old splash or residue, cleaning it helps separate an active leak from dried coolant left by an earlier spill.
3) Inspect the tank body, seams, cap, and hose connections
Use the flashlight to look closely at the reservoir for a fine crack, especially along molded seams, mounting tabs, and the area around the outlet. A crack may open only when the tank is hot and under pressure, so a cold visual check does not rule out the problem.
Check the cap seal and neck for distortion, cracks, or mineral crust. A failing cap can release coolant during normal heat cycles even when the tank body is intact. Also squeeze or follow the small overflow and feed hoses for swelling, splits, or loose clamps.
4) Pressure test the cooling system
If you have a cooling-system pressure tester and adapters, pump the system to the pressure listed in the vehicle repair information. Do not exceed that pressure. Watch the gauge and look for coolant appearing at the reservoir seams, cracks, cap, or hose fittings. A loss of pressure together with a new wet spot identifies a leak path.
Check the output
A useful diagnosis identifies the exact source: the reservoir body, cap, hose fitting, or a nearby cooling-system component. After cleaning the area, check the same spots after a short test drive or a full heat cycle. New wetness or a drop from the marked cold level supports an active leak.
If no source is visible after one heat cycle, do not conclude that the system is fine. Clean and mark it again, then recheck under the same conditions. Slow seepage can take several heat cycles or a specific engine temperature to appear.
Common problems and next steps
The tank looks wet, but there is no crack
Check whether the reservoir was overfilled above the cold maximum mark. When the engine warms up, coolant expands and can escape through the overflow. Bring the level back to the correct cold range, clean the area, and recheck before replacing parts.
Coolant appears near the cap or under the tank
A leaking cap seal can mimic a cracked tank. Look for residue running down from the neck and inspect the rubber seal for hardening or deformation. Loose hose clamps can also drip downward and make the reservoir look like the source.
The level is low without a visible external leak
Coolant can also be lost inside the engine, through a heater core, or at another cooling-system joint. If the reservoir and its connections are dry but the level keeps falling, stop treating the tank as the cause and inspect the rest of the cooling system or have the vehicle diagnosed.
After the diagnosis
Never drive far with an active coolant leak. Even a small loss can gradually lead to a low coolant condition, overheating, and engine damage. Replace the confirmed faulty reservoir, cap, or hose with the correct part, refill using the specified coolant mixture, and bleed the system according to the vehicle procedure.