Coolant Leaking From the Front of the Engine: How to Find the Source
The short answer
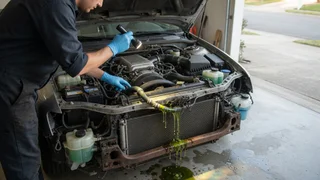
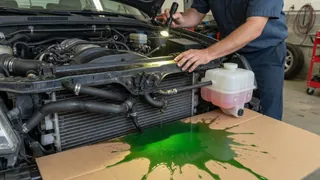
When coolant is leaking from the front of the engine, the source is almost always one of a short list of parts: a radiator or heater hose and its clamp, the water pump, the thermostat housing, the radiator itself, or the pressure cap and filler neck. Less often it is a bypass pipe, the coolant reservoir, or a gasket behind the timing cover on engines where the water pump sits inside that cover. The reliable way to find it is to confirm the fluid is coolant, note exactly where the drips land, and trace the wet trail upward to the highest point that is wet. That point is usually the source. A pressure test then confirms it.
The cooling circuit is a sealed loop. Coolant flows from the water pump through the engine block and cylinder head, past the thermostat, into the radiator, and back to the pump. Most of the parts where that loop leaves or re-enters the engine sit at the front, so that is where most external leaks appear.
What counts as the front of the engine on your vehicle
Front can mean two different places depending on how the engine is mounted. On many rear-wheel-drive trucks and cars, the engine sits lengthwise. Its front faces the radiator and holds the belt-driven accessories, including the water pump. On most front-wheel-drive cars and crossovers, the engine sits sideways. The belt and accessory side usually faces the driver or passenger side wheel well, not the grille. On those vehicles a puddle under the front bumper often points to the radiator or its hoses rather than the water pump. Check which side of your engine carries the drive belt before you narrow your search. Exact component locations vary by model year and engine, so a service manual or repair database for your specific vehicle is the best reference for layout.
Confirm the fluid is coolant
Several fluids can drip from the front of a vehicle, so identify the fluid before you replace parts. Engine coolant is thin and watery, has a noticeably sweet smell, and leaves a crusty or chalky residue when it dries. Its color depends on the coolant type and can be green, orange, pink, red, blue, purple or yellow. Comparing the drip to the fluid in your coolant reservoir is the quickest check.
Fluid | Typical appearance and smell | Common front-of-vehicle sources; Engine coolant | Thin, colored, sweet smell, crusty residue when dry | Hoses, water pump, thermostat housing, radiator, cap; Air conditioning condensate | Clear water, no smell, evaporates without residue | Drain tube, usually near the firewall; normal when AC is used; Windshield washer fluid | Thin, often blue, alcohol-like smell | Reservoir or lines, often at a front corner; Engine oil | Amber to black, slippery, does not evaporate | Front crankshaft seal, timing cover, valve cover; Transmission fluid | Red or brownish, oily | Cooler lines running to the radiator on some vehicles; Power steering fluid | Red, amber or clear, oily | Pump, hoses, rack on hydraulic systems
Safety before you start looking
Do your inspection with the engine cold. A hot cooling system is under pressure. Opening the radiator cap or reservoir cap on a warm engine can spray scalding coolant. Keep hands, sleeves and tools clear of the fan and drive belt if you need to run the engine to watch for a leak. Coolant tastes sweet to animals and is poisonous, so wipe up puddles and dispose of rags and old coolant according to local rules.
Where coolant leaks at the front of the engine come from
Radiator hoses and clamps
The upper radiator hose runs from the thermostat housing to the radiator. The lower hose runs from the radiator back toward the water pump. Look for wetness or dried residue where each hose meets its fitting, for cracks, and for soft, swollen or brittle sections. Clamps can loosen or corrode, and plastic hose necks on radiators and housings can crack. A hose that looks dry when cold may seep only once the system is hot and pressurized.
Water pump
Most water pumps have a small weep hole below the pulley shaft. Coolant or a dried trail coming from that hole means the internal shaft seal is failing, and the pump typically needs replacement. Coolant seeping around the edge of the pump body points instead to the gasket or O-ring where the pump bolts to the engine. Other signs of a failing pump include a wobbly pulley, grinding or whining from the belt area, and coolant spray on the belt or nearby parts. On engines where the timing belt or chain drives the water pump, the pump may sit behind the timing cover, and the leak may show up only as a drip from the bottom of that cover.
Thermostat housing
The thermostat sits in a housing where the upper radiator hose connects to the engine. The housing is often at the top front of the engine or on the side of the cylinder head. Its gasket or O-ring can harden and seep, and plastic housings can crack or warp. Residue around the housing seam, or wetness that runs down the engine from that point, is the typical sign. Because it sits high, a thermostat housing leak can trail down and look like a water pump leak below it. Tracing to the highest wet point helps avoid that mix-up.
Radiator
Many radiators have plastic side or top tanks crimped onto an aluminum core. The seam between tank and core is a common leak point, as are hairline cracks in the tanks and pinholes in the core from corrosion or debris impact. Look for colored crust along the tank seams and on the fins, and for drips from the lowest corner of the radiator. Check the drain petcock at the bottom as well, since a loose or cracked drain plug can drip.
Pressure cap and filler neck
The pressure cap holds the system at a set pressure, which raises the coolant's boiling point. A worn cap seal can let coolant escape around the filler neck. A cap that does not hold pressure can also push coolant out through the overflow hose and onto the ground when the engine is hot. Residue around the cap or neck, or a reservoir that overflows after driving, points here. The cap is inexpensive, but replace it with the correct type and pressure rating for your vehicle.
Coolant reservoir and overflow hose
The plastic expansion tank or overflow reservoir is often mounted near the front of the engine bay. It can crack with age, and its small hoses can split or slip off. On pressurized expansion tanks, the cap sits on the reservoir rather than the radiator, so the same cap checks apply.
Heater, bypass and crossover hoses
Depending on the engine, small-diameter heater hoses, bypass hoses, coolant crossover pipes or a throttle body coolant line may be routed across the front of the engine. These smaller lines and their clamps fail just as larger hoses do. They are easy to overlook because they are often hidden under covers or behind other components.
Gaskets behind covers
On some engines, coolant passages run through the timing cover, or the intake manifold gasket seals coolant passages near the front corners of the engine. A failed gasket in these locations can show up as an external drip at the front. These repairs usually involve more disassembly and are worth confirming with a pressure test before committing to them.
Order of checks
1) With the engine cold and the vehicle parked on level ground, check the coolant level in the reservoir and, if your system has one, the radiator. Note the level so you can tell how fast you are losing coolant. 2) Slide clean cardboard under the front of the vehicle overnight. The position of the drops tells you whether the leak is under the radiator, under the water pump area, or farther back. 3) Open the hood and look from above with a flashlight. Start at the highest coolant-carrying parts, the thermostat housing, upper hose, cap and reservoir, and work downward. 4) Look underneath, removing a splash shield if needed, to check the lower hose, the bottom of the radiator, the drain plug and the underside of the water pump. 5) Look for dried residue, not just wet spots. Coolant often evaporates on hot parts and leaves colored crust at the source. 6) Check the water pump weep hole and pulley. A wobbly pulley or a trail from the weep hole points to the pump. 7) Squeeze the hoses when cold. Hoses that feel soft, swollen, crunchy or cracked are candidates even if they are not visibly wet yet. 8) If nothing is obvious, clean the area and pressure test the system, or add leak-detection dye and inspect with a UV light after driving.
Using a cooling system pressure tester
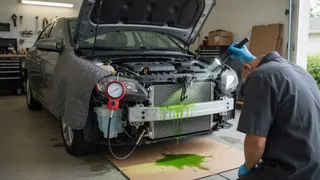
A pressure tester attaches in place of the radiator or reservoir cap and lets you pump the cold system up to its normal operating pressure without running the engine. With the system pressurized, slow leaks often become visible drips, and you can inspect calmly without heat or a moving fan. If the gauge drops but you see no external leak, coolant may be escaping internally. Use the pressure printed on your cap or listed for your vehicle; do not exceed it. Many parts stores lend or rent these testers, and most testers include an adapter for checking the cap itself.
Leaks that show up only when hot or only sometimes
Some leaks appear only at operating temperature, when parts expand and the system is fully pressurized. Others drip only after shutdown, when coolant continues to heat and expand. For these, a fluorescent leak-detection dye added to the coolant is useful. Drive until the engine is fully warm, let it cool, then inspect with a UV light; the dye glows at the point where coolant escaped. A leak that appears only after hard driving can also be a cap that fails to hold pressure, which forces coolant out through the overflow.
Why a front coolant leak should not wait
Even a slow leak lowers the coolant level over time. Low coolant lets air pockets form in the engine, especially around the cylinder head and thermostat. Air pockets cause hot spots, erratic temperature gauge readings and a heater that blows cold. Left alone, this leads to overheating, and overheating can warp the cylinder head or damage the head gasket. A leaking water pump can also fail suddenly, and on some engines a pump failure can damage the timing belt it shares a drive with. If the temperature gauge climbs or a warning light comes on, stop driving and let the engine cool before checking anything.
Refilling and bleeding after the repair
Use the coolant specification listed in your owner's manual or on the reservoir cap. Coolant chemistries differ, and mixing incompatible types or using the wrong one can reduce corrosion protection. If you buy concentrate, dilute it with distilled water to the coolant concentration the manufacturer recommends. A 50/50 mix is common, but follow the product label and your vehicle's guidance. Pre-mixed coolant is already diluted and goes in as is.
After refilling, the system must be bled of air. Methods vary by vehicle. Some engines have bleeder screws, some need the front of the vehicle raised, and some are bled with a spill-free funnel on the filler neck. A general approach is to fill slowly, run the engine with the heater set to hot, and let it warm until the thermostat opens. Watch for bubbles and top up as the level drops. Then let the engine cool completely and recheck the level, since trapped air often works its way out over the next few drive cycles. Check for drips at the repaired joint during this period as well.
When to get professional help
Consider a repair shop if the leak is coming from behind the timing cover, if fixing it requires removing the timing belt or chain, or if you are losing coolant with no visible leak. Coolant loss with no external leak, combined with white sweet-smelling exhaust, milky residue on the oil filler cap, bubbles in the reservoir while the engine runs, or repeated overheating, can indicate an internal leak such as a head gasket failure. A shop can confirm that with a combustion leak test, a pressure test or a cooling system inspection.