How to Test a Transmission Shift Solenoid
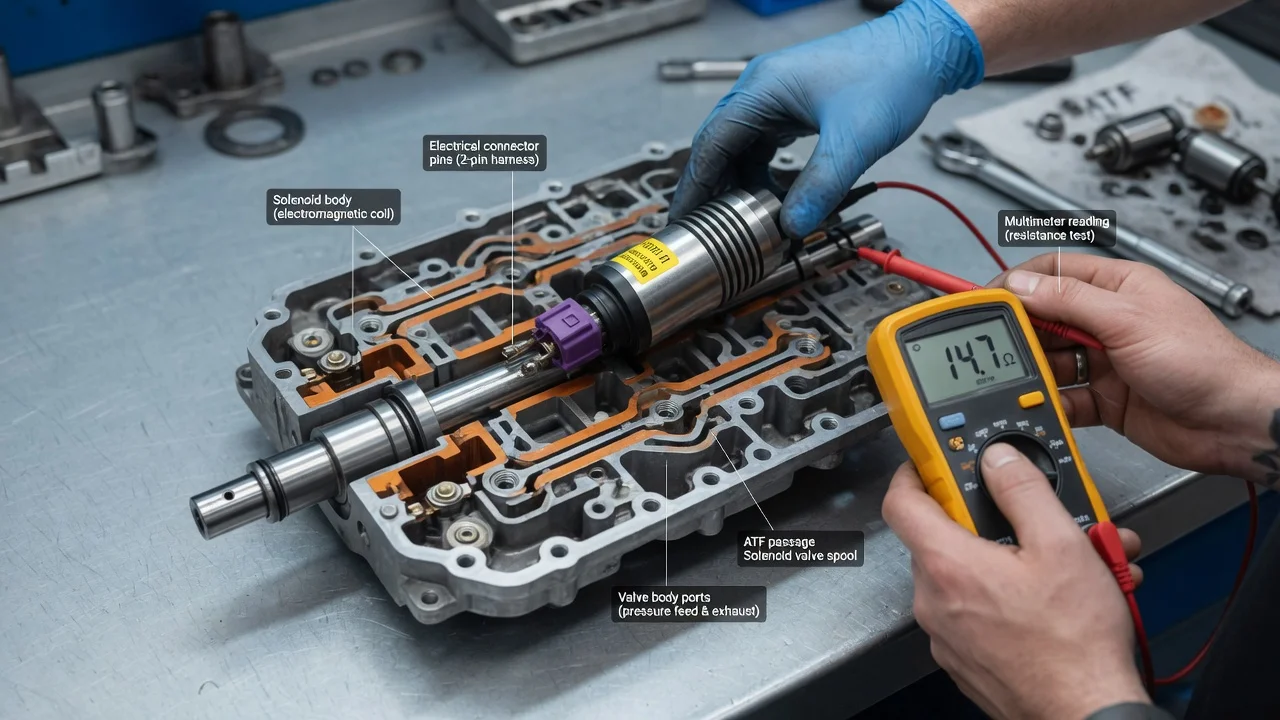
A shift solenoid is an electrically controlled valve that the transmission control module uses to route fluid pressure and select gears in many automatic transmissions. A proper test checks three things: the electrical circuit, the solenoid's response and the hydraulic result. A stored code alone is not enough. Designs differ between transmission types, so first identify your exact unit and configuration. Then work through symptoms, checks and interpretation before you buy a part.
Establish the symptoms
Start by writing down exactly what the transmission does and when it does it. Note whether the problem appears cold or only after the fluid reaches operating temperature. Note which gear change is affected, whether it happens under light throttle or heavy load, and whether it follows a stop or a highway cruise. Describe the shift behavior plainly. Examples include a harsh engagement, a delayed upshift, an engine speed flare between gears, no upshift at all, or the vehicle staying in one gear. Record any warning lights and whether the symptom comes and goes or stays constant. Also list recent changes, such as a fluid service, a battery disconnection, new parts, collision repair or wiring work near the transmission.
Next, identify the transmission. The vehicle identification number, the transmission tag or the service records can tell you the exact model. Conventional automatics, continuously variable transmissions and dual-clutch units use solenoids in very different ways. Even within conventional automatics, some use simple on/off shift solenoids, while others use pressure control or linear solenoids driven by a variable signal. Some solenoids are mounted individually. Others sit in a solenoid pack on the valve body, and some are integrated with a control module inside the case. Your service history also matters, especially the fluid type used at the last service and any previous transmission repairs.
Distinguish plausible causes
Several faults can look like a bad shift solenoid. Low fluid, degraded fluid or fluid that does not meet the required fluid specification can cause erratic or delayed shifts. That cause becomes more likely if the level is off, the fluid smells burnt or the symptoms change noticeably with temperature. Wiring and connector problems are common too. Corroded pins, chafed insulation or a loose connector often cause intermittent faults that change over bumps. They can also trigger several solenoid codes at once when the solenoids share a power feed. A single solenoid circuit code paired with a symptom that matches the gears that solenoid controls points more directly at that solenoid or its circuit.
Other causes can produce similar complaints. Worn clutch packs, a sticking valve in the valve body or a failing pump cause slipping or harsh shifts even when every solenoid is electrically healthy. Slipping under load with clean electrical results weakens the case for a solenoid fault. Faulty input or output speed sensors, a throttle position problem, low system voltage or outdated control module software can all make the module command shifts incorrectly. Keep in mind that a transmission held in a fixed gear is often a deliberate protective mode. That mode shows the module detected a problem, but it does not prove a solenoid has failed.
Checks in a useful order
Begin with checks that need no special tools. Park on level ground and check the fluid using the manufacturer's procedure. Many transmissions require a specific fluid temperature and engine state, and some sealed units have no dipstick and use a fill plug procedure that is best left to a shop. Note the fluid's color and smell and look for leaks. Inspect the visible harness and transmission connector for damage, oil intrusion or corrosion. Then scan for diagnostic codes with a tool that reads transmission module codes, not only generic engine codes. Record every code and its freeze-frame data before clearing anything.
Many enhanced scan tools display live data, including commanded gear, actual gear, solenoid commanded states and slip values. Some can also run actuator tests that command each solenoid on and off. Comparing commanded and actual values during a careful road test or a stationary test is often the most informative step. For electrical testing, use a digital multimeter with the ignition off and the connector unplugged. Measure each solenoid's resistance and compare it with the specification for your transmission, then check for any short to ground. Next, use the wiring diagram to verify the supply voltage and the module's control side at the harness.
Some tests call for specifications, special equipment or a qualified technician. Bench testing a removed on/off solenoid with a fused jumper can show whether it clicks and opens. However, pressure control and linear solenoids may not respond meaningfully to direct voltage and can be damaged by it. Line pressure testing requires a gauge, the correct port and published pressure values. Removing the pan or valve body involves hot fluid, fasteners with specific torque values and a careful refill. Never work under a vehicle supported only by a jack.
Interpret the findings
Each result answers a narrower question than it may seem. A resistance reading within specification shows the coil is electrically intact. It does not show that the valve moves freely, because debris or varnish can make a solenoid stick while it still measures correctly. An open or shorted reading points to the solenoid or the internal harness. Note where you measured: a reading at the case connector includes internal wiring, while a reading taken directly at the solenoid does not. A healthy solenoid paired with a missing supply voltage or control signal points toward wiring, a fuse, a connector or the module rather than the solenoid.
An audible click during an actuator test confirms the solenoid responds electrically, not that it controls pressure correctly. If the electrical checks pass but the shift fault remains, the next step is hydraulic and mechanical diagnosis, such as a pressure test or valve body inspection. Clutch material or metal debris in the pan suggests wear beyond a solenoid. Even after a confirmed solenoid fault, the repair may need adaptation reset or relearn procedures. A road test is also needed to confirm the original symptom is gone.
Urgency and next action
Some signs mean you should stop driving and arrange a tow. These include no engagement in drive or reverse, severe slipping with the engine revving freely, a heavy fluid leak, a burning smell, a transmission overheating warning, or being stuck in a gear that is unsafe in traffic. A protective fixed-gear mode is meant to get the vehicle off the road. It is not a basis for continued use, and how far the vehicle can safely travel cannot be predicted. Continuing to drive with slipping or overheating can turn a circuit or solenoid repair into a much larger one.
Before you visit a repair shop, gather the useful information. That includes the VIN and transmission model, all codes with freeze-frame data, your symptom notes, the fluid condition, the service history and any test results with the conditions under which you took them. Repair options may include wiring or connector repair, a single solenoid, a complete solenoid pack, a valve body or control module work. Confirm the fitment of any part by VIN or part number, because similar-looking solenoids can differ. Some replacements also require programming. Ask the technician to confirm the diagnosis before any parts are replaced.