How to Inspect Brake Pads and Measure Their Remaining Thickness
What a pad inspection decides
Brake-pad inspection is a check of the friction material still bonded to each pad’s steel backing plate. You measure that remaining thickness, compare it with the minimum published for the vehicle, and look for cracking, contamination and uneven wear. A pad at or below the specified minimum, or a pad that is damaged, oil-soaked, glazed or worn at an angle, is due for replacement. Measure only the friction material. The steel backing plate is excluded from the reading.
The discard limit is vehicle-specific. It appears in the manufacturer’s service information for that model, year and brake package, and it can differ between front and rear axles and between pad designs. A figure often seen for light-vehicle remaining friction material sits around 2 mm to 3 mm (about 0.08 in to 0.12 in). That band is a typical service range, not a universal specification. If the figure for your vehicle is unavailable, treat any pad near 3 mm as needing confirmation against the correct service data before you call it a pass. New-pad thickness is also design-dependent; many light-vehicle pads start with roughly 8 mm to 14 mm of friction material.
A look through the wheel can catch an outer pad that is already thin. An accurate remaining-thickness reading usually needs the wheel off so both the inner and outer pads are visible and a gauge or caliper can sit on the friction face. The inner pad often wears faster than the outer pad on a sliding caliper, so a thick outer pad alone is an incomplete result.
When to hand the job to a workshop
If the pedal is low, fades or pulses, the vehicle pulls under braking, a brake warning lamp is on, or you hear grinding from a backing plate on the disc, treat the vehicle as unsafe for further driveway diagnosis as a go/no-go driving decision. Those symptoms can mean a pad already at metal, a damaged disc, seized hardware or a hydraulic fault. That work belongs with a qualified technician. The same stop applies if a pad is so worn that the backing plate is marking the disc, or if the caliper must be stripped to reach a measurement.
What you need before you start
Use the service information that states the minimum pad thickness, wheel-nut torque, jacking points and any pad-wear-sensor or directional-pad notes for the exact vehicle. Equipment for a visual check and a thickness measurement:
Service information or owner documentation that gives the pad discard thickness; Flashlight; Brake-pad thickness gauge, or a steel rule or digital caliper that reads in millimetres; Wheel chocks; Jack rated for the vehicle, plus jack stands; support the raised vehicle on stands before you work at the wheel; Lug wrench and any wheel-lock key; Eye protection and gloves; A dust mask if you will be close to brake dust
Treat brake dust as a respiratory hazard. Wipe or vacuum with equipment rated for fine dust. Skip compressed air. Older linings in particular may have contained asbestos, and the safe handling rule is the same either way: keep dust down and off skin and clothing.
Screen the pads through the wheel
Park on level ground, apply the parking brake, and chock a wheel you are not raising. Turn the steering so the outer pad is visible through the spokes, or remove a wheel cover that blocks the view. Shine a light on the outer pad where the friction material meets the disc. Note remaining material, any wear-indicator tab that is close to or touching the disc, and obvious cracks or missing chunks. Repeat at the other wheels and compare pads on the same axle. A large left-to-right difference is a reason to continue with a wheel-off check.
This screening step often cannot show the inner pad. Use it to decide whether a full measurement is urgent, then move to a wheel-off check for a thickness figure you can record.
Measure remaining thickness with the wheel off
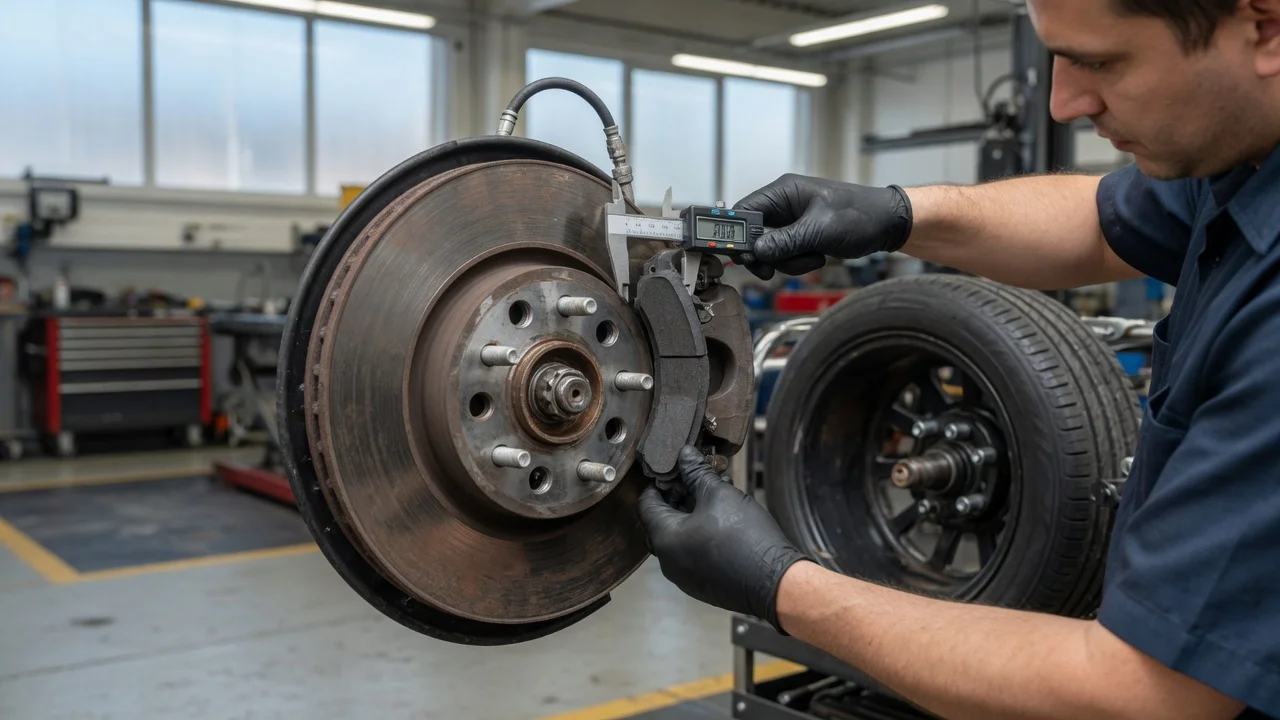
Confirm park or gear is selected, the parking brake is on, and a wheel on the opposite side is chocked. Loosen the wheel nuts slightly while the tyre is still on the ground. Raise the corner at the manufacturer’s jacking point and set it on a jack stand. Remove the wheel. Identify the inner and outer pads in the caliper. A flashlight at the inboard side of the disc is usually enough on a sliding-caliper brake. Measure the friction material at its thinnest point, from the disc-contact face back to the backing plate. Write down inner and outer readings for that wheel. Refit the wheel, lower the vehicle, and tighten the wheel nuts to the manufacturer’s torque in the specified pattern. Repeat on the other wheel of that axle, then on the remaining axle if you are inspecting a full set.
A pad thickness gauge is a stepped or slotted tool made for this measurement. Seat it against the pad so the friction material fills a marked step, then read the last step that still fits or the scale mark that lines up with the pad face. With a caliper or steel rule, close on the friction material only, with the tool parallel to the backing plate. On a tapered pad, the smallest reading is the one that counts. If a wear sensor or mechanical squealer is already in contact with the disc, record that as a replace condition even when some material remains beside the tab.
If slide pins, the caliper body or pad hardware must come apart to reach the friction face, stop the DIY measurement and have the brakes serviced. Reassembly, abutment and slide lubrication, sensor handling and hydraulic opening are qualified-service items once you leave a visual check.
Condition checks that sit beside the millimetre reading
Wear-indicator tab touching the disc, or a pad-wear warning already stored or displayed; Cracks, chunks missing, or friction material separating from the backing plate; Oil, grease or brake-fluid contamination of the lining; A glazed, glass-smooth friction face; Strong inner-to-outer or left-to-right wear on the same axle; A disc that is deeply scored, heavily rust-lipped, or already at its own discard thickness; Loose, missing or heavily corroded pad clips, or caliper slides that are dry or seized
Any of those findings is a reason to replace the pads as a complete axle set and to have the discs and calipers assessed. Match inner and outer shapes, any wear-sensor position, and directional arrows if the pads carry them. Hardware kits and disc condition are part of the same repair when the service information calls for them.
How to judge the result
At or below the manufacturer’s minimum: replace the pads on that axle and inspect the discs at the same time. Above the minimum but close, or ahead of heavy use or a long trip: schedule replacement rather than waiting for the next casual look. Well above the minimum, even wear, lining intact and hardware free: the pads can remain in service. Keep the readings with the date or mileage so the next check has a baseline. Uneven readings, contamination, noise you cannot explain, or missing discard data for the vehicle: treat the inspection as incomplete and have a workshop measure and specify the parts.
After any wheel removal, pump the brake pedal until it is firm before the vehicle moves, and confirm the parking brake still holds. A short, low-speed stop in a safe place should be straight and quiet. If it is not, keep the vehicle out of use until the brakes are inspected.
Limits of this check
This procedure covers remaining pad thickness and obvious pad, disc and hardware condition. It does not certify hydraulic-fluid condition, ABS operation, or disc thickness to a workshop standard. Minimum pad thickness, wheel-nut torque, jacking points, sensor type and whether pads are directional are all taken from the service information for the exact vehicle; those values are not interchangeable across models or brake packages. Periodic inspection programmes in some jurisdictions also set a legal remaining-thickness limit, which can differ from the manufacturer’s service limit. Use the published rule for the place the vehicle is inspected, and use the manufacturer’s figure for service replacement. Where either figure is unknown, the correct next step is to obtain the data for that vehicle or to have a qualified workshop take the measurements.