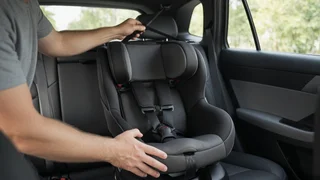
How to Install a Diono Radian 3R Rear-Facing: A Practical Guide
A rear-facing Diono Radian 3R installation comes down to four jobs. Set the correct recline for the child's age and size. Secure the seat with either the lower anchors or the vehicle seat belt. Tighten it until it barely moves at the belt path. Then adjust the harness to fit the child. The steps below explain each stage and the reasoning behind it. The seat's own manual and labels remain the final authority, because weight limits, height limits and accessory requirements vary by production date and market.
The Short Answer
To install the Radian 3R rear-facing, first set the recline. Depending on the version, this may involve the angle adjuster supplied with the seat, so the recline indicator reads correctly for rear-facing use. Then choose one installation method: lower anchors or the vehicle seat belt. Route the strap or belt through the rear-facing belt path only, press the seat firmly into the vehicle seat and remove the slack. The installation is tight enough when the seat moves less than about an inch side to side or front to back when you test it at the belt path. Finally, position the harness straps at or below the child's shoulders, buckle and tighten, and place the chest clip at armpit level.
Two qualifications change the answer for some owners. First, the Radian line has been sold in several generations, and details differ between them, including rear-facing limits, the included recline accessory and whether a top tether may be used rear-facing. Second, your vehicle's owner's manual decides which seating positions have lower anchors and how the seat belts lock. Check both manuals before you start.
What Makes the Radian 3R Different to Install
The Radian 3R is a convertible, all-in-one style seat. It works rear-facing, forward-facing with a harness and, in later stages, as a booster. It has a narrow, steel-reinforced frame and a comparatively low seat shell. That shape helps it fit in tighter back seats. It is also why recline matters so much in rear-facing mode.
The seat sits close to the vehicle cushion. Many vehicle seats slope backward, which tips a rear-facing seat too upright for a young baby. For that reason, Diono pairs the seat with an angle adjuster, a wedge-like base attachment, for rear-facing use in many configurations. Whether the adjuster is required depends on your version and the child's age or weight. The manual and the seat labels state when to use it.
Rear-facing, the seat also takes up noticeable front-to-back space. Front passengers in smaller vehicles may need to move their seats forward. Keep the vehicle's front seat from pressing hard against the car seat unless both manuals allow contact.
Before You Begin
Read the car seat manual for your seat's production date, and the child restraint section of your vehicle owner's manual. Check the labels on the seat for the rear-facing weight and height limits and the maximum child weight for lower-anchor use. Choose a seating position. Confirm it allows a car seat and that the rear-facing seat will not sit in front of an active frontal airbag. Decide between lower anchors and the vehicle seat belt. Use one method, not both, unless the manual specifically permits combining them. Have the angle adjuster ready if your version requires it for the child's stage.
Setting the Recline
Correct recline keeps a young infant's head from falling forward, which can restrict the airway. It also helps spread crash forces across the seat back. Attach the angle adjuster to the base of the seat as the manual describes, if your version and the child's stage call for it.
Place the seat rear-facing on the vehicle seat. Check the recline indicator with the vehicle parked on level ground. If the indicator shows the seat is too upright, adjust it using the method the manual allows. Depending on the version, that may be the angle adjuster or a firmly rolled towel or foam pool noodle under the front edge. Only use a towel or noodle if the manual permits it. Recheck the angle after tightening, because pulling the seat down into the cushion can change it.
Installing With Lower Anchors
Lower anchors are the metal bars in the crease of the vehicle seat. They are part of the system often called LATCH. The Radian line uses connectors that clip onto these bars, with a strap you tighten to pull the seat down.
Locate the two lower anchor bars for the chosen seating position. Route the lower anchor strap through the rear-facing belt path. The manual and the seat labels identify which path is for rear-facing use. Attach each connector to its anchor bar, with the connector facing the direction shown in the manual. Press down firmly on the seat with one hand or a knee and pull the tightening strap to remove the slack. Pulling the strap back toward the belt path, rather than straight out, often makes tightening easier. Test for movement at the belt path and recheck the recline.
Lower anchors have a weight limit. Once the child exceeds the weight printed on the seat's label for lower-anchor use, switch to a seat belt installation. Do not borrow lower anchors from neighboring seating positions unless both the vehicle and seat manuals allow it.
Installing With the Vehicle Seat Belt
A seat belt installation is equally safe when done correctly. It works in seating positions without lower anchors and remains usable after the child outgrows the lower anchor limit. Getting the seat belt routing right is the key step.
Store the lower anchor connectors in their storage area so they cannot become loose objects. Thread the lap and shoulder belt through the rear-facing belt path. Make sure the belt is flat and not twisted. Buckle the belt and confirm it is in the correct buckle for that seating position. Lock the belt. Most US vehicles have seat belts that lock when you pull the belt all the way out and let it retract. If your version of the seat has a built-in lock-off for rear-facing use, the manual explains how to use it instead. Press the seat firmly into the vehicle cushion while feeding the slack back into the retractor. Test for movement and recheck the recline.
Choosing Between the Two Methods
Factor | Lower anchors | Vehicle seat belt; Weight limit | Limited by the maximum child weight on the seat label | Usable up to the seat's rear-facing limits; Availability | Only in seating positions with anchor bars | Any position with a suitable lap and shoulder belt; Ease of tightening | Often simpler in vehicles with accessible anchors | Depends on locking the belt correctly; Common mistakes | Using lower anchors past the weight limit, twisted strap | Unlocked belt, wrong belt path, wrong buckle
Choose the method that gives you a tight, correctly angled installation in your vehicle. Neither method is inherently safer when both are done properly.
A Note on the Top Tether
In the US, the top tether is mainly used for forward-facing installations, where it reduces forward head movement in a crash. Some Diono seats in some markets have allowed a tethered rear-facing installation using a specific strap or kit. This varies by generation and region. Do not attach the tether rear-facing unless your seat's manual describes that configuration and your vehicle's manual allows it.
Checking the Installation
Movement test: hold the seat at the belt path, not at the top of the shell, and tug side to side and front to back. Movement of less than about an inch is the common benchmark. Recline check: confirm the recline indicator still reads correctly for the child's stage. Routing check: make sure the strap or belt is in the rear-facing path only, flat and untwisted. Clearance check: confirm the front seat is not pressing on the car seat in a way the manuals prohibit. Some movement at the top of the shell is normal for a rear-facing seat. The test that matters is at the belt path.
Getting the Harness Fit Right
A tight installation protects the child only when the harness fits. For rear-facing use, the shoulder straps should come from slots at or just below the child's shoulders. This keeps the child from sliding up the seat in a frontal crash.
Adjust the harness height so the straps sit at or below the shoulders, using the method your version provides. Buckle the crotch buckle and the chest clip, then tighten the harness until you cannot pinch a horizontal fold of strap at the collarbone. Slide the chest clip to armpit level. Avoid bulky coats or aftermarket inserts between the child and the harness. They compress in a crash and leave the straps loose. Use only inserts that came with the seat or that Diono approves for it.
When to Move On From Rear-Facing
Keep the child rear-facing until they reach either the rear-facing weight limit or the height limit printed on the seat. Height limits are often defined by how much shell remains above the child's head. Reaching a minimum age or weight for forward-facing does not mean the child should switch. Rear-facing supports the head, neck and spine more evenly in a frontal crash, so using the full rear-facing limits is the widely recommended approach.
Getting a Second Opinion
If the seat will not tighten, the recline will not come right or the manuals seem to conflict, a certified child passenger safety technician can check the installation in your vehicle. Many offer free inspections. They work from both manuals and can confirm that your installation and harness fit match what the seat requires.