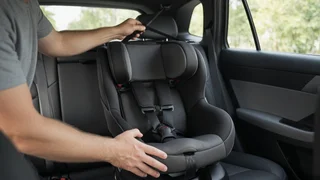
How to Install a Diono Car Seat Rear-Facing: A Practical Guide
Installing a Diono car seat rear-facing follows the same core sequence as most convertible seats. You set the seat to its rear-facing configuration, achieve the correct recline angle, secure it with either the vehicle's lower anchors or its seat belt, tighten until it barely moves at the belt path, and then adjust the harness to the child. The important qualification is that Diono has sold several Radian generations and other models over the years. Belt paths, recline accessories, lock-offs, tether options and weight limits differ between them, so the labels on your seat and the booklet that came with it decide the details for your exact model.
The Short Answer
For a rear-facing installation, use one method: lower anchors or the vehicle seat belt. Do not use both at the same time unless your seat's instructions specifically allow it. Route the anchor strap or belt through the path marked for rear-facing use, which is usually color-coded or labeled on the seat shell. Check the recline indicator, press the seat down firmly while tightening, and confirm the seat moves less than about one inch side to side or front to back when you pull at the belt path. Finally, adjust the harness so it is snug on the child.
Using a Diono Rear-Facing Installation Video
Many parents search for a Diono rear-facing installation video, and videos are useful for seeing hand placement, how to apply pressure, and where the belt path sits. Their limitation is model matching. A video made for one Radian version may show a different angle adjuster, lock-off design or belt routing than the seat in your car. Before following any video, compare the model name and manufacture details on your seat's label with the model shown on screen. If anything differs, follow the printed instructions and seat labels instead of the video.
Read the car seat section of your vehicle owner's manual as well. It tells you which seating positions have lower anchors, whether anchors can be borrowed for a center seat, and how to lock the seat belt for car seat use. A video cannot tell you those facts about your specific vehicle.
Before You Start
Confirm that your child is within the rear-facing weight and height limits printed on the seat's label. Choose a back seat position. Never install a rear-facing seat in front of an active frontal airbag. Check that the seat is in its rear-facing configuration. Some Diono models use a separate angle adjuster or recline base for rear-facing use, and some require specific parts to be attached or removed. Remove thick seat covers or aftermarket mats that the seat or vehicle manufacturer has not approved, since they can affect tightness and crash performance. Keep both manuals within reach during installation.
Choosing Lower Anchors or the Seat Belt
Lower anchors are the metal bars set into the crease of the vehicle seat. They are part of the system often called LATCH. Lower anchors and seat belts are considered equally safe when either is used correctly. The better choice is whichever gives you a tight, correct installation in your vehicle and seat combination.
Method | Advantages | Things to check; Lower anchors | Often easier to tighten and see; less reliance on belt locking | Lower anchor weight limit on the seat label; anchor availability in the chosen seat position; Vehicle seat belt | Works in positions without lower anchors; remains usable after the child exceeds the lower anchor limit | Belt must be locked using the vehicle's locking retractor or the seat's lock-off if equipped; buckle should not rest on the belt path frame
Step-by-Step Rear-Facing Installation
1) Set the recline. Attach the rear-facing angle adjuster or set the recline position your model specifies, then place the seat on the vehicle seat facing the rear of the car. 2) Check the angle indicator. Many seats have a level line or bubble indicator. The correct position may depend on the child's age or weight, so read the label. 3) Route the strap or belt. Pass the lower anchor connectors or the seat belt through the rear-facing belt path only. Make sure nothing is twisted. 4) Connect and lock. Clip the lower anchor connectors onto the anchor bars, or buckle the seat belt and lock it as your vehicle manual or seat instructions describe. 5) Tighten. Press down into the seat with your hand or knee near the belt path while pulling the tightening strap or removing slack from the belt. 6) Test movement. Grip the seat at the belt path and pull side to side and front to back. Less than about one inch of movement indicates a tight installation. 7) Recheck the angle. Tightening can change the recline, so confirm the indicator again.
What About the Top Tether?
The top tether is a strap at the back of the car seat that clips to an anchor point in the vehicle. In the US it is routinely used for forward-facing installations. Whether a tether can be used rear-facing depends on the specific Diono model and the vehicle, and the rear-facing tether method differs from forward-facing routing when it is permitted. Use a rear-facing tether only if your seat's instructions describe that method. Otherwise, stow the tether strap as directed so it does not swing loose.
Checking Rear-Facing Harness Fit
Shoulder straps should come out of the seat at or just below the child's shoulders when rear-facing. The harness should be snug. If you can pinch a horizontal fold of strap at the collarbone, tighten it more. The chest clip should sit at armpit level. Avoid bulky coats under the harness. Place a blanket over the buckled harness if extra warmth is needed. Check the child's head position against the height limit on the seat label. Many rear-facing seats specify a minimum distance between the top of the head and the top of the shell or headrest.
Common Mistakes to Avoid
Routing the belt through the forward-facing path while the seat faces rearward. Using lower anchors and the seat belt together without explicit permission in the instructions. Forgetting to lock the seat belt, which allows the installation to loosen over time. Skipping the angle adjuster or recline step on models that require it for rear-facing use. Testing tightness at the top of the seat instead of at the belt path. Keeping a child in lower anchor mode after they pass the lower anchor weight limit.
Getting a Second Check
If the seat will not tighten, the angle will not land in range, or the vehicle's seat shape makes the installation awkward, a certified Child Passenger Safety Technician can review the installation with you. Many communities offer car seat checks through fire departments, hospitals or local safety programs. A technician can confirm that your restraint installation matches both the seat's and the vehicle's instructions, which is the step a video cannot replace.