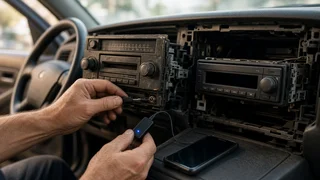
Classic Car Radio with Bluetooth: Your Options and How to Set One Up
Yes, you can have a classic car radio with Bluetooth, and you usually don't have to give up a period-correct dashboard to get it. There are three main routes: a retro-styled replacement head unit with Bluetooth built in, a hidden Bluetooth module wired into the original or a reproduction radio, or a simple add-on adapter that sends phone audio into the existing system. The right choice depends on three things: how much originality you want to keep, what your dash opening and electrical system can accept, and whether you need hands-free calling or only music streaming. Some conditions change the answer. Many older vehicles use a 6-volt electrical system, and some use positive-ground wiring. Most modern Bluetooth electronics are designed for 12-volt negative-ground systems. If your car has either feature, you need equipment specifically rated for it, or a suitable voltage converter or isolation solution. Check this before buying anything.
Key terms
Head unit: the radio or receiver mounted in the dash that controls audio sources and volume. Shaft-style radio: a radio with two control shafts that pass through separate holes in the dash, typical of many older cars. It differs from the rectangular single-DIN opening common in later vehicles. Device pairing: the one-time process in which your phone and the radio exchange identification so they can reconnect automatically later. Hands-free profile: the Bluetooth function that carries phone calls. It requires a microphone and is separate from music streaming. Interface adapter: a module that connects a phone or other source to a radio that was never designed for it, often through an auxiliary input or a modified internal circuit.
Your three main options
1) Retro-style head unit with built-in Bluetooth
These units are built to look like vintage radios, with chrome faceplates, push buttons or rotary knobs, while containing modern internals such as Bluetooth streaming, hands-free calling and often USB or auxiliary inputs. Many are offered in shaft-style or single-DIN formats, and some are made with faceplates styled for particular makes or eras. This is usually the most integrated solution, because pairing, call handling and volume all run through one device.
The trade-off is originality. Even a convincing reproduction replaces the factory radio, so keep the original unit and its knobs if the car's value or authenticity matters to you. Fitment also varies: confirm that the shaft spacing, depth behind the dash and knob style match your vehicle before ordering.
2) Hidden Bluetooth module behind the original radio
If you want the dash to stay exactly as it left the factory, a concealed Bluetooth receiver can feed audio into an amplifier and speakers while the original radio remains in place. Some specialists also restore or modify original radios internally, adding Bluetooth while keeping the factory faceplate and controls. These approaches preserve the look, but control is often limited. You may need to select tracks and adjust some settings from the phone, and the original radio may need a switch or a modification to choose between broadcast reception and Bluetooth input.
3) Add-on adapters
The simplest options are a Bluetooth receiver plugged into an existing auxiliary input, or an FM transmitter that broadcasts phone audio to a frequency your radio can tune. An FM transmitter needs no wiring into the radio, but sound quality depends on finding a clear frequency, and it only works if the radio receives FM. Many early classics have AM-only radios, which rules this method out. Adapters are the least invasive and easiest to reverse, but call quality and integration are usually the weakest of the three routes.
Option | Keeps original look | Hands-free calls | Installation effort | Reversibility; Retro-style Bluetooth head unit | Look-alike only | Usually built in | Moderate | Good if original radio is kept; Hidden module or modified original radio | Yes | Depends on module and microphone | Moderate to high | Varies with the modification; Aux receiver or FM transmitter | Mostly | Limited or none | Low | Very easy
Before you buy: compatibility checks
Electrical system: confirm voltage (6V or 12V) and ground polarity (positive or negative). Check the wiring diagram or have a qualified technician confirm it if you are unsure. Dash opening: measure the shaft spacing and hole sizes for a shaft-style dash, or confirm whether the car has a single-DIN opening. Check the available depth behind the dash. Speakers and impedance: original speakers may not suit a modern amplifier. Many classics also have only one dash speaker, so decide whether you will keep it, add speakers or use under-dash or kick-panel units. Antenna: if you want radio reception, confirm the new unit works with your antenna connector, or plan for an adapter. Phone software compatibility: most phones pair with any standard Bluetooth receiver. Features such as track information display or voice assistant access depend on the unit and the phone, so confirm them in the product information if they matter to you. Call requirements: if you want hands-free calling, make sure the unit supports it and includes or accepts an external microphone.
Steering wheel interface modules, which let factory wheel buttons control a modern stereo, are common in later vehicles but rarely relevant to classics. Most older cars have no wheel-mounted audio controls. If your vehicle has been modernized with such controls, check whether the new head unit supports a steering wheel adapter before assuming it will work.
Installation outline
Exact steps depend on the car and the unit, so follow the installation instructions supplied with your equipment. The general sequence looks like this.
1) Disconnect the battery before touching any wiring. 2) Remove the original radio carefully. Label its wires and store it with its knobs and hardware. 3) Identify the constant power, switched (ignition) power, ground, speaker and antenna connections. 4) Wire the new unit or module. Use proper connectors and fit an inline fuse on the power feed if one is not already present. 5) Mount the microphone for hands-free calls where it will pick up your voice and avoid road and wind noise. Locations near the headliner, sun visor or top of the steering column are common choices. 6) Reconnect the battery and test before fully reassembling the dash.
Older wiring can be brittle and may have been modified by previous owners. If insulation is cracked or connections look improvised, address that first. If you are not comfortable with automotive wiring, a professional installer is the safer choice, especially on a 6-volt or positive-ground car.
Pairing your phone
1) Turn the ignition to accessory or on so the unit is powered. 2) Put the radio or module into pairing mode. This may happen automatically on first power-up, or it may require a button press or menu selection described in its manual. 3) Open the Bluetooth connection settings on your phone and look for the unit's name in the list of available devices. 4) Select it and confirm any passcode or on-screen prompt. 5) Allow access to calls and contacts if you plan to use hands-free calling. 6) Play audio and adjust the volume on both the phone and the radio.
If the unit doesn't appear on your phone, switch Bluetooth off and on, make sure the unit is still in pairing mode, and remove any old or unused paired devices from the radio's memory if it has a limit.
Verifying the result
Automatic reconnection: turn the car off, wait, and restart. The phone should reconnect without re-pairing. Music streaming: play audio at low and high volume and listen for distortion, hiss or dropouts. Call audio: make a test call while parked and again while driving. Ask the other person whether your voice sounds clear and whether road noise is a problem. Charging-system noise: listen for a whine that rises and falls with engine speed. This usually points to a grounding or power-feed issue and may need a better ground point or a noise filter. Battery drain: if the car will sit for long periods, confirm the unit does not draw significant power with the ignition off. Some classic owners use a battery disconnect or maintainer during storage. Radio reception: if the unit includes AM or FM, check that stations come in as expected.
Choosing your next step
If you want the best everyday usability and hands-free calls, a retro-style Bluetooth head unit that fits your dash is usually the most practical choice. Keep the original radio stored safely. If originality is the priority, consider a hidden module or a professionally modified original radio, and accept some loss of on-dash control. If you only want occasional music and the least intrusive change, an auxiliary Bluetooth receiver or, for FM-capable radios, an FM transmitter is a low-commitment starting point. Whichever route you choose, confirm voltage, ground polarity and physical fitment first. Those three checks prevent most problems with adding Bluetooth to a classic car.