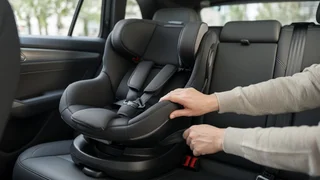
How to Install a Chicco NextFit Rear-Facing With a Seat Belt
Yes, you can install a Chicco NextFit rear-facing with your vehicle's seat belt instead of the lower anchors (LATCH). A correct seat belt installation is considered just as safe as a correct LATCH installation. What matters is that the seat is at the right recline angle, the belt runs through the rear-facing belt path, the belt is locked, and the seat moves very little once installed. This guide explains the general process and the checks that confirm a good fit. The exact belt path markings, lock-off design and recline settings can differ between NextFit versions, such as the original NextFit, NextFit Zip, NextFit Sport and NextFit iX, so your car seat manual and your vehicle owner's manual remain the final authority for your setup.
When a seat belt installation makes sense
Parents often choose a seat belt installation for the NextFit rear-facing for one of three reasons. First, the preferred seating position, often the center rear seat, may not have dedicated lower anchors. Second, the child and seat together may exceed the lower anchor weight limit listed on the car seat label and in both manuals. Third, some vehicles simply produce a tighter, more stable fit with the belt than with LATCH. In each case the goal is the same: a firm, level installation that follows both the car seat and vehicle instructions.
Use either the seat belt or the lower anchors, not both at once, unless your specific NextFit manual explicitly allows it. Before starting a seat belt install, stow the LATCH connectors in their storage location so they cannot rattle loose or interfere with the belt path.
Choose the seating position and check the airbag
A rear-facing seat must never be placed in front of an active frontal airbag. In most vehicles that means the rear seat is the only acceptable location. The front passenger airbag's deployment zone is directly where a rear-facing shell would sit, and an inflating airbag can strike the back of the car seat with great force.
Some vehicles use an occupant classification system that feeds information to the restraint control module, the computer that decides whether airbags and seat belt pretensioners fire based on impact sensor data. A passenger airbag warning indicator showing the airbag is off is not a substitute for following your vehicle owner's manual, which may still prohibit rear-facing seats up front. Treat the rear seat as the default and confirm any exceptions in the vehicle-specific instructions.
Also check your vehicle manual's child restraint section for positions where seat belt installation is not allowed, such as seats with inflatable seat belts, unusual belt geometry or belts that cannot be locked.
Understand how the belt is locked
A seat belt only holds a car seat tightly if it is locked so it cannot loosen during driving. There are two common ways to do this.
Locking method | How it works | What to know for the NextFit; Car seat lock-off | A clamp built into the car seat holds the belt in place once it is tightened. | Many NextFit versions include built-in belt lock-offs. Use the one designated for rear-facing, as described in your manual. Vehicle retractor lock (ALR) | On many US vehicles, pulling the shoulder belt all the way out switches the retractor into a locking mode that only lets the belt retract, not extend. | Your NextFit manual specifies whether to lock the retractor when using the lock-off, or only one method. Follow that instruction. Latch plate lock | Some belts lock at the buckle tongue when tightened. | Check your vehicle manual to see whether your belts work this way.
Do not modify the seat belt, clip it with aftermarket devices or alter the buckle stalk. The belt, its retractor and its pretensioner are part of the vehicle's crash protection system and are designed to work as built.
Step-by-step: Chicco NextFit seat belt installation, rear-facing
1) Read the rear-facing seat belt section of your NextFit manual and the child seat section of your vehicle manual before you begin. 2) Stow the LATCH connectors in their storage spots on the seat. 3) Set the recline to a rear-facing position. The NextFit uses an adjustable recline system and a bubble level indicator. Choose a recline setting that the manual permits for rear-facing use. 4) Place the seat rear-facing on the vehicle seat, pressed against the vehicle seat back as the manual directs. 5) Locate the rear-facing belt path. Depending on the version, you may need to open a cover or lift part of the seat pad to reach it and the lock-off. Belt paths are usually labeled or color-coded on the seat. 6) Route the vehicle's lap and shoulder belt through the rear-facing belt path and buckle it. Make sure the belt is flat and not twisted anywhere along its length. 7) Open the rear-facing lock-off and position the belt in it as the manual shows. 8) Remove slack: press down firmly into the seat with your hand or knee while pulling the shoulder belt to tighten the lap portion. Feed the slack back toward the retractor. 9) Close the lock-off while keeping tension on the belt. If your manual also calls for locking the retractor, do so now. 10) Recheck the bubble level indicator. If the seat is outside the rear-facing range, loosen the install, adjust the recline and repeat the tightening steps.
Check that the installation is tight
The standard test is to hold the car seat at the belt path, not at the top of the shell, and try to move it side to side and front to back. A properly installed seat should move less than one inch in any direction at the belt path. Movement at the top edge of a rear-facing seat is expected and does not indicate a loose install.
If the seat moves more than that, the most common causes are slack left in the lap portion, a belt that was not held tight while the lock-off was closed, or a twisted belt. Unlock, reposition and tighten again rather than trying to pull the belt tighter after the lock-off is closed.
Common problems and how to approach them
Bubble level out of range: change the recline setting first. Use rolled towels or pool noodles under the seat only if your NextFit manual specifically permits them. Buckle stalk sits in the belt path: try a different seating position or check whether the manual allows a particular routing. Do not let the buckle rest on the frame edge of the car seat in a way that could stress it. Belt loosens over time: confirm the belt is actually captured in the lock-off and, if required, that the retractor is locked. Seat touches the front seat back: some contact may or may not be allowed. Check both manuals before relying on it. Seat feels stable but tilts: recheck that the seat is pushed back against the vehicle seat and that the recline is set before tightening.
Securing your child after installation
Once the seat is installed, adjust the harness for rear-facing use. For rear-facing, harness straps should come from slots at or just below the child's shoulders. Buckle the harness, position the chest clip at armpit level, and tighten until you cannot pinch a horizontal fold of strap at the collarbone. Avoid bulky coats under the harness, since they compress in a crash and leave the straps loose.
Bottom line
A Chicco NextFit rear-facing seat belt installation comes down to four things: a rear seating position away from active frontal airbags, the belt routed through the rear-facing path without twists, the belt locked the way your manual specifies, and less than one inch of movement at the belt path with the level indicator in range. Because lock-off design, labels and recline settings vary across NextFit versions, keep both manuals at hand while installing. If you are unsure about the result, a certified child passenger safety technician can review your installation in person.