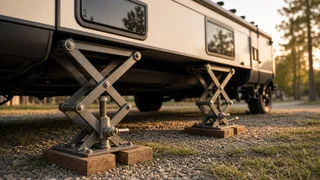
Jack Stands for an RV Slide-Out: What to Check Before You Buy
Slide-out support stands can reduce bounce and movement in an extended RV slide-out, but they are not a requirement for every rig and they are not meant to lift or level anything. If your RV manufacturer or slide-out system maker says the room should not be supported from below, follow that guidance. If supports are allowed, choose stands that adjust finely, rest on a stable base, contact a solid structural point, and are only snugged up rather than jacked tight. Remove them before you retract the room.
The short answer
Most slide-outs are designed to be cantilevered, meaning the room extends out from the coach and is held by its own mechanism and the coach structure without needing support at the outer edge. Owners often add stands anyway because a supported slide can feel more solid underfoot, especially in larger rooms with heavy furniture or when people walk across the slide floor. That is a comfort benefit, not a structural fix.
Two conditions change the answer. First, some manufacturers advise against supporting the slide, or allow it only with specific placement, because pushing upward can stress the slide mechanism, seals or the room frame. Second, if your RV uses an automatic leveling system that can re-level while the room is out, a fixed stand under the slide may fight that movement. Check the manufacturer instructions for both the coach and the leveling system before buying.
Why automotive jack stands are usually a poor fit
Searches for jack stands for an RV slide-out often mean ordinary automotive jack stands, the ratcheting type used to hold up a car during service. They can physically fit under a slide, but they have drawbacks for this job. Their height adjusts in fixed notches, so you may not be able to reach a snug fit without either leaving a gap or forcing the room upward. Their small saddle top is shaped for vehicle frames and pinch welds, not the underside of a slide-out room. Their feet are often sized for garage concrete rather than gravel, dirt or grass.
Dedicated slide-out supports typically use a threaded screw or a telescoping tube with a fine-adjust collar, a broader base, and a flat or padded head. That combination makes it easier to bring the stand into light contact without loading the room.
Common support types compared
Type | How height is set | Strengths | Watch for; Dedicated screw-adjust slide stand | Threaded post, turned by hand or crank | Fine adjustment, purpose-made head | Check minimum and maximum height against your slide; Telescoping stand with pin and fine-adjust collar | Coarse pin setting plus screw or collar | Quick setup across a wide height range | Pin hole spacing and quality of the locking collar; Automotive ratchet jack stand | Fixed notches | Widely available, sturdy for vehicle use | Coarse adjustment, small top, small footprint; Permanently mounted slide stabilizer | Attached to the slide or coach, deployed when parked | Always on board, consistent placement | Requires installation and compatibility with your slide design
What to check when choosing slide-out support stands
Height range
Measure the distance from the ground to the underside of your extended slide at the points where you would place a stand, and do it on a few sites if you can, since that gap changes with terrain and how the coach is leveled. The stand's adjustable range should cover that distance with some margin at both ends. A stand that is almost fully extended is usually less stable than one working in the middle of its range.
Load rating
A load rating tells you how much weight the stand is built to hold. Because a slide support should be carrying only a small share of the room's weight, a high rating mainly signals sturdy construction rather than a target to use. Prefer products that state a clear rating, and treat an unrated stand with caution. Do not use the rating as permission to put the room's weight on the stand.
Adjustment precision
The goal is light contact. A screw or fine-adjust mechanism lets you turn the stand up until it just touches, then stop. Coarse notches make it harder to avoid either a gap, which provides no benefit, or too much pressure, which can stress the slide.
Base and ground stability
Ground stability matters as much as the stand itself. On soft soil, sand or wet grass, a narrow foot can sink or tilt over time. Look for a wide base, or plan to use a solid pad underneath. Recheck stands after rain or after the first night, since ground can settle.
Head design and support point
The support point should be a structural part of the slide-out, typically the frame or a reinforced section of the room's underside, not a thin floor skin, plastic trim, wiring, or the slide mechanism itself. A flat head or rubber pad spreads contact and helps avoid denting or scuffing. If you cannot identify a solid point on your slide, that is a reason to consult the coach manufacturer before adding supports.
Number of stands
Owners commonly use a pair under each slide, placed toward the outer corners, but the right number and position depend on the room's size and construction. Buying more stands than the manufacturer's guidance supports does not add safety.
Materials, weight and storage
Steel stands tend to be strong and heavier; aluminum stands are lighter to carry and store. Look for corrosion-resistant finishes if you camp in humid or coastal areas or store gear in an exterior bay. Consider how much cargo weight you are adding and where the stands will ride when you travel.
How stands fit with your leveling system and stabilizers
Slide supports come last in the setup order. Level the coach first using blocks, manual jacks or the onboard leveling system, then deploy the main stabilizers, then extend the slide, and only then set the slide stands to light contact. Using a slide stand to correct an unlevel coach puts the load in the wrong place.
Stabilizer mounting on the frame and slide supports do different jobs. Frame stabilizers reduce rocking of the whole coach; slide stands only reduce flex at the extended room. If your coach moves a lot, improving the main stabilizers often helps more than adding slide supports. With powered leveling systems, check whether the system adjusts while slides are out and whether it recommends removing slide supports before any re-leveling.
Mistakes to avoid
Raising the slide with the stand instead of stopping at light contact. Retracting the slide with stands still in place, which can damage the room, seals or mechanism. Placing stands under trim, skirting, wiring or the slide mechanism instead of a structural point. Setting stands on soft ground without a pad, then not rechecking them. Using slide stands as a substitute for proper leveling or main stabilizers. Ignoring manufacturer instructions that limit or prohibit slide supports.
Quick buying checklist
Your RV and slide-out system allow supports, and you know where they may be placed. The stand's height range covers your measured gap with margin. Adjustment is fine enough to reach light contact without forcing. A stated load rating and sturdy construction. A wide base or a plan for ground pads. A flat or padded head suited to your slide's support point. Weight, size and corrosion resistance that suit how you travel and store gear. A reminder system, such as a tag on the slide switch, so stands are removed before retraction.
Next step
Start by confirming in your owner's information whether slide supports are recommended, allowed or discouraged for your model and slide system. If they are allowed, measure the ground-to-slide gap at your usual campsites, identify a solid support point, and compare dedicated adjustable stands against that height and placement. If the slide still feels unstable with proper leveling and stabilizers in place, have the slide mechanism and coach stabilizers inspected rather than relying on stands to compensate.