How to Grease a Driveshaft U-Joint: Steps, Checks and Limits
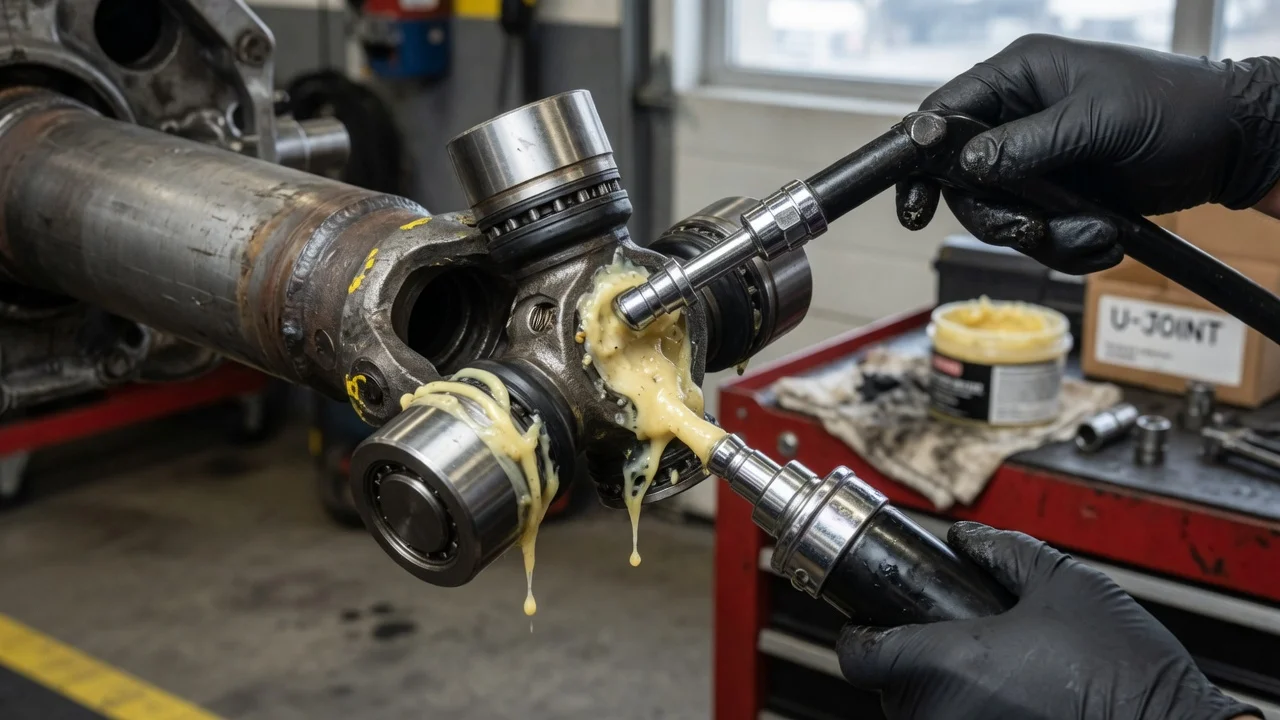
A universal joint lets the driveshaft carry power while the suspension moves and the angle between the transmission and axle keeps changing. If your joints have grease fittings, greasing them is one of the simplest ways to protect them. This guide explains how to grease a U-joint correctly, how to tell whether yours can be serviced at all, and what fresh grease can and cannot fix.
The Short Answer
If the U-joint has a grease fitting, clean the fitting, attach a grease gun loaded with the grease your manufacturer specifies, and pump slowly until fresh grease appears at all four bearing cap seals. Then wipe away the excess. If there is no fitting, the joint is a sealed design lubricated at the factory, and it cannot be greased in normal service. In that case the job is inspection, and replacement when the joint wears out.
Two qualifications matter. First, how often to grease comes from the maintenance schedule for your specific vehicle, not from a universal mileage figure. Second, grease only protects a healthy joint. It does not restore bearings that already have play, rust damage or a notchy feel.
How a U-Joint Uses Grease
A typical driveshaft U-joint is a cross, often called a spider, with four polished trunnions. Each trunnion rides in a ring of needle bearings inside a cap pressed into the yoke. As the shaft turns at an angle, the needles do not spin continuously like a wheel bearing. They rock back and forth through a short arc under heavy load, so they depend on a film of grease that stays in place. Seals on each cap hold that grease in and keep water and dirt out.
In a greasable joint, the cross is drilled with passages that run from the central fitting out to each trunnion. New grease pushed in through the fitting travels to every bearing and forces old grease, moisture and fine debris out past the seals. That visible purge is how you know each cap received fresh lubricant. When grease breaks down or water gets in, the needles and trunnions start to rust and wear, and the joint develops play that eventually shows up as noise or vibration.
What Changes the Answer
The biggest difference is sealed versus serviceable. Many factory joints have no fitting at all. Some trucks, four-wheel-drive vehicles and replacement joints have a fitting on the center of the cross, and a few place it in a bearing cap. Some fittings face toward the shaft and can only be reached with the driveshaft rotated to a particular position. Front driveshafts on some 4x4s use a double cardan joint, which may have an additional fitting for the centering ball. A slip yoke or slip spline may have its own fitting, or it may be lubricated by transmission fluid instead, so check how your vehicle is built before assuming every fitting is a U-joint.
Operating conditions also change the picture. Water crossings, mud, salted winter roads, towing, frequent off-road driving and lifted suspensions with steeper driveshaft angles all work the joints harder or wash grease out faster. Many manufacturers publish a separate severe-service schedule for these situations, so look for it in your owner's manual. The grease itself should match what the manufacturer or joint maker calls for, since not every grease is suitable and different thickener types are not always compatible with each other.
Step by Step: Greasing a U-Joint
Park on level ground, set the parking brake and chock the wheels. If you need more clearance, lift the vehicle with a proper jack and support it on rated jack stands; never work under a vehicle held only by a jack. To rotate the driveshaft and reach a hidden fitting, you may need to shift to neutral with the wheels firmly chocked or have one drive wheel off the ground, so make sure the vehicle cannot roll before you do. Wipe the fitting clean so dirt is not pushed into the joint, and check that it is not cracked or bent.
Pump a little grease out of the gun first to clear any air, then press the coupler straight onto the fitting and pump slowly. Watch all four caps. Fresh grease should begin to appear at each seal, often looking cleaner than the old grease it pushes out. Tight fittings may require a 90-degree adapter, a flexible hose or a needle-style tip. If grease squirts out around the coupler rather than into the joint, the coupler is not seated or the fitting is faulty and should be replaced.
If one cap will not purge, the load on that side may be holding its seal closed. Rotate the shaft to a new position, move it gently by hand, and try again rather than forcing more pressure, which can blow out a seal. When every cap has purged, wipe away the excess so it does not collect dirt and so new leakage is easy to spot later. Repeat for each joint on the vehicle, including the front driveshaft, any centering ball fitting and the slip yoke fitting if one is present.
What to Check While You Are Under There
Greasing is a good moment for a quick inspection. Before adding grease, grab the driveshaft near each joint and try to twist and lift it. A healthy joint feels solid, while any clunk or movement inside the joint itself suggests worn bearings. Also look for rust-colored dust around the caps, dried or torn seals, and a joint that feels notchy or binds when you rotate the shaft. On the road, common warning signs include a clunk when shifting into drive or reverse, vibration that grows with speed, and a chirp or squeak at low speed.
Fresh grease may quiet a dry squeak for a while, but it will not remove play that is already there. Keep a short note in your service history with the date, mileage, which joints took grease, and any cap that refused to purge. Over several services, that record makes it easier to see when a joint is starting to fail rather than guessing.
Limitations and Next Step
This guide cannot give you a grease specification or interval for your vehicle, because both depend on the exact vehicle configuration, drivetrain and how it is used. Check the manufacturer specifications and maintenance schedule for your model, and follow the joint maker's instructions if your joints are aftermarket replacements.
Have a professional inspect the driveshaft if a joint will not accept grease after reasonable attempts, if you feel any play, or if vibration or clunking continues after service. Replacing a U-joint involves pressing bearing caps in and out, and a driveshaft that is reinstalled out of phase or damaged during removal can vibrate badly. A joint that fails completely can let the driveshaft drop, which can cause serious damage and loss of control, so worn joints are worth addressing promptly.