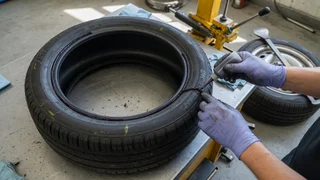
How to Apply Tire Bead Sealer
A slow leak at the wheel rim can often be traced to corrosion, light pitting, or a small irregularity where the tire sidewall meets the barrel. Tire bead sealer is a thick rubber-forming compound designed to fill those tiny voids and create a more reliable air seal during mounting. Applying it correctly matters because too little material may not close the leak path, while heavy or uneven application can make future dismounting difficult. The right approach is to use bead sealer as a targeted mounting aid, not as a substitute for cleaning damaged surfaces or correcting an incorrect tire-to-wheel fit.
Direct answer
The essential method is to clean the wheel’s bead seat thoroughly, inspect the tire bead for damage, and apply a thin, even layer of bead sealer to the wheel’s bead area immediately before seating the tire. Work in one continuous pass around the rim with a brush, swab, or applicator tip, keeping the coating wet enough to fill minor porosity and scratches without sagging into the tire cavity. The sealer remains pliable during inflation and spreads as the bead slides into position, helping correct a persistent rim leak at the tire-to-wheel junction.
Bead sealer is most appropriate for minor corrosion pitting, light scratches, or porosity on an otherwise sound wheel. It does not repair a bent flange, cracked barrel, badly corroded bead area, or a tire with a cut or deteriorated bead bundle. The seal depends on adequate inflation pressure, a compatible tire size for the rim width, and clean contact between the bead toe and the bead seat. If the wheel surface continues to shed scale or the leak returns after a proper application, the sealing problem may require wheel refinishing or replacement rather than additional sealer.
How to proceed
Begin by safely supporting the vehicle and removing the wheel and tire assembly. Deflate the tire completely and break both beads away from the rim flanges using appropriate tire service equipment. Inspect the bead seat around the full circumference of the wheel. Remove loose corrosion, old rubber residue, and dried sealer with a wire brush or abrasive pad, then wipe the area with a dry cloth so the sealer can bond directly to the metal. Check the tire’s bead area for cuts, cracks, or embedded debris that would prevent a clean seal.
Apply a thin, continuous coat of bead sealer to the cleaned bead seat area on both sides of the wheel, or directly to the tire bead toe if the product instructions permit that method. Avoid letting excess material run onto the tread or into the valve stem opening. Mount the tire onto the wheel immediately while the sealer is still tacky, then inflate in brief controlled bursts while watching the bead progress toward the rim flange. Once both beads are seated, set the cold inflation pressure to the value shown on the vehicle placard or tire information label, then recheck the rim area with soapy water for bubbles and verify that the tire holds pressure before reinstalling the wheel.