Graco Extend2Fit Installation With a Seat Belt: Rear-Facing and Forward-Facing Guide
Yes, the Graco Extend2Fit convertible car seat can be installed with the vehicle seat belt instead of the lower anchors (LATCH). A correct seat belt installation is considered just as safe as a correct LATCH installation. The basic method is to route the lap and shoulder belt through the correct belt path, lock the belt, and tighten it until the seat moves less than about one inch at the belt path. The details change depending on whether the seat is rear-facing or forward-facing, which version of the Extend2Fit you have, and how your vehicle's seat belts lock. This guide covers the general process. Your seat's own manual and labels, and your vehicle owner's manual, take priority wherever they differ.
Seat belt or LATCH: which should you use?
Use one method or the other, not both at the same time, unless your seat's manual specifically allows combining them. Graco's general instructions for its convertible seats call for one attachment method. Choose whichever gives you a tight, correctly angled installation in your vehicle.
Situations where a seat belt installation is the better choice or the only option: • The child's weight plus the seat's weight exceeds the lower anchor limit printed on the seat's labels. Many children outgrow LATCH use before they outgrow the seat. • You want to install the seat in a center seating position that has no dedicated lower anchors. Do not borrow the inner anchors from the outboard seats unless both the vehicle manual and the seat manual permit it. • The lower anchors in your vehicle are hard to reach, or they do not let you get the seat tight. • You are installing the seat in a vehicle that has no lower anchors, such as an older car or some rideshare and rental situations.
Before you start
• Check the labels on the side of the seat for the rear-facing and forward-facing height and weight limits that apply to your specific model. Limits vary between Extend2Fit versions, such as the standard convertible and the 3-in-1. • Find out how your vehicle's seat belt locks. Most modern US vehicles have a switchable retractor in the rear seats. Some belts lock at the latch plate instead. Your vehicle owner's manual describes this in its child restraint section. • Check whether your vehicle has inflatable seat belts in the rear. Some vehicles offer these, and not all car seats are compatible with them. Your vehicle manual and seat manual will say whether they can be used together. • Remove the lower anchor connectors from use. Store them in their designated storage spots on the seat so they cannot rattle loose or interfere with the belt. • Choose the seating position. The back seat is the right place for a child seat. Never put a rear-facing seat in front of an active front passenger airbag, because the airbag deploys directly into the space where the back of the car seat sits.
Rear-facing installation with a seat belt
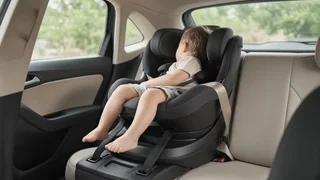
Rear-facing is the mode most Extend2Fit owners use, since the seat is designed around extended rear-facing. Its adjustable extension panel adds legroom for taller children. The rear-facing belt path runs through the base of the seat, near the child's legs. It is typically marked with blue color-coded labels. Confirm this against the markings on your seat.
1) Set the recline position the manual specifies for rear-facing use. Then place the seat rear-facing on the vehicle seat. 2) Adjust the extension panel to the position you want before tightening the belt. Moving it afterward can loosen the installation. 3) Route the vehicle lap and shoulder belt through the rear-facing belt path. Make sure the belt is not twisted, then buckle it. 4) Lock the belt. With a switchable retractor, pull the shoulder belt all the way out until it stops, then let it feed back in. You should hear a ratcheting sound, and the belt should no longer pull out. If your vehicle locks at the latch plate, follow the vehicle manual's procedure instead. 5) Press down firmly into the seat with your hand or knee. While pressing, feed the slack back into the retractor, pulling the lap portion tight first and then the shoulder portion. 6) Check the recline indicator on the side of the seat. The level line or indicator must show the correct range for the child's age and weight. If it does not, uninstall the seat, change the recline setting, and reinstall it. 7) Do the tightness test described below.
Graco's US instructions for its convertible seats generally do not call for a top tether in rear-facing mode. Follow your manual on this point rather than habits carried over from other brands.
Forward-facing installation with a seat belt
The forward-facing belt path runs behind the child's back, through the seat shell. It is typically marked with orange or red labels. Move the seat to forward-facing only after the child has exceeded the rear-facing limits or meets the minimums your seat's labels set for forward-facing. Many safety experts recommend staying rear-facing as long as the seat allows.
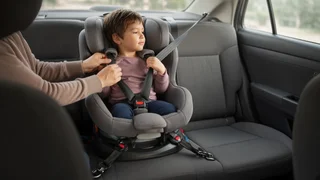
1) Set the recline position specified for forward-facing use. This is usually more upright than the rear-facing settings. 2) Adjust the harness to the correct forward-facing height, at or above the child's shoulders. Doing this before installation is easier on some versions. 3) Route the lap and shoulder belt through the forward-facing belt path behind the seat pad. Buckle it and lock it as described above. 4) Press the seat down and back into the vehicle seat while removing all slack from the belt. 5) Attach the top tether to the vehicle's designated tether anchor and tighten it. The tether reduces how far the child's head moves forward in a crash. Use it in every forward-facing harnessed installation, whether you installed with the seat belt or with LATCH. Your vehicle manual shows where the tether anchors are. Do not confuse them with cargo hooks. 6) Do the tightness test.
Rear-facing vs. forward-facing at a glance
Step | Rear-facing | Forward-facing; Belt path location | Through the base, near the child's legs | Behind the child's back, through the shell; Typical label color | Blue | Orange or red; Recline | Rear-facing range shown on the indicator | More upright forward-facing setting; Top tether | Generally not used per Graco US instructions | Always use it; Belt locking | Required | Required
How to check that the installation is tight
Hold the seat at the belt path, the spot where the vehicle belt passes through it, not at the top of the seat. Pull side to side and front to back with about the force of a firm handshake. The seat should move less than one inch in any direction. Some movement at the top of a rear-facing seat is normal and does not mean the installation has failed. Recheck tightness periodically, because belts can loosen slightly over time.
Once the child is in the seat, check the harness as well. The chest clip should sit at armpit level. You should not be able to pinch a horizontal fold of harness webbing at the child's collarbone. That check is often called the pinch test.
Common seat belt installation mistakes
• Forgetting to lock the belt. An unlocked belt lets the seat shift in normal driving. Your vehicle's seat belt pretensioner only tightens the belt during a crash, so it does not replace locking the belt for a child seat. • Using the wrong belt path for the direction the seat faces. • Using LATCH and the seat belt together when the manual does not allow it. • Leaving a twisted belt in the belt path. • Buckle crunch. This happens when the vehicle's buckle stalk sits against the car seat's frame or bends over the edge of the belt path. If you can't get the buckle into a flat, straight position, try another seating position or consult a certified technician. • Getting the recline wrong. Correct belt tension does not make up for a recline outside the indicator's range. • Skipping the top tether in forward-facing mode.
Airbags, sensors and vehicle-specific considerations
Modern vehicles use a restraint control module that reads impact sensors and decides when to fire airbags and seat belt pretensioners. In many vehicles, the front passenger seat also has an occupant classification sensor. It may switch the passenger airbag on or off and show a warning indicator on the dash. Do not rely on that system to make a front-seat rear-facing installation acceptable. Keep child seats out of airbag deployment zones as your vehicle manual directs, and use the back seat. If your vehicle has unusual belt hardware, such as inflatable belts or rear belts without a switchable retractor, the vehicle-specific procedure in the owner's manual is the authority.
When to get hands-on help
If the seat won't tighten to less than one inch of movement, or the recline indicator won't reach the correct range, get hands-on help. The same applies if your vehicle's belt geometry seems to fight the belt path. A certified Child Passenger Safety Technician (CPST) can check the installation in your specific vehicle. Many fire stations, hospitals and community safety programs in the US offer free car seat checks. Also check the manual that came with your seat, since instructions can differ between Extend2Fit versions and production years.