Brake Pad Clips: How to Install Replacement Hardware
What brake pad clips are and why they get replaced
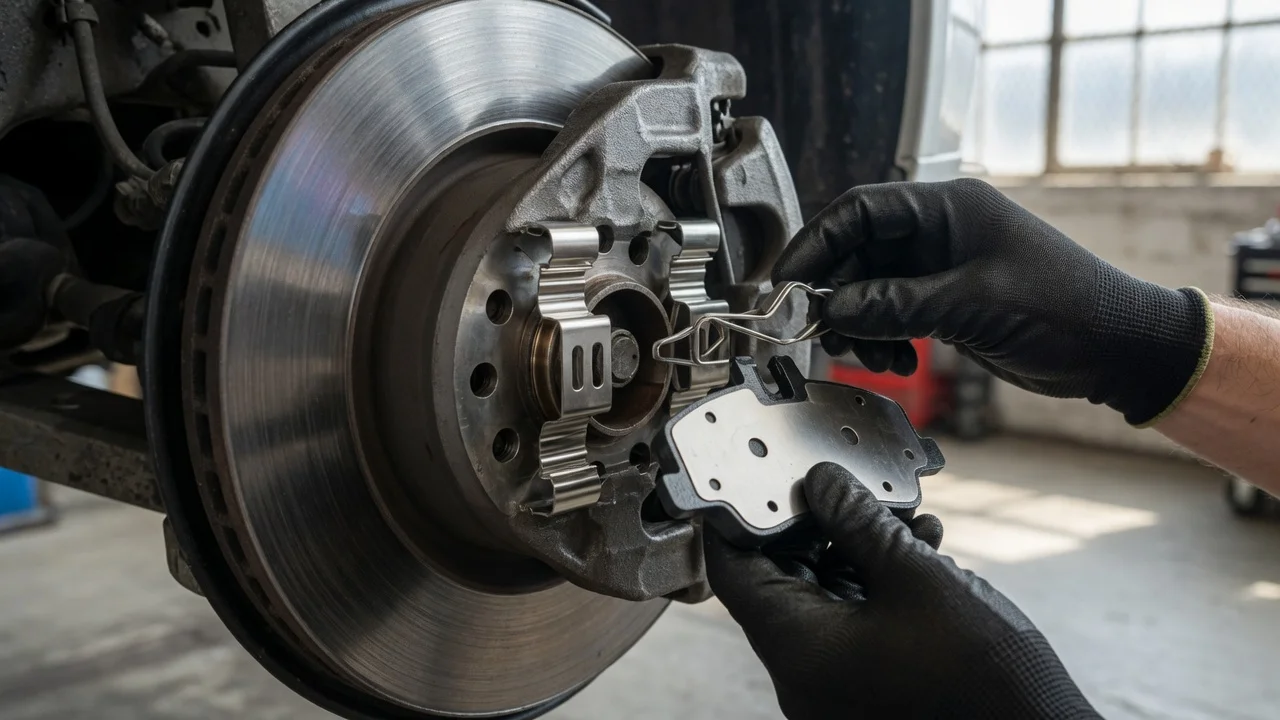
Brake pad clips are the small steel hardware pieces that locate the pads in the caliper or caliper bracket, keep them from rattling, and let the pads slide as the disc wears. They are also sold as pad hardware, anti-rattle clips, abutment clips, retaining springs or a hardware kit. On most passenger vehicles with sliding (floating) calipers, a hardware kit includes abutment clips that sit in the bracket ears, plus any pad springs, shims or pins the design uses. Fixed-caliper and some rear parking-brake designs use different retainers. The essential rule is the same: new pads should go in with new clips that match that axle’s hardware kit, not reused rusty or bent clips from the old pads.
Clips are wear and corrosion parts. Road salt, heat and pad movement flatten the spring tabs, rust the abutment seats and leave the pads tight or loose in the bracket. A pad that cannot slide freely can drag, wear unevenly, pull to one side or overheat. A pad that is loose can rattle and, in a badly worn or missing-clip condition, shift enough to score the disc or bind the caliper. Replace the clips whenever the pads are replaced, unless the vehicle maker specifies a reusable design and the parts still meet that inspection standard. Fitment is vehicle-specific: the kit must match the year, make, model, engine or brake package, and front versus rear axle. Hardware from another model, or a kit that merely looks similar, can leave the pad off-center or too tight.
Limits of this job and when to stop
Installing clips is part of a pad and disc service, not a standalone swap with the wheel on the car. The work involves supporting the vehicle, opening the hydraulic caliper, and restoring sliding and clamping function. Torque values, lubricant type and whether the caliper piston must be wound back or pressed in are set by the manufacturer for that vehicle. Those figures are not interchangeable across models. If the service information for the vehicle is not available, if a seized slide pin, torn boot, leaking caliper, cracked bracket, scored or below-minimum disc, or damaged ABS sensor ring is found, stop and have a qualified technician complete the repair. Brakes are a safety system; a pad that is not fully seated, a caliper that is hanging on the hose, or a job finished without pumping the pedal can leave the vehicle with little or no braking on the first stop.
What you need before you start
Confirm the replacement hardware kit and pads are catalogued for the exact vehicle and axle. Compare the new clips to the old ones before the caliper comes off: tab count, shape, which way the pad ears sit, and whether a separate anti-rattle spring or pad pin is used. Gather the vehicle’s service procedure for pad replacement, including wheel-nut torque, caliper-bolt torque, and any note on lubricating abutment points or slide pins. Typical equipment includes a floor jack and rated jack stands, wheel chocks, the correct sockets or calipers-bolt bits, a C-clamp or manufacturer-specified piston tool, a wire or hook to support the caliper, a brake-parts cleaner approved for the vehicle, a brush for the bracket abutments, and the lubricant the maker calls for (often a high-temperature brake grease or synthetic lubricant specified for rubber boots). Do not use ordinary chassis grease on slide pins or on the friction faces of the pads. Have a drain pan and a means to cap or control brake fluid if a hose will be opened; most pad jobs do not require opening the hydraulic circuit if the piston can be retracted with the bleeder closed.
Hardware kit and pads that match the vehicle, axle and brake package; Manufacturer service information for torque, lubricant and piston method; Jack, stands and chocks rated for the vehicle; Correct fasteners tools, piston retraction tool and caliper support; Brake cleaner, abutment brush and specified brake lubricant; New disc if the existing disc is below minimum thickness, scored or out of specification
Install the replacement clips and pads
Park on level ground, chock a wheel that will stay on the ground, and loosen the wheel nuts slightly before the tyre leaves the pavement. Raise the vehicle at the approved lift points and support it on jack stands. Remove the wheel. Do not rely on a jack alone. If the brake fluid reservoir is near the maximum mark, remove a small amount of fluid before retracting the piston so the reservoir does not overflow; dispose of used fluid as required in the local jurisdiction. Never reuse fluid that has been removed.
Unbolt the caliper using the procedure for that vehicle. On a sliding caliper this is usually the lower guide bolt, or both guide bolts, so the caliper can swing or lift off. Hang the caliper from the suspension or body with a support so the hose is not stretched or twisted. Remove the old pads. Note which pad had a wear indicator, inner versus outer, and how any anti-rattle spring was hooked. Pull the old abutment clips out of the bracket. If a clip is rusted in place, do not pry against the disc or the rubber boot; work the clip out of the machined ear so the bracket is not gouged.
Clean the pad abutment surfaces in the bracket until the pad ears can slide on bare metal. Remove rust scale and old grease from the clip seats. Inspect the bracket, slide pins and boots. Pins should move freely in their bores with the specified lubricant; a seized pin, split boot or leaking caliper is a stop condition. Measure the disc against the discard thickness and runout limits in the service information. A disc that is under minimum thickness, deeply grooved or cracked is not restored by new clips and must be replaced or machined only if the maker allows machining and enough thickness remains.
Fit each new clip fully into its abutment so it sits flat in the machined recess and the spring tabs face the direction shown in the kit or service illustration. A clip that is only partly seated will pinch the pad or pop out when the caliper is tightened. Where the maker specifies lubricant, apply a thin film only on the points the pad ears slide on, or on the clip surfaces called out in the procedure. Keep lubricant off the pad friction material, the disc face and the piston boot. Retract the piston with the correct tool: many rear calipers with an integral parking brake must be rotated in while being pressed, and forcing them straight in can damage the mechanism. Install the new pads in the clips with the wear indicator and inner/outer orientation as specified. The pad should slide in the clips with light hand effort and should not fall out of the bracket.
Seat the caliper over the pads without prying on the hose. If the caliper will not drop on, the piston is not fully retracted or a pad is sitting on a clip tab. Install the guide bolts or caliper bolts and tighten them to the torque and sequence in the service information. Reinstall any pad spring or retaining pin that belongs to the design. Refit the wheel and tighten the wheel nuts to the specified torque after the vehicle is on the ground. Repeat for the opposite side of the same axle so pad and hardware condition stay matched. Before the vehicle moves, pump the brake pedal until it is firm so the pistons take up the gap to the new pads. Check the fluid level and restore it with the specified fluid type only. A soft or sinking pedal after pumping is a stop condition; do not drive the vehicle.
Completion check
Each clip is fully seated in the bracket and matches the kit for that axle. Pads slide in the clips and sit flush, with wear indicators in the correct position. Caliper bolts and wheel nuts are at the manufacturer torque. Slide pins move, boots are intact, and no grease is on the disc or pad faces. The pedal is firm after pumping, the reservoir is at the correct level, and there is no leak. A low-speed check in a safe area confirms even braking with no grind, pull or remaining warning lamp. Follow any bedding procedure the pad maker publishes.
A scraping sound on the first few stops can be a pad wear sensor touching the disc if that design uses a mechanical indicator; persistent grind, vibration, a pulling vehicle or a warning light means the installation is not complete. Electronic parking brakes and some stability-control systems require a scan-tool service mode before the piston is retracted; forcing those calipers without that step can set faults or damage the actuator. When those systems are present, use the procedure and tools the manufacturer specifies, or have the work done by a shop equipped for that vehicle.