Brake Booster Check Valve Location and Installation Direction
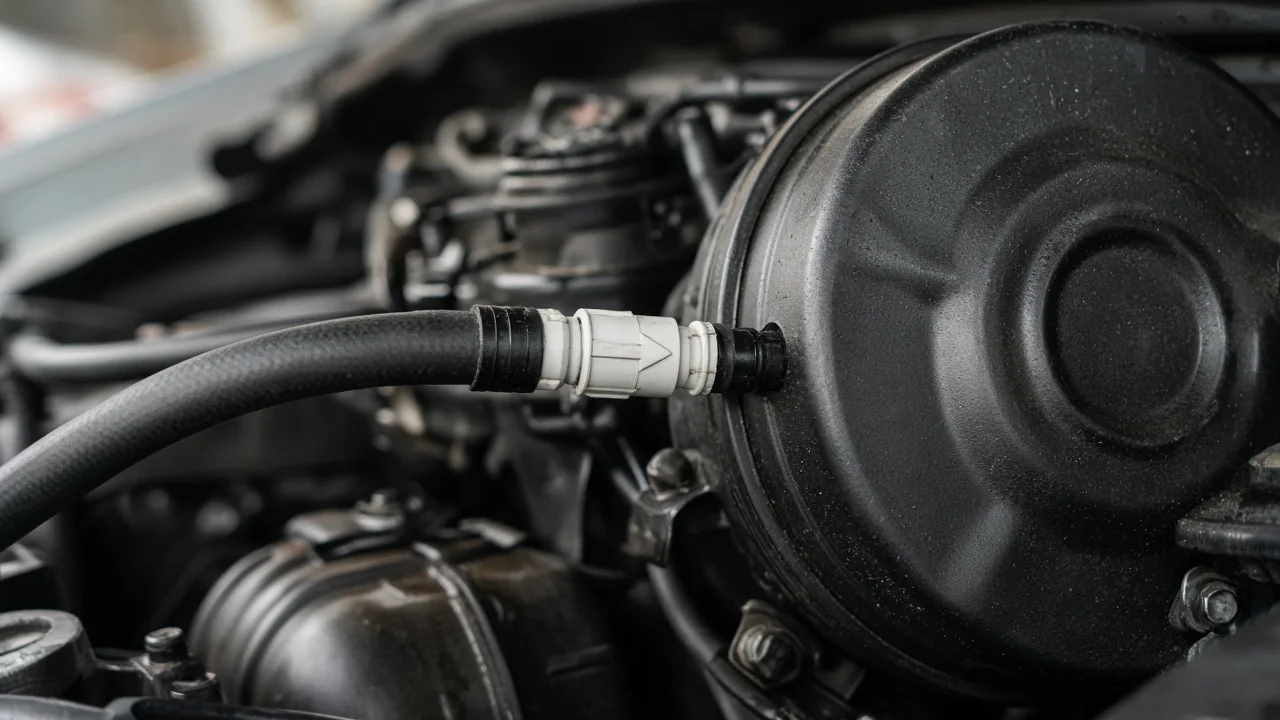
The brake booster check valve is a small one-way valve that keeps vacuum stored in the booster so the brake pedal stays power-assisted. On most engines with a vacuum booster, it sits where the vacuum hose meets the booster shell, or inline in that hose. If the valve faces the wrong way or sticks, the pedal can turn hard. This guide covers where the valve usually sits and which direction it should face. It also explains how to narrow down a hard-pedal complaint before you replace parts.
Establish the symptoms
Start by writing down exactly when the pedal feels wrong. A booster that has lost its vacuum reserve usually gives a firm, high pedal. Stopping takes much more leg force, while pedal travel stays normal. Note whether the problem appears on the first stop after a cold start, only after the engine has been off for a while, at idle, or during hard acceleration. Engine vacuum is naturally low under hard acceleration. Each pattern points in a different direction.
Record any associated signs as well. These include a hiss from under the dash or engine bay when you press the pedal, a rough or changing idle when you brake, a check engine light for a lean condition, and any warning lamp on the dash. Most important, list recent work. If the hard pedal appeared right after someone replaced a vacuum hose, intake part, booster or check valve, suspect a valve installed backwards or a hose left loose. Note any brake pad, rotor or caliper work done just before the complaint, too, because that shifts attention toward the hydraulic and friction side of the system.
Distinguish plausible causes
A check valve installed in the wrong direction stops vacuum from reaching the booster, so the pedal is hard almost immediately and stays hard. A valve stuck closed behaves much the same way. A valve that sticks open lets the booster lose its vacuum as soon as the engine stops or manifold vacuum drops. In that case, the first press after a restart, or a stop under heavy load, feels hard, while normal driving seems fine.
Other vacuum faults produce similar complaints. Air can leak in through a cracked hose, a split grommet where the valve enters the booster, or a leaking booster diaphragm. A diaphragm leak often hisses at the pedal and makes the idle stumble when you brake. Low engine vacuum from an intake or engine problem starves even a good booster. Many diesel, turbocharged and some direct-injection gasoline engines use a mechanical or electric vacuum pump instead of manifold vacuum, and a weak pump gives the same hard pedal. Some vehicles use hydraulic or electric brake assist and have no vacuum check valve at all, so confirm which system your vehicle has first.
Some pedal symptoms point away from the booster entirely. A pedal that sinks slowly, feels spongy or travels closer to the floor suggests a hydraulic problem, such as low or contaminated brake fluid, air in the lines, or a master cylinder fault. A firm pedal with full assist but weak stopping can come from glazed or contaminated friction material, pads worn past their wear limits, or a sticking caliper. A sticking caliper often also causes a pull or uneven wheel heat.
Checks in a useful order
Begin with safe visual checks with the engine off. Find the brake booster: on most left-hand-drive vehicles it is the large round canister on the driver's side of the firewall, behind the master cylinder. Follow the vacuum hose from the booster toward the intake manifold or vacuum pump. The check valve is usually pressed into a rubber grommet on the booster shell, with the hose clamped to its other end. On some vehicles it sits inline along the hose instead, or forms part of the hose assembly. Look for cracks, a collapsed or swollen hose, a loose grommet and oil contamination.
Next, confirm the valve's orientation. The valve lets air flow out of the booster toward the vacuum source and blocks air flowing back in. Most valves carry an arrow or a label. On the common design, the arrow points toward the engine side, following the direction air is drawn out of the booster. Marking conventions differ between manufacturers, so check the diagram in the service information for your vehicle rather than relying on the arrow alone. You can also test a removed valve with a hand vacuum pump. Connected to the booster-side end, the pump should hold vacuum. Connected to the engine-side end, it should draw air through freely.
Two simple pedal tests help next. For the first, start with the engine off and press the pedal several times to use up the stored vacuum. Then hold light pressure on the pedal and start the engine. The pedal should drop slightly as assist arrives. For the second, run the engine briefly, switch it off, wait a short time and press the pedal. A healthy system gives one or more assisted applications before the pedal firms up. Measuring engine vacuum, checking vacuum pump output or assessing the diaphragm against vehicle-specific specifications requires a gauge and the service information. Leave hydraulic diagnosis to a qualified technician.
Interpret the findings
If the valve faces the wrong way or fails the one-way test, that fault explains a hard pedal. After correcting it, repeat the pedal tests to confirm assist has returned. If the valve passes and the hose and grommet are sound, but the pedal does not drop when the engine starts, the problem lies upstream, in low engine vacuum or a weak vacuum pump. If the pedal drops at startup but assist disappears quickly after shutdown, suspect a leak past the valve, the grommet or the booster diaphragm.
A hiss that changes as the pedal moves, especially with an idle change, strongly suggests a booster diaphragm leak. That usually means replacing the booster rather than the valve. If assist is normal in every test but the complaint remains, look next at the brake pads, rotors, calipers or hydraulic circuit. Before buying a replacement valve, hose or booster, match the part to your vehicle by year, engine and brake system. Valve size, port angles and grommet design all vary.
Urgency and next action
Stop driving and arrange professional service if any of these occur: the pedal is suddenly hard or sinks toward the floor, a brake warning lamp comes on, brake fluid is leaking or its level has dropped, or the vehicle pulls hard while braking. Losing assist does not remove braking completely, but it can greatly lengthen stopping distances, especially in an emergency. No remaining driving distance can be considered safe until the brakes have been inspected.
When you book a repair, give the shop the year, make, model and engine, and describe when the hard pedal appears. Include the results of any pedal or valve tests and any recent work on the vacuum or brake system. A photo of the check valve and its arrow as installed is also useful. This information helps the technician confirm the cause and avoid replacing parts that were never faulty.