What Is a Layered Car Door-Panel Design?
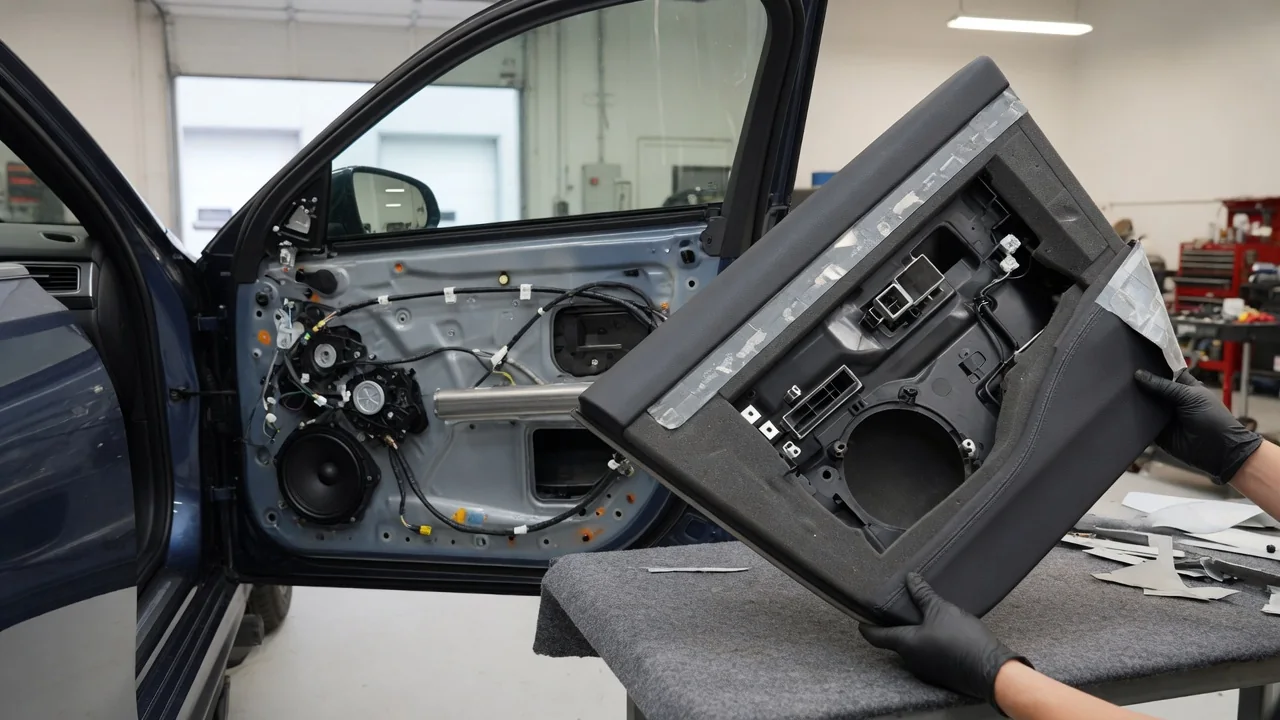
A layered car door-panel design is an interior trim approach in which the inside of the door is built from several distinct zones instead of one flat molded surface. An upper section, a decorative mid insert, an armrest shelf, and a lower panel are separated visually and often physically, and each can use its own material and serve its own purpose. Knowing how layered vehicle door trim is organized helps owners understand how the door feels, how it is assembled, and what to expect when it has to come apart.
Material layers
Most door panels start with a rigid substrate, usually an injection-molded plastic carrier or, in some designs, a pressed fiber-based board. This substrate gives the panel its shape and carries the clips, screw bosses, and brackets that attach it to the door. The visible layers are added to it. Common examples are a soft-touch skin over foam on the upper section or armrest, a fabric, vinyl, or leather-like insert in the middle, and a harder, textured plastic on the lower area, where shoes and cargo tend to scuff the surface. Designers assign each material to the area where its feel, durability, and cost make the most sense.
Layering is also a visual language. Horizontal bands, overlapping surfaces, contrasting colors, trim strips, and deliberate shadow gaps break up the large flat area of a door and give it depth. In some vehicles these layers are separate parts that are joined during assembly. In others they are suggested by shapes and textures molded into a single piece. The two approaches can look similar from the driver's seat, so appearance alone does not reveal how many physical components a panel actually contains.
Behind the visible trim there is usually another stack that owners rarely see. A plastic or foam water shield is commonly sealed against the inner door metal to keep moisture out of the cabin side. Some doors also carry sound-deadening material or acoustic pads. These hidden layers are not part of the styling, but they belong to the same assembly and need attention whenever the panel is removed.
Armrest location
In a layered layout, the armrest typically forms the main horizontal shelf at roughly mid-height and serves as the dividing line between the upper and lower layers. It is placed where an occupant's elbow and forearm can rest comfortably, although how well it fits a particular person depends on seat adjustment, body size, and the vehicle's interior packaging. The armrest area frequently houses the window switches, door lock controls, and mirror adjustment, along with a pull cup or grab handle used to close the door.
Because people pull on the handle to shut the door, the armrest region must carry real loads. For that reason it is often attached with screws that pass through to the substrate or to a bracket on the door inner structure, rather than relying on clips alone. Depending on the design, the armrest can be a separate subassembly with its own padded cover or an integrated part of the panel molding. Below it, the lower layer commonly holds a storage pocket and a speaker grille, both of which have to fit around the window glass path and the mechanisms inside the door.
Service access
Even when a door panel looks like a stack of separate pieces, it is usually removed as one assembly. A general pattern is that a few screws are hidden inside the pull cup, behind the switch pod, under small covers, or near the interior handle bezel. Push-in clips around the perimeter hold the panel to the door metal, and the top edge often hooks over the window belt line, so the panel lifts upward once the fasteners are released. The exact locations and sequence differ between vehicles, which is why the model's repair manual should be the reference for any specific door.
Once the panel is free, it typically stays tethered by wiring connectors for the switches and lighting and by the cable or rod for the interior door handle. These must be disconnected before the panel can be set aside. The opening behind it gives access to the window regulator and motor, the latch and lock actuator, the speaker, and wiring harnesses. After the work is done, the water shield should be resealed properly so moisture does not reach the interior side of the trim.
Individual layers are not always serviceable on their own. On some designs a decorative insert or upper trim piece can be unclipped separately. On others it is heat-staked, welded, or bonded to the substrate during manufacturing, so a damaged section may mean replacing the whole panel or a larger subassembly. Checking how a specific panel is constructed before attempting a partial repair avoids damaging parts that were never meant to separate.
Practical implications and limits
In everyday use, mixing materials means different parts of the same door age differently. A padded armrest skin may show compression or wear where an elbow rests, a fabric insert can absorb stains, and hard lower plastic tends to collect scratches. Each surface usually calls for its own cleaning method, so a product suitable for vinyl may not be appropriate for fabric or a soft-touch coating. The seams between layers can also collect dust, and as clips loosen or plastic shrinks and expands with temperature, those joints are a common source of squeaks and rattles.
It helps to treat the term itself with some caution. Layered door-panel design is a descriptive phrase used in interior design discussion, not a standardized engineering classification, and manufacturers apply the idea in very different ways. Plastic retaining clips often break during removal, so having replacements on hand is sensible. Doors may also contain side-impact sensors or other safety-related wiring, so following the manufacturer's procedure, including any recommended precautions with the electrical system, is more reliable than general guidance.
Owners planning modifications, such as installing different speakers or adding sound-deadening material, should account for the layers both in front of and behind the visible trim. Added thickness or relocated components can interfere with how the panel seats against the door, how the clips engage, or how the window and handle mechanisms move. Fitting the panel back cleanly and confirming that every control works before finishing the job keeps the layered construction functioning as designed.