What Grit Sandpaper and Tools to Use for Removing Rust From a Car
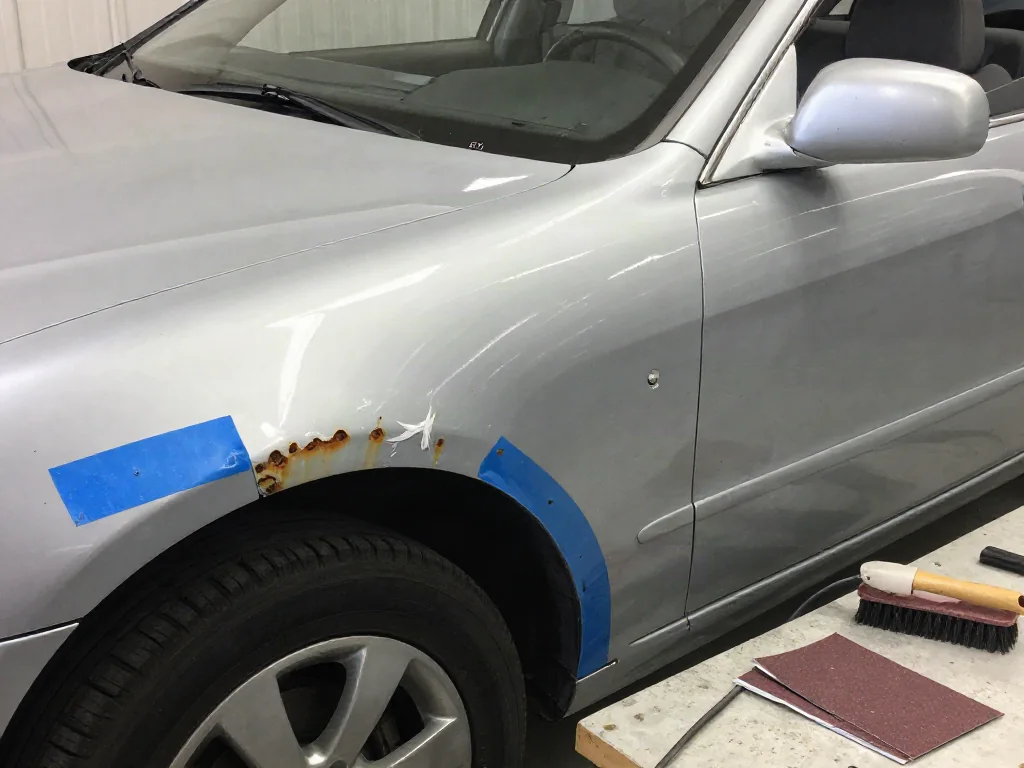
Rust on a car panel demands the right abrasive to remove corrosion without thinning good metal or ruining nearby paint. A wire brush for car rust works fast on loose scale, but sandpaper for removing rust from car surfaces provides the controlled grit progression needed for a smooth repair. Learning how to sand rust off a car means matching the tool to rust depth and panel shape.
Judge How Deep the Rust Goes Before Picking an Abrasive
Surface rust shows as reddish-brown freckling with no paint lifting, while bubbling rust pushes up under paint in blisters and flaking scale rust leaves layered, crumbling edges. Each type needs a different starting abrasive: light surface rust may begin with medium sandpaper, but raised scale first needs a coarse abrasive or wire brush to knock down high spots before sanding.
To check depth gently, drag a plastic scraper or credit card edge across the affected area. Soft, flaking metal that crumbles under light pressure indicates advanced corrosion, and pinholes show rust has penetrated the panel. Avoid probing with a screwdriver, which can puncture weakened steel. Discoloration can travel beneath paint beyond the visible damage, so plan to remove a slightly larger area.
Grit Progression: Coarse, Medium and Fine Sandpaper for Car Rust
For heavy rust and scale, start around 40 to 80 grit to remove corrosion quickly. Move to 120 or 180 grit to smooth the surface and feather paint edges, then finish with 220 or 320 grit before primer. Skipping an intermediate grit, such as jumping from 40 to 220, leaves scratches too deep to cover cleanly, and those marks can show through primer and topcoat.
A grit has done its job when the entire repair area shows bright bare metal without dark pits or rust speckles. Stop and check under good light; any remaining orange staining means the panel needs more work at that grit. These ranges are general guidance because panel thickness, rust severity and the specific primer or paint system all influence the final sanding level.
Choosing Sandpaper Types and Backing for Rusty Car Panels
Aluminum oxide sandpaper is commonly used for rust removal because the abrasive stays sharp on metal and resists dulling. Silicon carbide paper is harder and often preferred for finer work or wet sanding, but it can wear out faster on bare steel. Choose the material for the task: aluminum oxide for corrosion, silicon carbide for last-stage pre-paint smoothing.
On flat panels, a stiff sanding block prevents fingertip grooves and keeps the surface level. For curves, a flexible pad or sponge conforms to the body line and prevents flat spots. Dry sanding is the standard for rust removal because it cuts efficiently and makes it easier to see progress. Wet sanding is generally reserved for fine finishing on fresh primer or paint.
Wire Brushes and Power Abrasives for Rust Removal
Hand wire brushes work well in seams and tight corners where power tools cannot fit. Drill-mounted wire wheels cover larger flat areas quickly, while cup brushes help on irregular surfaces. A coarse wire wheel strips thick rust and scale fast, but on thin body panels a fine wire brush may be safer because it removes material more slowly.
Steel bristles are common and aggressive, stainless bristles reduce the chance of leaving behind particles that can cause surface rust later, and brass bristles are softer for delicate areas but may wear out quickly. Flap discs and strip discs also remove rust effectively, with flap discs cutting more metal and strip discs being less aggressive on paint. Keep power tools moving lightly to avoid heat.
How to Sand Rust Off a Car Step by Step
Begin by cleaning the area with a degreaser so the abrasive does not push contaminants into the metal. Mask off surrounding panels and trim, then remove loose rust with a wire brush or coarse paper. Sand the rusted spot with coarse grit, then work through finer grits to refine the surface. Feather the paint edge by sanding back the surrounding paint so it tapers gradually to bare metal.
When the panel shows clean metal in pits, stop and inspect thickness. If sanding makes the panel noticeably more flexible, it has become too thin. Bare steel begins to oxidize within hours, so clean the area and apply primer as soon as possible. Run your hand over the repair and view it under angled light to catch scratches or ridges before moving on to primer.
Protecting Surrounding Paint, Trim and Your Health While Sanding
Mask adjacent paint, glass, rubber seals and trim with high-quality tape and paper or plastic sheeting. Abrasive sparks and stray movement can scuff surfaces outside the repair area, and paint edges accept primer poorly if contaminated. Cover enough margin so the sander or wire brush cannot reach unprotected panels.
Wear safety glasses to block metal particles and bristles, gloves to protect hands from sharp edges, and hearing protection when using power tools. A respirator rated for dust and vapors is important because metal dust and paint particles can be harmful. Older automotive paint may contain hazardous ingredients, so contain dust with a vacuum attachment and clean the area thoroughly before priming.
When Sanding Is Not Enough for Car Rust
Sanding cannot repair holes, gaps, or metal that flexes under a finger. If the rust has eaten through the panel or left a crumbling edge, abrasive removal only widens the damage. At that point, rust converters, body filler or panel replacement are separate repair steps with their own limitations and materials.
Rust in structural areas such as frames, floor pans or suspension mounts is a safety concern and should be inspected by a professional. Hidden corrosion inside boxed sections or seams can continue spreading even after visible rust is removed. Sanding addresses surface damage effectively, but it cannot stop internal corrosion or restore structural strength.