Transmission Cooler Line Routing Diagram: Connections to the Radiator
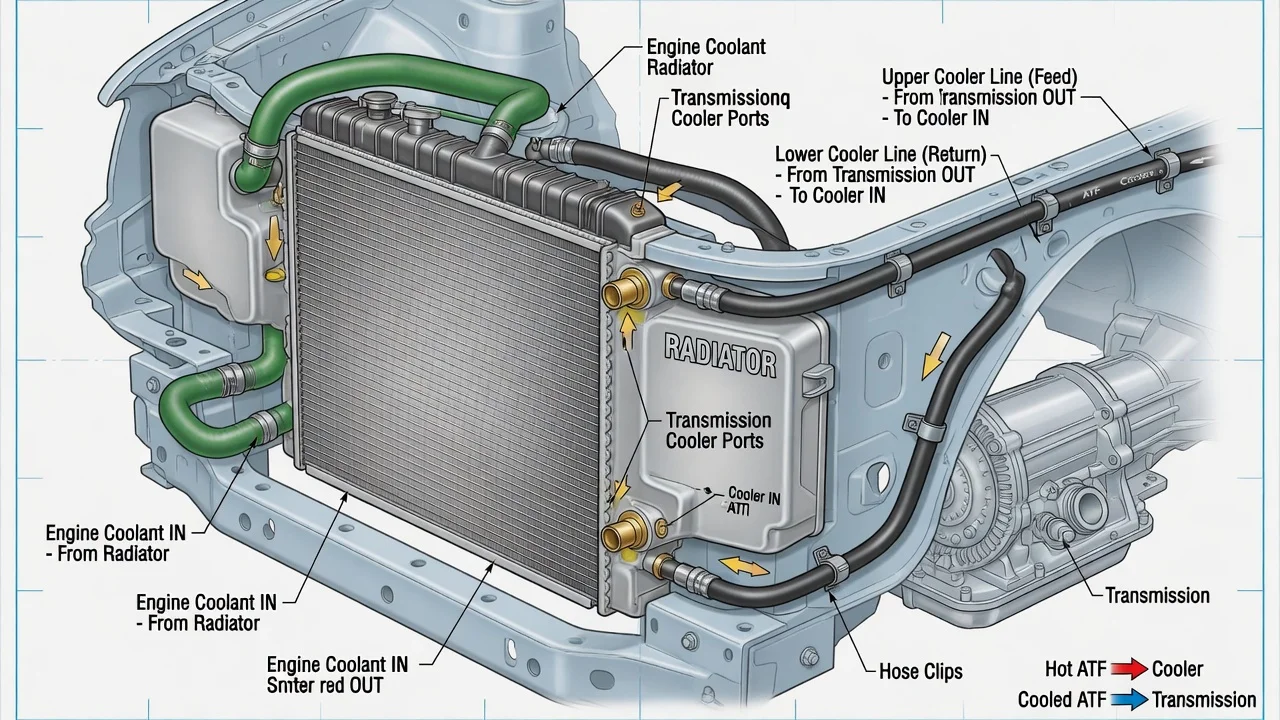
On most vehicles with an automatic transmission, two lines carry transmission fluid from the transmission case to a cooler built into the radiator, then back again. Understanding that loop helps when you replace a radiator, trace a fluid leak, or add an auxiliary cooler for towing. This guide describes the typical routing in words rather than as a drawing, because fitting positions and line paths differ from one vehicle to the next.
The short answer: a two-line loop to the radiator tank
In a conventional setup, one line carries hot fluid out of the transmission to the cooler and the other returns it. At the radiator, both lines connect to two fittings on one of the radiator tanks, where a small oil cooler sits submerged in engine coolant. The fluid and coolant never mix in normal operation; heat passes through the walls of the cooler. The lines are usually steel tubing, sometimes joined by short rubber sections, and they are held along the engine, transmission or frame with clips and brackets. Described as a simple diagram, the path runs: transmission outlet fitting, supply line, radiator tank cooler, return line, and finally the transmission return fitting. On vehicles with a towing package, an air-to-oil auxiliary cooler mounted in front of the radiator is often added in the return path.
Two qualifications matter. Which transmission fitting is the outlet and which is the return is not standardized across manufacturers or even across transmissions from the same brand. And some modern vehicles do not send transmission fluid to the radiator at all. Treat any generic transmission cooler lines diagram as an explanation of the concept, not as proof of how your vehicle is plumbed.
How transmission fluid and coolant share the radiator
The in-tank cooler is normally placed in the radiator tank where coolant leaves the core, the side where coolant is at its lowest temperature. Fluid leaving the transmission carries heat generated mostly in the torque converter and by clutch engagement. As it passes through the cooler, it gives that heat to the surrounding coolant, and the radiator core then sheds it to the outside air along with heat from the engine. The cooled fluid returns to the transmission, where it typically feeds the lubrication circuit.
Because coolant temperature is regulated by the thermostat, a radiator-mounted cooler tends to hold transmission fluid in a fairly stable range rather than simply chilling it. That link also works against you: a stuck thermostat, low coolant level, air pockets, or a pressure cap that no longer holds pressure can raise coolant temperature and, with it, transmission fluid temperature. Problems in the cooling circuit can therefore show up as transmission temperature warnings or shift complaints.
Configurations that change the routing
Several designs depart from the classic two-line loop. Many newer vehicles use a liquid-to-oil heat exchanger mounted on or near the transmission, connected to the engine cooling circuit by coolant hoses instead of running fluid lines to the radiator. Some transmissions include a thermostatic bypass valve that limits flow to the cooler until the fluid warms up, which changes how the lines behave and where they connect. Heavy-duty and towing applications may combine the radiator cooler with an auxiliary air-to-oil cooler, typically in series, while a few setups rely on an external cooler only. Front-wheel-drive vehicles with a transverse transaxle route the lines very differently from rear-wheel-drive trucks with the transmission behind the engine.
The connections themselves also vary. You may find threaded flare fittings, quick-connect fittings released with a clip or special tool, or banjo-style fittings with sealing washers. Replacement radiators sometimes come with different fittings or adapters, and an aftermarket radiator may lack a cooler entirely if it was built for a manual transmission model. Manual transmissions generally do not use radiator cooler lines, although some have their own separate oil cooler.
Tracing and checking the lines yourself
Start with the engine off and fully cooled. Follow each line by sight from the transmission case to the radiator, noting every clip, rubber section and any auxiliary cooler along the way. Look for wet spots, crusted residue, chafing against brackets or other components, kinks and corrosion on steel tubing. Before disconnecting anything, photograph both ends and label the lines so they go back to the same fittings.
If you are replacing the radiator, do the work only on a cold engine. Never remove the radiator cap, reservoir cap or a coolant hose while the system is hot and pressurized, because scalding coolant can spray out. Use a flare-nut wrench on threaded fittings to avoid rounding them, and release quick-connects with the correct tool rather than prying. Cap or plug open lines to limit fluid loss and keep dirt out. After installation, refill with coolant that meets the vehicle's coolant specification at the correct coolant concentration; color alone does not tell you whether a coolant is compatible. Remove air from the cooling circuit following the vehicle's bleeding procedure, then check the transmission fluid level using the manufacturer's method, since opening the lines always loses some fluid and some transmissions have no dipstick.
Watch for signs that the cooler inside the radiator has failed internally. Transmission fluid in the coolant may appear as an oily film or brown sludge in the reservoir, while coolant in the transmission can turn the fluid pink and milky. Shift problems or slipping can follow. Cross-contamination can damage transmission friction materials, so it calls for prompt professional attention, usually including radiator replacement, flushing of the lines and an inspection of the transmission. Similarly, after a transmission failure, debris can lodge in the cooler and lines, which is why shops often flush or replace them before installing a rebuilt unit.
When a generic diagram is not enough
A general description cannot tell you which fitting on your transmission is the outlet, whether your vehicle uses a bypass valve or a transmission-mounted heat exchanger, or what fill procedure applies after the lines are opened. Many sealed transmissions require checking the level at a specific fluid temperature, sometimes read with a scan tool. Reversing lines on a system with an auxiliary cooler or bypass valve can reduce cooling or flow, and service procedures often include a flow check to confirm the cooler circuit is working after a repair.
For exact routing, fitting identification and torque values, use the factory service information for your specific model and transmission. If you find contaminated fluids, a leaking cooler, overheating, or you are unsure how the lines connect, have a transmission or cooling system specialist inspect the vehicle before driving it further.