Tire wear bars: what they mean and when to replace tires
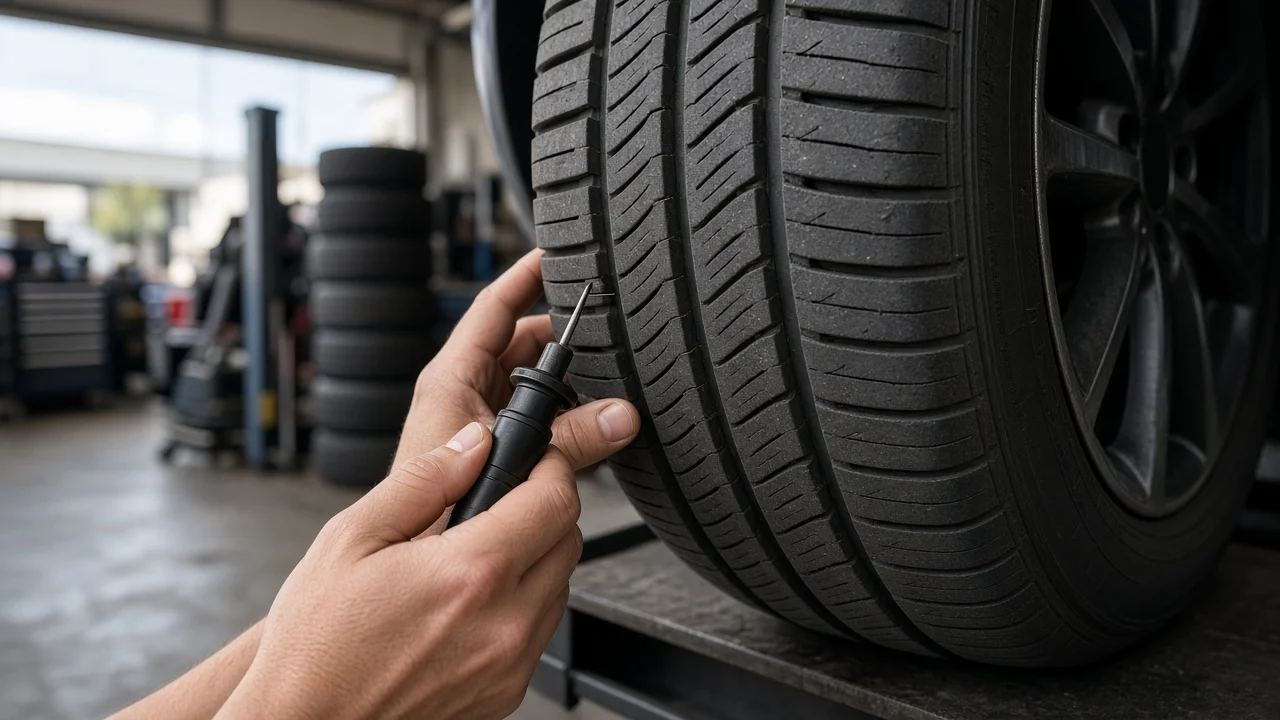
Tire wear bars are small raised strips molded into the bottom of the tread grooves. When the tread wears down to the same height as these bars, the tire has reached the end of its safe service life. This guide explains what wear bars look like, where they are located, what they tell you about tread depth, and how to handle replacement so the new tires match your vehicle placard and drivetrain.
What tire wear bars are and where to find them
Wear bars, also called tread wear indicators, are narrow bridges of rubber that run across the main circumferential grooves of a tire. On a new tire they sit well below the tread surface, so they are easy to miss. They are spaced at several points around the circumference, so you can check wear in more than one place. To find them, look at the shoulder of the tire. Many manufacturers mark the indicator positions with a small triangle, an arrow or the letters TWI on the upper sidewall, directly in line with a bar.
If you are trying to picture a worn tire, the bars become obvious as the tread wears. Instead of a continuous groove, you see a solid band of rubber crossing the tread from rib to rib. When that band is flush with the surrounding tread blocks, the groove is effectively interrupted and the tire's ability to channel water away is reduced.
In the United States, the indicators are molded to show when roughly 2/32 of an inch (about 1.6 mm) of tread remains, which is also the minimum legal tread depth in most states. Their purpose is to give you a visual cue that requires no tools. What they tell you is that the tire has no remaining safety margin, not that it performs well right up to that point. Wet-road grip and resistance to hydroplaning decline well before the bars become flush, so many owners plan replacement earlier, especially if they regularly drive in rain or snow.
Confirm the part and repair scope
Wear bars answer one question: whether a tire has reached its minimum tread. Before buying replacements, check whether the bars are flush across the whole tread or only in one area. Even wear that reaches the indicators means the tire has simply worn out. Wear that reaches the bars on one edge, in the center or in scalloped patches points to another cause, such as incorrect inflation pressure, an alignment problem or worn suspension parts. New tires installed without correcting that cause will wear the same way.
Owners sometimes report a hum or roar and blame the wear bars. The bars themselves are not designed to make noise, but a heavily worn tire, or one with cupped or feathered tread, can become louder. If noise comes with vibration or pulling, a wheel bearing, balance or alignment issue may be involved and should be diagnosed rather than assumed to be a tire problem. Also inspect for damage the indicators cannot reveal: cracking, bulges, exposed cords, sidewall punctures and tire age. Any of these can justify replacement even when tread remains above the bars.
Prepare tools and safe access
Checking wear bars needs no lift. Park on level ground, set the parking brake and turn the front wheels to one side to see the full tread width. A flashlight and an inexpensive tread depth gauge give you a measured reading in each main groove at several spots around each tire. Note the readings so you can compare the inner, center and outer grooves.
Replacing tires is a different job. Removing a tire from its wheel and mounting a new one requires a tire changer, a wheel balancer, a torque wrench and the vehicle's service information for lifting points and wheel fastener torque. Most owners should leave mounting and balancing to a tire shop; it is not a suitable project for an inexperienced owner, because damaged beads, rims or pressure sensors and improperly secured wheels create real safety risks. Before the visit, read the vehicle placard, usually on the driver's door jamb, or the owner's manual to confirm the original tire size, load index, speed rating and recommended inflation pressure.
Remove without avoidable damage
The vehicle should be raised only at the lift or jack points shown in the service information and supported on proper stands before any wheel comes off. Break the wheel fasteners loose slightly while the tire is still on the ground, then remove them once the wheel is raised. Marking each wheel's position helps if you track rotation history.
On the tire machine, the valve core is removed to deflate the tire fully before the bead is broken. If the wheel has a tire pressure monitoring sensor, the bead breaker and mounting tool must be positioned away from it, because a sensor mounted at the valve can be cracked by careless handling. Alloy wheels need protected clamps and tools to avoid scratching the rim flange. While the tire is off, inspect the wheel for bead seat corrosion, bends or cracks; a damaged bead seat can cause slow leaks under a new tire.
Install and restore the system
Replacement tires should match the size on the vehicle placard and meet or exceed the specified load index and speed rating. A lower rating than the vehicle requires is not an acceptable substitute. Drivetrain compatibility matters too: many all-wheel-drive vehicles require tires with matched size and closely matched tread depth on all four corners, because differences in rolling circumference can strain the drive system. Check the owner's manual for the manufacturer's guidance before replacing only one or two tires. When a single pair is replaced, tire makers commonly recommend fitting the new pair on the rear axle, but follow the vehicle and tire manufacturers' instructions.
Check orientation before mounting. Directional tires carry a rotation arrow that must point in the direction of forward travel, and asymmetric tires have a marked outside face that must face out. The beads should be lubricated with tire mounting lubricant and seated without exceeding the tire maker's seating pressure. Install a new valve or the service parts the sensor manufacturer specifies, then balance each assembly.
Refit the wheels, snug the fasteners in a star pattern, lower the vehicle and torque them to the value in the service information. Set inflation pressure to the placard figure with the tires cold, not to the maximum pressure molded on the sidewall. Some vehicles need a TPMS relearn or reset after tire or sensor service; use the procedure listed for your vehicle.
Check the completed work
Confirm that the TPMS warning light goes out and, where the vehicle displays them, that individual pressures read correctly. On a short test drive the steering wheel should be centered, the vehicle should track straight and there should be no vibration at highway speed. Vibration suggests a balance or mounting issue; pulling suggests an alignment check is needed, particularly if the old tires showed uneven wear. Recheck wheel fastener torque after the distance specified in your service information.
Record the new tread depth and the date, then check the tires monthly: pressure when cold and depth in several grooves. Rotate them at the interval in the owner's manual to spread wear evenly. If new tires start wearing faster on one edge, or the indicators appear sooner than expected, have the suspension and alignment inspected rather than simply buying another set.