Timing Chain Maintenance: What to Inspect and When
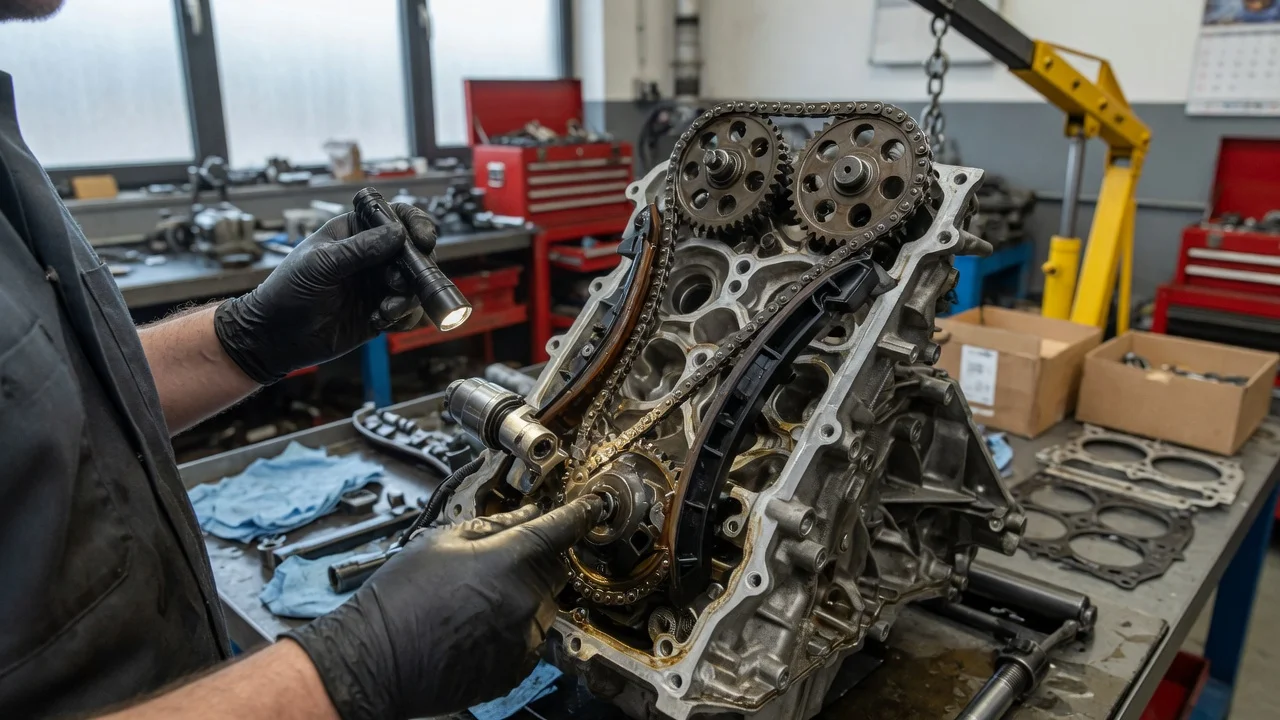
A timing chain is not a routine service item on a fixed calendar for most engines. The essential maintenance is the oil the chain and its tensioner need, plus inspection when the manufacturer calls for it, when related engine work opens the front cover, or when noise, timing-related faults or oil neglect give a reason to look. Replacement is a repair decision driven by measured wear, damage or lost timing, not a universal mileage interval. What to inspect, and whether you can see it at all, depends on the engine family, model year and market. Many modern chains sit behind a cover with no owner-level sight glass. Manufacturer service information for that powertrain is the authority for interval, measurement method and limits. Where that information is silent on a scheduled chain inspection, treat oil service as the ongoing maintenance and treat symptoms as the trigger for diagnosis.
What the chain does, and why oil and tension matter
The timing chain links the crankshaft to the camshaft or camshafts so the valves open and close in time with piston position. On engines with variable valve timing, the chain also drives the cam phasers. If the chain lengthens, skips a tooth or the guides and tensioner no longer control slack, valve timing drifts. On an interference engine, a jumped or broken chain can let pistons and valves occupy the same space and cause internal damage.
A typical layout is a metal roller or silent chain over sprockets, held in mesh by a hydraulic or mechanical tensioner and by plastic or metal guides. Hydraulic tensioners use engine oil pressure and a ratchet or check valve to take up slack. That is why oil level, oil specification, change interval and sludge matter as much as the chain metal itself: starved or dirty oil can leave the tensioner weak, varnish the check valve and accelerate guide wear. The practical effect of maintenance is keeping the chain taut and lubricated so timing stays where the engine control unit expects it.
When to inspect
There is no single mileage or year that applies across engines. Some manufacturers list the chain as a non-scheduled, long-life part and only call for inspection or replacement if a symptom or measurement appears. Others publish an inspection, a stretch limit, a campaign or a replacement interval for a specific engine code and production range. Use the maintenance schedule and any technical service information for your vehicle identification number and engine, not a generic round number.
Inspect, or have the system diagnosed, in these situations even if the schedule does not list a chain service.
The owner’s literature or workshop procedure specifies a timing-drive inspection, measurement or replacement at a given time, distance or engine hours. A cold-start rattle, scrape or slap from the front of the engine is new, worse, or lasts after oil pressure should have built. A malfunction indicator lamp is on with camshaft-to-crankshaft correlation, variable-valve-timing or misfire data that the workshop procedure traces to the timing drive. Treat a fault code as a reason to investigate, not as proof the chain has failed. Oil changes have been skipped, the wrong specification was used, the level has been low, or the filter or sump shows unusual metallic or plastic debris. The front cover, cylinder head or other timing-drive parts are already off for other work, so the chain, guides and sprockets can be examined without a second teardown. The vehicle is subject to a manufacturer inspection program, extended coverage or known timing-drive campaign for that engine. Those notices are engine- and date-range specific.
Between those events, the recurring owner task is oil and filter service at the interval and specification the manufacturer gives for the climate and duty cycle, with the correct level maintained. That is the maintenance that most directly protects the chain, tensioner and guides. A timing chain does not have a rubber-belt-style replacement cadence that you can assume from another make or an older engine.
What to inspect
Inspection targets the whole timing drive, not only the links. A chain that still looks metallic can be out of limit if it has elongated, if a guide is worn through, or if the tensioner is fully extended and can no longer take up slack.
Chain condition and elongation: rust, stiff links, damaged plates or rollers, and stretch beyond the limit in the workshop procedure. Stretch is measured by the method that procedure specifies, which may be a gauge, a timing-mark offset, cam-to-crank angle on a scan tool or oscilloscope, or tensioner-piston extension. Do not substitute a guess from free play you can feel by hand unless that is the published method. Tensioner: housing leaks, a plunger that is at or near maximum extension, a ratchet that will not hold, and, on hydraulic units, evidence of aeration, varnish or collapse when oil pressure is low. Guides and rails: groove wear from the chain, cracks, missing pads and fragments in the sump or oil pickup. Plastic guides can wear or break while the chain is still intact. Sprockets and phasers: hooked or rounded teeth, axial play, and variable-valve-timing units that rattle or will not hold commanded angle. Oil system as it affects the drive: correct specification and viscosity, level, sludge in the tensioner feed, a clogged pickup and metallic or plastic debris in the filter. Debris is a finding that needs a source, not an automatic chain condemnation by itself. External clues you can gather without removing the cover: front-cover seepage at the crank seal area, a rattling cold start that fades as oil pressure rises, and scan data showing cam and crank correlation outside the specification for that engine.
Access is the main limit. If the chain is fully enclosed, a flashlight look through the oil filler is not an inspection. Some engines allow a borescope through a designated plug or after removing a cam-cover or tensioner blank; others require cover removal. Follow the access path in the service information so you do not disturb timing without a way to lock and re-time the engine.
How to inspect, in order
Confirm the engine code, model year and market, then open the matching workshop procedure before any cover comes off. Torque figures, lock-pin positions, timing-mark diagrams, chain-stretch limits and oil specifications are not interchangeable between engines. Those values are omitted here because they are variant-specific and must be read from the applicable manufacturer guidance. If you do not have that information and the tools it assumes, stop at non-invasive checks and use a shop that does.
Record symptoms: when the noise occurs (cold, hot, idle, revving), whether the lamp is on, recent oil service, and any loss of power or misfire. Do not continue to drive if the engine has a violent rattle, a sudden change in sound, or a stall that suggests timing has jumped, especially on an interference design. Scan for stored and pending faults and note freeze-frame data. Correlation, phaser and misfire codes point to the timing drive as one possible cause among sensors, solenoids, oil control valves and wiring. Clear nothing until the data is recorded. Check oil level, condition and the last documented specification used. Inspect the drain sample and filter media for glitter, flakes or plastic. Low level or the wrong oil does not prove the chain is worn, but it does explain tensioner distress and it must be corrected before judging noise that may be oil-pressure related. Perform the non-invasive checks the procedure allows: listen at the timing-cover area on a cold start, compare cam and crank correlation to the published spec with a capable scan tool, and use a borescope only at the ports the procedure describes. If those checks fail the spec or remain inconclusive and the procedure requires a visual or measured inspection, support the engine as required, disconnect the battery when instructed, and set the crankshaft and camshafts to the locking positions given in the manual before loosening the tensioner or cover. With the drive exposed, compare chain, guides, sprockets and tensioner with the wear illustrations and numeric limits in the manual. Measure elongation by the published method. Photograph as-found timing marks and tensioner extension. Replace components as a set when the procedure says the chain, guides and tensioner are serviced together. Refit with new gaskets, seals and any one-time fasteners the manual requires. Prime or pre-fill a hydraulic tensioner if instructed. Rotate the engine by hand at least two full crankshaft turns, confirm the locks or marks still align, then tighten to the specified sequence and values from the manual. Completion check: no tools or lock pins left in the engine, correct oil filled to the mark, no stored correlation faults after the required drive cycle or relearn, a quiet cold start once oil pressure is up, and no seepage at the cover. If marks do not align after rotation, do not start the engine.
Precautions and when to stop
Setting timing incorrectly can bend valves as soon as the engine is cranked. Do not rotate the crankshaft or camshafts independently on an interference engine unless the procedure says it is safe in that position. Do not rely on a tensioner to “take up” a chain that was installed a tooth off. Do not use a belt-style “replace at this mileage” rule, aftermarket stretch claims without a method, or a single fault code as a substitute for measurement.
Cover removal, chain replacement, guide rivets and cam-phaser work are professional-boundary jobs when they need an engine support, crank and cam locks, a press, or a relearn the owner scan tool cannot perform. Independent inspection of noise and oil condition is reasonable; declaring a chain serviceable without the specified measurement is not.
What inspection findings usually mean
A short rattle that disappears within a few seconds of a cold start can be a hydraulic tensioner filling, especially after an oil change or a long sit, but the same sound that grows longer or louder is a common early sign of slack, a weak tensioner or worn guides. A scrape or grind that does not change with oil temperature points more toward a guide or sprocket. Correlation data that is out of spec after oil level and cam-solenoid checks are good is a reason to measure the chain, not a reason to replace it on the code alone. Metal in the filter with a quiet engine still needs a source; plastic in the sump after a timing-cover job often traces to a guide.
Stop using the engine and obtain a diagnosis if timing has clearly jumped, if the engine will not restart after a loud snap from the front cover, or if a shop measurement already shows the chain past the published limit. Continuing to run a slack or jumped chain on an interference engine risks valve and piston contact.
What this guide cannot specify
No stretch limit, tensioner extension figure, fastener torque, oil grade or replacement mileage is given here because those numbers change by engine code, model year, market and sometimes production date. Some engines have well-documented timing-drive problems in a narrow production run; others do not. Check the schedule and service information for your vehicle before buying parts or opening the cover. If that information is unavailable, a workshop with the procedure and locking tools is the next action, not an improvised inspection.