Suzuki Samurai Rear Axle Shafts: Choosing the Correct Part
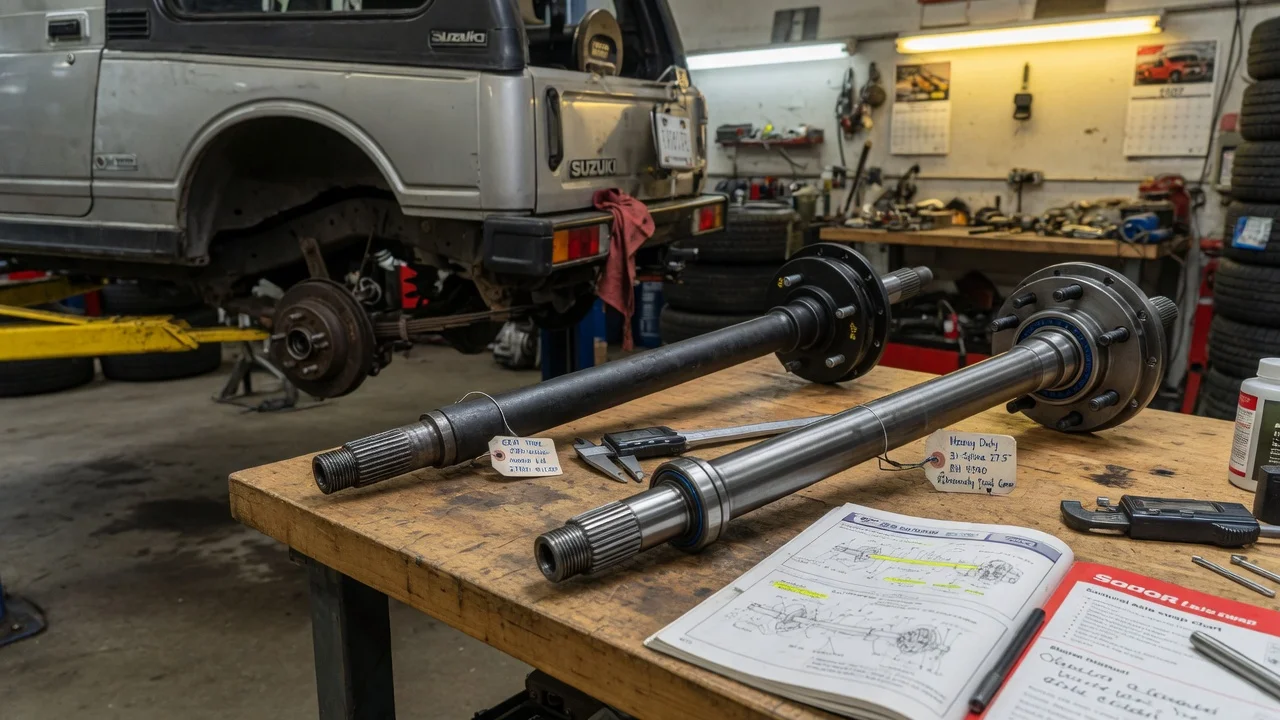
On a Suzuki Samurai, the rear axle shaft carries the wheel, transmits torque from the differential and holds the wheel bearing. A mismatched or poorly made replacement soon shows up as leaks, noise or a broken shaft on the trail. Choosing the right part starts with two things: why you are replacing it and exactly which axle is under your vehicle. A catalog headline is not enough.
Define the job the product must do
Start by naming the problem the new shaft has to solve. Owners usually shop for Samurai rear axle shafts for one of a few reasons: a shaft has snapped, often at the splines or near the flange; the bearing journal or seal surface is worn and keeps eating seals; the shaft has been bent by an impact; or the owner is planning upgrades such as a locker, larger tires or harder trail use. A stock-style replacement may be enough for the first three cases on a lightly used vehicle. A planned upgrade usually changes which shafts make sense.
Next, be honest about practical constraints. A daily driver that never leaves pavement has different needs from a rock crawler. Decide whether you have access to a hydraulic press, or whether a shop will press bearings for you. Also check how much of the vehicle's service history you actually know. Most Samurais are decades old and have passed through several owners, so unknown repairs and modifications are common. That uncertainty should shape the rest of the process.
Check compatibility
Confirm the real vehicle configuration before comparing listings. The model year on the title is a starting point, not proof. Housings, differentials, brake assemblies and even complete axles are often swapped between Suzuki models or replaced with aftermarket assemblies. Look for signs of earlier work: a disc brake conversion, a different differential cover, a locker, spacers or a wider track than stock. Any of these can change which shaft fits.
The interfaces that decide suitability are physical, and you can check most of them on the old part: • Spline count and spline length must match the differential side gears or the locker you run. • Overall length matters, and so does whether the listing is for the left side, the right side or both. Measure the removed shaft and compare it with the seller's figure rather than assuming the two sides are interchangeable. • The wheel flange must match your wheels, brake drum or rotor, including bolt pattern, stud size and center pilot. • The bearing must be the correct size, and the shaft needs a matching retainer and seal surface. • The shaft must suit the way it mounts with your backing plate or brake hardware. If a listing does not state these details, ask before buying.
Where possible, lay the old and new shafts side by side and check the figures against the manufacturer specifications in a factory service manual for your exact model. A seller who cannot give measurements, or who promises a universal fit across very different Suzuki axles, has given you a reason to keep looking.
Features that affect the choice
The main trade-off is between OEM-style replacement shafts and heavy-duty aftermarket shafts. A stock-style shaft restores original behavior and usually costs less. An upgraded shaft made from a stronger alloy with documented heat treatment can survive more torque and traction, which matters with lockers, low gearing and large tires. A stronger shaft does not make the whole axle stronger, though. It can move the weak point to the differential, ring and pinion, housing or other driveline parts. Treat terms such as heavy duty, extreme or race grade as marketing. Useful evidence is a stated material, a heat treatment description, spline specifications and clear dimensions.
Several practical features also matter. Some shafts come bare, while others arrive with the bearing, retainer, seal and wheel studs already installed. Pre-assembled shafts save press work but cost more, and you should confirm which bearing brand and type is fitted. Used or remanufactured shafts can be a budget option. Inspect them for straightness, twisted or worn splines, pitting on the seal surface and damage at the bearing journal. Read warranty and return terms closely. Many sellers exclude off-road damage, which narrows the cover for a trail vehicle.
Limitations and ownership costs
Plan for the installation work, not just the part price. Removing a rear shaft means taking off the wheel and brake components. Depending on the brake setup, you may disturb hydraulic lines, which then need bleeding. The bearing and its retaining collar are pressed onto the shaft, and a pressed collar is generally not meant to be reused. Follow the factory service manual for the removal method and for which parts must be replaced. If you do not own a press, add shop time to the budget.
Budget for consumables as well: axle seals, the bearing if it is not included, gear oil to restore the correct differential level, and any brake parts that have been ruined. Brake shoes soaked in gear oil from a leaking seal should be replaced rather than cleaned. A new shaft also cannot fix everything. It will not cure a worn differential, wrong gearing or a bent axle housing. A bent housing is a common cause of repeated seal and bearing failures, so inspect the housing if seals keep failing. After installation, check the backing plate area for leaks and recheck fastener torque according to your maintenance schedule and operating conditions. There is no universal replacement interval for axle shafts.
Build a practical shortlist
Before comparing prices, run each candidate through the same checklist: • The part matches your verified axle configuration, not just your model year. • Spline count and length suit your differential or locker. • Overall length and side match your measured old shaft. • Flange bolt pattern, studs and pilot fit your wheels and brakes. • You know whether the bearing, retainer and seal are included, and which ones. • The seller documents material and heat treatment rather than using labels alone. • The return policy and warranty terms suit how you use the vehicle. Total the full cost, including seals, gear oil, brake parts and press labor.
Rank the remaining options in a fixed order. Fitment certainty comes first, then suitability for your intended use, and price last. A cheaper shaft with unclear dimensions often costs more after a second teardown. An upgraded shaft also makes little sense if the rest of the axle has not been checked through a proper inspection.