Supercharger Bypass Valve Actuator: Identification and Checks
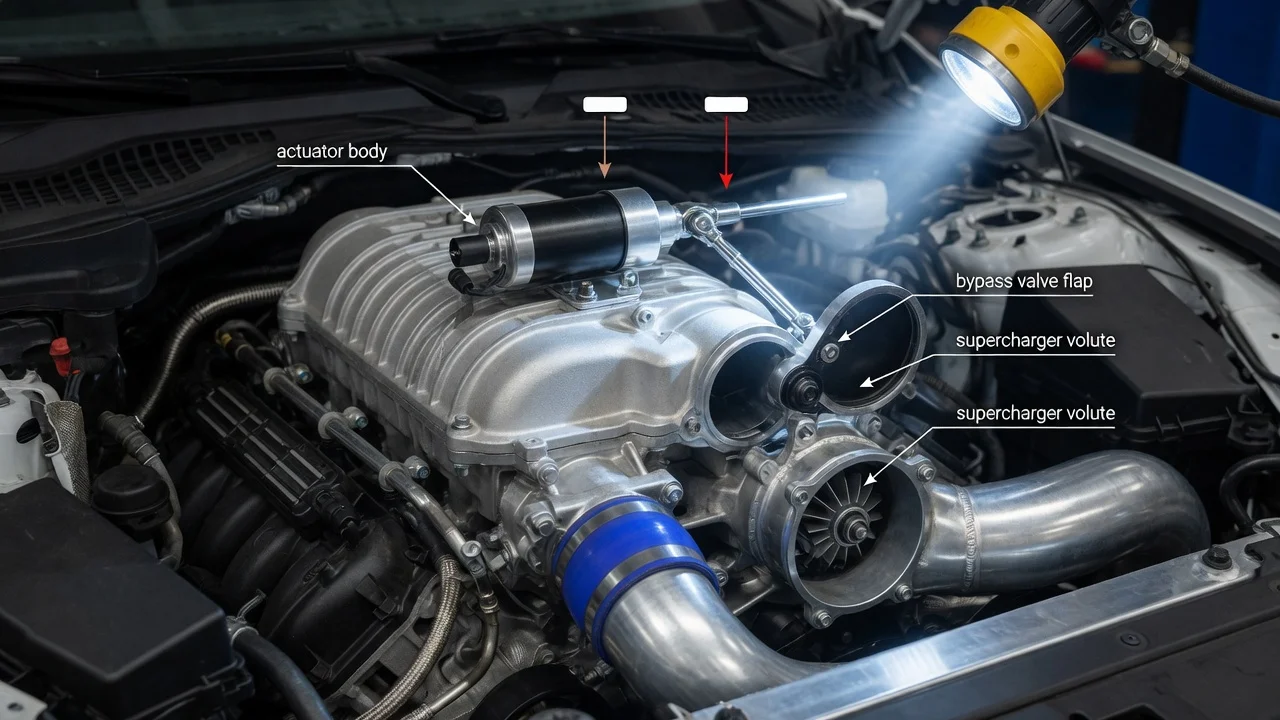
A supercharger bypass valve lets the engine skip boost when it is not needed, and its actuator decides when that happens. When the actuator or the valve it moves stops responding properly, the result can look like a weak supercharger, a vacuum leak or a sensor fault. This guide explains how to identify a bypass valve actuator problem, which checks to do first and how to read the results before anyone orders parts for your vehicle.
Establish the symptoms
On many positive-displacement supercharger systems, the bypass valve opens at idle and light load so air circulates from the supercharger outlet back to its inlet. This cuts pumping losses and heat. Under heavier throttle the actuator closes the valve so the supercharger can build boost. Depending on the design, the actuator may be a vacuum diaphragm, sometimes controlled by a solenoid, or an electric motor with a position sensor commanded by the engine control module. Your vehicle configuration determines which type you have, so confirm it in the service information before testing.
Symptoms usually point to which way the valve is stuck. A valve that stays open, or opens when it should not, typically causes low boost, sluggish acceleration under load and less power than normal, sometimes with a boost-related diagnostic trouble code. A valve that stays closed tends to keep the supercharger working at cruise. That can bring a louder whine at part throttle, higher intake air temperatures, surging or jerky light-throttle behavior and worse fuel economy. A hissing sound near the actuator or an unstable idle suggests a vacuum leak at the diaphragm or its hose.
Before testing, write down when the problem occurs: cold start or fully warm, idle, steady cruise, light throttle or full throttle. Also note whether outside temperature or load makes a difference. Record any warning lights, reduced power messages and stored codes with freeze frame data. Note recent changes, such as supercharger or intake work, a belt replacement, an engine calibration change or a fuel stop just before the symptoms started. This record of operating conditions and service history is often more useful than any single test.
Distinguish plausible causes
Within the bypass system itself, common failure points include a torn or hardened vacuum diaphragm and a cracked, collapsed or disconnected vacuum hose. A faulty control solenoid, a seized valve shaft or butterfly from oil and carbon buildup, or a broken or misadjusted linkage can also be responsible. On electric designs, add a failed motor, position sensor, connector or wiring fault. If the actuator moves freely while the valve stays put, the problem is in the valve or linkage rather than the actuator.
Several other faults produce similar complaints. A boost leak at an intercooler coupler or intake hose also lowers boost. However, it usually affects boost regardless of what the bypass system is commanded to do, and a smoke test may locate it away from the valve. A slipping supercharger drive belt can cause low boost, often along with squeal or a glazed belt surface. A faulty boost or manifold pressure sensor can trigger codes without any mechanical problem; this often shows when its reading disagrees with other data at key-on, engine-off. On vehicles with a liquid-cooled charge air cooler, a weak cooler pump raises intake temperatures and can mimic a bypass stuck closed. Misfires, fuel delivery problems and a restricted air filter also reduce power. Do not rule them out just because a bypass code is present.
Checks in a useful order
Start with checks that need no special tools and carry little risk. With the engine off and cool, inspect the actuator, its vacuum hoses and fittings for cracks, splits, oil soaking or loose connections. Check the electrical connector for corrosion, bent pins or a released lock, and look at the linkage for a missing clip or obvious damage. Inspect the supercharger belt condition as part of the same visual inspection. If anyone starts the engine, keep hands, tools and loose clothing away from the belt and pulleys, and avoid hot components.
The next stage uses tools and manufacturer specifications. A scan tool can read codes and, on many vehicles, live data. Useful values include boost or manifold pressure, desired boost, intake air temperature and, on electric actuators, commanded versus actual bypass position. Comparing these values at idle, steady cruise and a controlled load shows whether the valve responds when commanded. A hand vacuum pump can show whether a vacuum diaphragm holds vacuum and whether the rod and valve move smoothly through their travel. A smoke test helps locate intake or boost leaks. Accepted values for vacuum, voltage, resistance and position differ by vehicle, so use only the figures in the service information for your engine.
Some tests are better left to a qualified technician. These include bidirectional actuator commands, wiring checks against the wiring diagram, and removing the valve or supercharger components for inspection. They also include any adaptation or relearn procedure that an electric actuator may need after replacement. Load testing to reproduce a boost fault should be done safely and legally, not by repeated hard acceleration on public roads.
Interpret the findings
Each result narrows the problem but rarely proves it alone. A diaphragm that will not hold vacuum indicates a failing actuator. Before replacing it, confirm that the leak is not at a hose or fitting and that the valve itself moves freely, because a seized shaft can also damage the diaphragm. A diaphragm that holds vacuum and moves the valve smoothly suggests the actuator is mechanically sound. That shifts attention to the vacuum source, control solenoid or command logic.
On electric designs, a gap between commanded and actual position can come from the motor, the position sensor, wiring or a binding valve. Check mechanical freedom and circuit integrity before condemning the actuator. A trouble code describes the circuit or performance condition the control module detected, not the part that failed. If live data shows normal bypass operation but boost is still low, return to boost leaks, belt slip, sensor accuracy and the supercharger itself. Replace parts only when the test results and the symptom pattern agree.
Urgency and next action
Many bypass faults only reduce performance or efficiency, but some signs mean you should stop using the vehicle and arrange a tow or inspection. These include a flashing check engine light, loud grinding or rattling from the supercharger, smoke or a burning smell, and oil leaking onto hot parts. A sudden loss of power that makes merging or passing unsafe, or a reduced power mode that will not clear, also qualifies. Do not rely on a specific remaining distance before repair; the safe margin depends on the actual fault and how the vehicle is used.
For an efficient repair, give the shop the vehicle identification number, engine, model year and mileage. Include the symptom record with operating conditions, stored codes and freeze frame data, and any test results. Add recent service history, including supercharger, belt or calibration work. Ask the technician to confirm the diagnosis against manufacturer specifications before replacing the actuator. For related components such as the supercharger drive belt, follow the maintenance schedule for your vehicle rather than a generic interval.