Serpentine Belt Tools Explained: Tensioner Bars, Ratcheting Wrenches and Kits
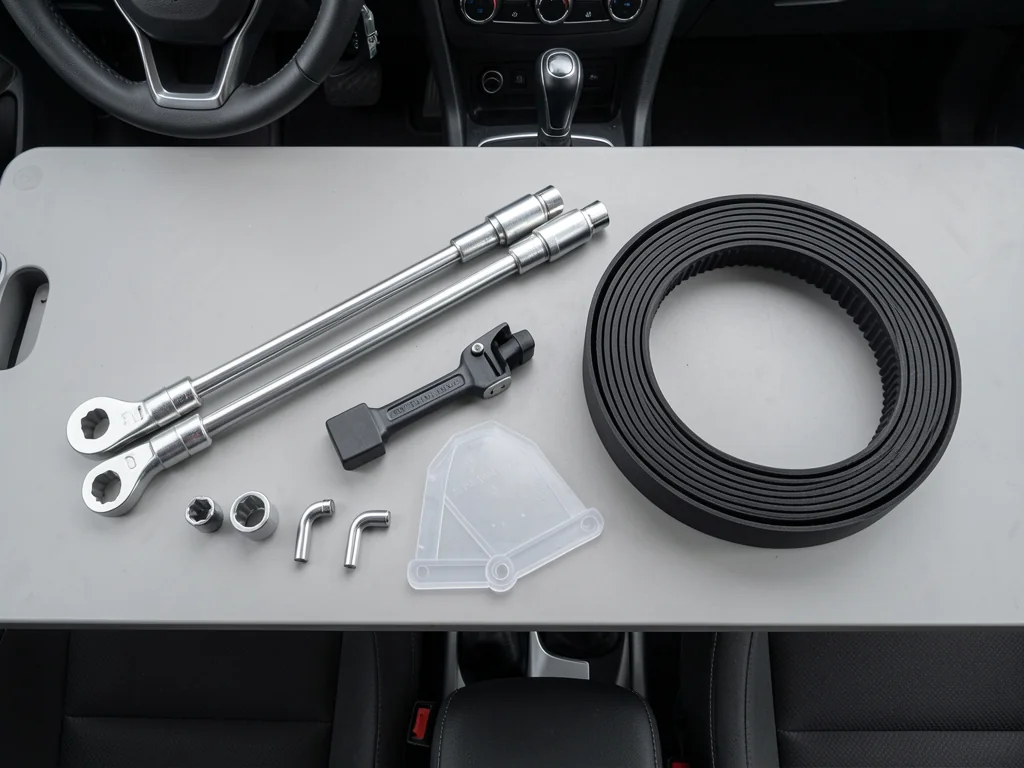
Replacing an accessory drive belt is often less about the belt than about reaching the tensioner. A serpentine belt tool gives you the leverage and clearance to release that tensioner without fighting the engine bay. This guide explains the main tool types, from long tensioner bars to low-profile ratcheting wrenches and complete kits. It also covers how to match each one to your engine's layout and fastener style.
Why a Standard Wrench Often Fails at the Belt Tensioner
A serpentine belt tool turns the automatic tensioner arm against its spring until the belt goes slack enough to slip off a pulley. The trouble is that the tensioner bolt or square drive usually sits behind other pulleys, inches from the frame rail or inner fender. A standard ratchet or combination wrench is often too thick or too short to fit. Even when it does fit, there is rarely enough room to swing the arm through its full travel.
The term actually covers several different tools, and the right one depends on the tensioner design and the space around it. Many tensioners turn on a hex bolt head, while others have a square opening for a drive tool, so check which one your engine uses before buying anything. Keep your expectations realistic, too. The tool only releases tension. It won't tell you why a belt squeals, frays at the edges or jumps a rib.
Tensioner Bars: Long-Reach Leverage for Spring-Loaded Tensioners
A tensioner bar is a long, thin flat bar with a drive end or crowfoot head that reaches down to the tensioner and multiplies your effort against the spring. Swappable sockets or heads let one bar fit different bolt sizes and square-drive openings. The bar suits automatic, spring-loaded tensioners, where you simply rotate the arm and hold it. Older manual tensioners work differently. They're set with an adjusting bolt and tightened to spec, not pried with a bar.
Before releasing tension, find the belt routing sticker under the hood or look up a service diagram. The new belt has to follow exactly the same path, including which side of each pulley it rides on. A photo of the old belt's routing is a sensible backup. Treat the spring with respect, because if the bar slips off the fastener, the arm can snap back hard. While it's under load, keep your fingers away from the pulleys and out of the arm's path.
Ratcheting and Low-Profile Belt Wrenches for Tight Bays
A ratcheting serpentine belt wrench pairs a thin ratchet head with a long handle. It works in the few degrees of swing where a regular ratchet can't even click to its next tooth. Low-profile versions are shaped to slide between the tensioner and the frame rail or radiator support, a common squeeze in sideways-mounted, front-wheel-drive engines. Many have several hex sizes plus a square drive on one head, which helps when you're not sure of the exact fastener size.
A longer handle means less effort, but it can hit the hood, the fender edge or a wiring harness partway through the stroke. Test the swing gently before you lean on it so you don't bend a bracket or crack a connector. Also remember that a ratcheting wrench doesn't lock the tensioner in the released position by itself. You'll usually need your other hand or a helper to hold the handle while the belt slides off.
Serpentine Belt Tool Kits and Sets: What Comes in the Case
A typical serpentine belt tool kit includes a main bar or wrench, a range of hex sockets, a square-drive adapter, one or more crowfoot heads, and sometimes a locking pin that holds the tensioner open. A full set makes sense if your household has more than one vehicle, you deal with different tensioner styles, or you haven't confirmed the fastener size yet. If you look after one known vehicle with easy access and a known drive size, a single tool is usually enough.
Make sure the kit's sockets fit the tensioner fastener and also any idler pulley bolt that might need to come off. Some jobs require removing an idler to make room for the belt or to replace a noisy one. What's in the box varies a lot from brand to brand, and two kits that look alike in photos can cover different sizes. Read the listed adapter and socket sizes and compare them to what your engine needs instead of assuming they'll cover it.
Removal and Installation Tools, Including Stretch-Fit Belt Tools
Removal follows a simple logic. Release the tension, slide the belt off the smoothest or easiest-to-reach pulley first, then work it off the rest of its path once the tensioner goes back. Stretch-fit belts are different. They have no tensioner and rely on the belt's own stretch, so installing one takes a plastic guide or ramp. The guide rolls the belt onto the last pulley while the engine is turned slowly by hand. Follow your vehicle's specific instructions for that step.
When installing, check that every rib sits in its groove on every pulley before you let the tensioner go. A belt that's off by one rib wears quickly and may throw itself off. With the belt removed, spin each pulley by hand. A wobble, a rough feel, or a bearing that drags or won't turn suggests the tensioner or an idler needs attention. The tool can't confirm correct tension or alignment, so a belt that keeps failing needs a professional inspection.
Honda and Other Tight-Access Engines: Choosing a Tool That Fits
Many sideways-mounted engines, including a lot of Honda layouts, tuck the tensioner close to the frame rail or wheel well, with no room to swing a breaker bar. Tensioner designs, fastener sizes and access paths also change between models, engines and model years. Confirm the details for your exact vehicle before you order a tool. In these tight spaces, a low-profile ratcheting wrench or a thin bar with the right hex size is often the most practical choice.
Some of these jobs go more smoothly from below, or through the wheel well with the splash shield removed. Choose a tool that can reach the fastener from that angle, not just from the top of the engine. If you work underneath, support the vehicle properly. Belt routing can also change with the options on the car, such as whether it has air conditioning. Rely on a service manual or trusted diagram for the routing and the direction the tensioner turns.
Working Safely and Knowing When the Job Needs a Shop
Work only on a cool engine with the key out. Disconnect the battery where practical so an electric fan or an accidental start can't catch you. Keep hands, sleeves and jewelry clear of the belt path. Some symptoms point to more than a simple belt swap. Watch for a tensioner that rattles or bounces at idle, a pulley that won't spin freely, coolant or oil on the belt, or a new belt that keeps drifting off its pulleys.
Let a shop take over if the tensioner is seized, the pulley alignment is in doubt, or the belt drives a part like a water pump or alternator that has already failed. No belt tool can make up for wrong routing or a worn tensioner. If a new belt still squeals, the cause is usually somewhere else, often tension, alignment, contamination or a failing pulley. That calls for a proper diagnosis, not another belt.