Savvy Transfer Case Linkage: Fitment and Kit Selection
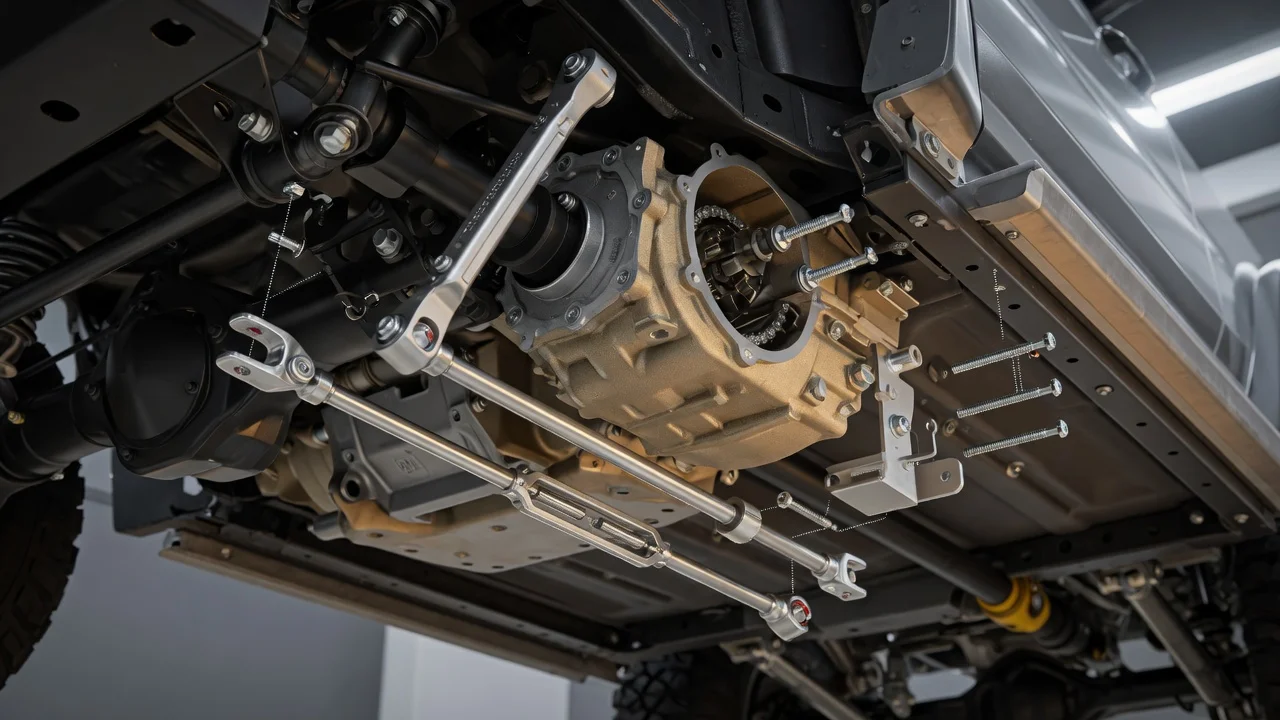
A transfer case linkage connects the in-cab shifter to the selector arm on the transfer case. If the two don't match, you get hard shifts, partial engagement, or a lever that never quite reaches its detent. Before you order a Savvy transfer case linkage, be clear about what problem you need to solve and exactly how your vehicle is built. This guide covers the fitment checks, the kit features worth weighing, the real cost of owning one, and a short checklist for narrowing your options.
Define the job the product must do
Owners usually look at an aftermarket linkage for one of four reasons. The factory linkage may have worn bushings or bent rods that cause slop. A suspension lift, body lift, transfer case drop or skid plate change may have moved the transfer case relative to the shifter. A transfer case swap may have created geometry that stock parts can't handle. Or the owner wants firmer, more positive engagement on the trail. Each reason leads to different requirements. A setup that still has stock geometry but worn parts may only need new bushings. A relocated transfer case usually needs adjustable length and sometimes a different pivot or mounting point.
Next, write down your practical constraints. Consider how the vehicle is used, whether as a daily driver, weekend trail rig or dedicated off-road build. Decide whether you will install the kit yourself with hand tools and jack stands or pay a shop. Settle on a budget, and list any drivetrain changes you have planned. If a high-clearance skid, motor mount change or transfer case swap is coming, choose a linkage for the final configuration rather than the current one. Otherwise you may end up buying twice.
Check compatibility
Start with the exact vehicle configuration: model, year, transmission type and transfer case model. Shifter location and brackets often differ between manual and automatic versions of the same vehicle. The transfer case model is usually stamped on an identification tag on the case itself, so read it there instead of relying on memory or a previous owner's description. The manufacturer's published fitment list is the primary reference. If the listing is vague about your year, transmission or case, contact the seller with the tag information and your build details before you buy. Don't assume it fits.
Then check the physical interfaces. These include how the linkage attaches at the shifter end, the hole size and arm shape at the transfer case selector, and where any intermediate pivot mounts. Pivot location matters because the body and drivetrain move independently. A linkage that spans body-mounted and frame- or drivetrain-mounted points has to absorb that movement without binding. Note every modification that changes geometry, such as body lift height, motor mount spacers, transfer case drop, skid plate design and driveshaft or yoke changes. Measure clearance to the exhaust, driveshaft and crossmember. A kit designed for one lift height will not necessarily suit another, so compare your measurements against the adjustment range the manufacturer states.
Features that affect the choice
Adjustability is the most practical feature. Threaded rod ends or turnbuckle-style adjusters let you set the length so each range position engages fully, and you can reset it after future changes. More adjustment helps on nonstandard builds, but every extra joint is another item to inspect. Joint type is the next trade-off. Spherical rod ends give a precise, direct feel, but they can transmit more noise and vibration and wear faster when exposed to grit. Rubber or polyurethane bushings damp vibration but allow some play. Material and finish also matter. Steel and aluminum behave differently, and plating or powder coat affects corrosion resistance, which counts if you drive on salted roads or cross water regularly.
Separate useful evidence from marketing labels. Words like heavy-duty, bombproof or trail-proven describe nothing you can measure. The useful details are a fitment list that names the transmission and transfer case, a stated adjustment range, a complete list of included hardware, and installation instructions you can read before buying. You also want a clear statement on whether drilling, cutting or bracket relocation is required, plus written warranty and return terms. If a listing leaves these out, ask for them. A vague answer tells you something too.
Limitations and ownership costs
Installation is more than bolting parts in place. You need to adjust the linkage so the shifter reaches every detent and the transfer case fully engages each range, without binding as the suspension and drivetrain move. Verify each position your case offers, following the service procedure for your vehicle and supporting the vehicle safely while you work underneath. Budget for small extras, which may include new clips or cotter pins, thread locker, replacement shifter bushings or boot, and time spent on trial adjustments. If you are paying a shop, adjustment time can be a meaningful part of the bill.
After installation, inspect the rod ends, bushings, jam nuts and fasteners as part of routine maintenance, and do it more often after trail use, mud or water crossings. There is no universal inspection interval. Follow your vehicle's maintenance schedule and adjust for your operating conditions. Also know what a linkage cannot fix. It will not repair a worn shift fork, stretched chain, low or contaminated fluid, or other internal transfer case faults. On vehicles with an electronically shifted transfer case, a mechanical linkage kit may not apply at all. Your service history helps here. Shifting that grew vague gradually points toward linkage wear. New grinding, noise or trouble staying in range calls for an inspection of both the linkage adjustment and the case itself.
Build a practical shortlist
Run each candidate kit through the same questions. Does the listed fitment match your year, transmission and transfer case model? Does it account for your lift, body lift, motor mount and skid plate changes? Is the adjustment range stated, and does it cover your measurements? Does the joint type suit your tolerance for noise and the conditions you drive in? Is all hardware included, or do you reuse factory pieces? Are instructions available before purchase? Is any cutting or drilling required? Can you buy wear parts such as rod ends or bushings separately? What happens under the warranty and return policy if the fitment turns out to be wrong?
If the Savvy kit and another option both pass these checks, decide on serviceability, parts availability and the quality of the seller's support, not on labels. If no kit matches your configuration, a different route may make more sense. You can rebuild the stock linkage with fresh bushings, or have a qualified shop fabricate a solution that suits your manufacturer specifications. Whichever you choose, record the installation and final adjustment in your service history so future inspections start from a known baseline.