Parking Sensor Repair and Replacement: Diagnosis, Installation and Cost Factors
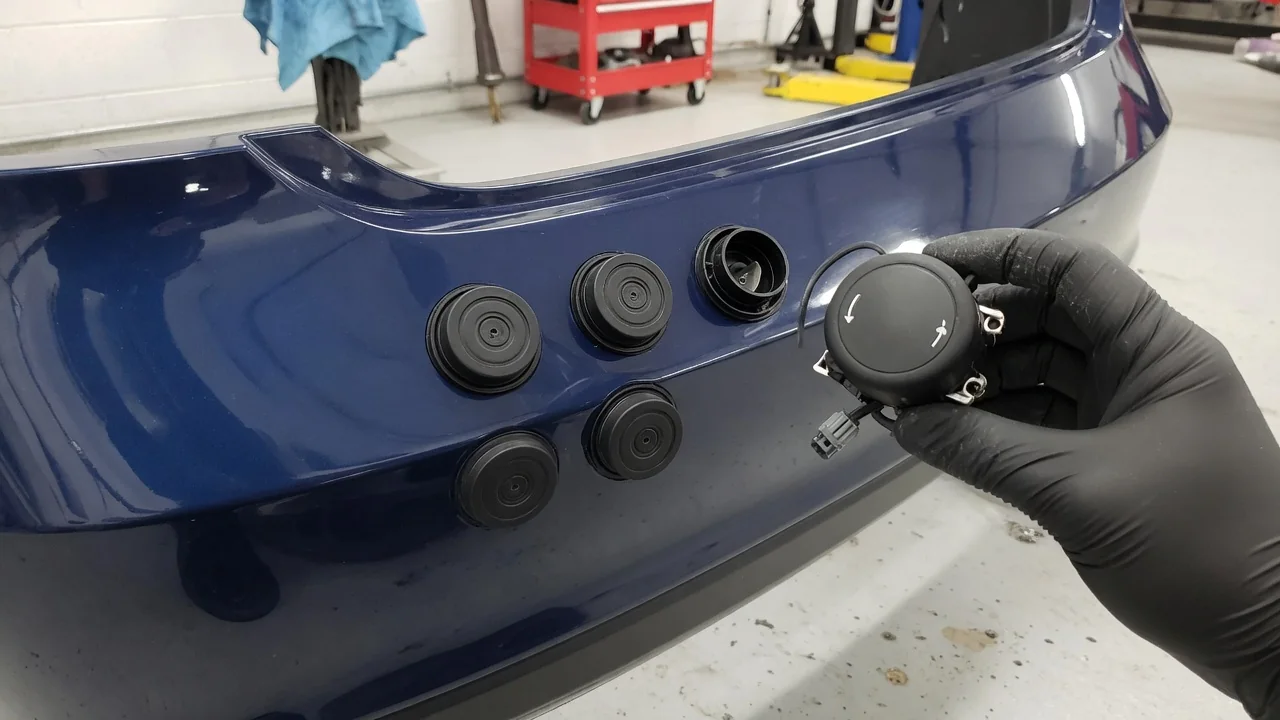
Parking sensors repair can be as simple as cleaning a dirty bumper sensor or as involved as tracing a damaged wiring harness behind the bumper cover. You may be replacing parking sensors after a minor impact or weighing the cost to install parking sensors on a car that never had them. Either way, knowing how park assist works helps you diagnose sensibly, ask better questions and avoid paying for parts you don't need.
Recognizing a Faulty Parking Sensor and What Repair Can Fix
A failing park assist system usually shows itself in one of a few ways. The reverse sensor may beep constantly with nothing behind the car. It may stay silent when an obstacle is clearly close, give alerts that come and go with the weather, or bring up a system-fault message on the dash or infotainment display. Before you book a repair, park safely, turn the engine off and look at each bumper sensor. Dirt, ice, road film, chipped paint on the sensor face or a unit pushed out of its mount can all cause false alerts or a silent system.
If cleaning and a visual check don't help, the symptoms alone can't tell you where the problem is. It could be the ultrasonic parking sensor itself, a corroded connector, a chafed sensor wiring harness or the park assist control module. That's when a shop scan and circuit testing are worth paying for, because they measure power, ground and signal before any part is replaced. Stored fault codes are useful evidence, but their meanings vary by manufacturer, so confirm the definition for your vehicle before acting on one. A code that points to one sensor position may still turn out to be a wiring fault.
When Replacing a Parking Sensor Makes More Sense Than Repairing It
Sometimes there's no practical way to repair parking sensors, and replacement is the honest answer. A cracked housing lets moisture reach the internal transducer. An internal electronic failure generally can't be serviced. A bumper impact can break a sensor or its bracket even when the bumper cover looks undamaged. Sensors in a group often share a circuit and module, so one failed unit can disable the warnings for the whole front or rear set. Once testing has found the fault, usually only the faulty sensor needs changing, not the entire set.
Replacement sensors often arrive unpainted or in primer. A paint-matched sensor may need a body shop to spray it in your bumper color, which adds curing time and cost to the job. Some suppliers sell pre-painted parts, but the shade can still differ slightly from the finish on your bumper. Compatibility matters just as much. Sensors that look identical can differ in connector, operating frequency, mounting angle or software between trims and model years. Confirm the part number by VIN with a dealer or a reputable parts supplier instead of assuming one sensor fits another.
How Parking Sensor Replacement Is Generally Done
On many vehicles, replacing a parking sensor means reaching the back of the bumper cover, releasing the connector lock and unclipping the old sensor from its bracket. The new unit is then pressed into place and reconnected. The hard part is getting access. Some sensors can be reached through a wheel-arch liner or from underneath, while others need the bumper cover removed. That job involves many fasteners and clips. Careless work can snap trim, break tabs, scratch paint or disturb nearby sensors and wiring, turning a simple swap into extra repairs.
Some park assist systems recognize a new sensor automatically. Others need a scan tool to register it, run sensor calibration or clear stored faults, and the requirement varies by vehicle. Afterward, confirm that the system works in a safe, empty space at walking pace rather than trusting it in traffic. Follow the service information for your vehicle, which covers fastener locations, connector handling and any coding steps. If you're unsure about removing a bumper or using diagnostic software, have a professional technician do the work.
What Affects the Cost of Installing Parking Sensors
When people ask how much it costs to install parking sensors, the answer depends on which job they mean. Repairing a factory system involves diagnosis, a sensor that matches the original, possible paint matching and labor that depends on bumper access. Adding an aftermarket parking sensor kit to a car that never had sensors is a different project. It means drilling the bumper, routing a new harness into the cabin, mounting a control box and connecting a buzzer or display. The cost to install parking sensors grows with each of those steps, not just with the parts.
The main cost factors are the sensor type, how many sensors are fitted, whether holes must be drilled and painted, and whether the alerts connect to an existing screen or backup camera. Front systems can take more work than rear-only kits because of grille and cooling components and a longer wiring run. Ultrasonic kits need visible holes. Electromagnetic strip kits mount inside the bumper but detect obstacles differently. Labor rates and vehicle designs vary, so the cost of installing parking sensors differs by region and car. Ask for a written, itemized estimate that lists parts, paint and labor separately.
Getting a Fitting Quote from a Retail Chain or Independent Shop
Whether you ask a retail chain such as Halfords or an independent auto-electrical shop, a precise request gets you a more useful quote. Give the make, model and year, describe the bumper material and color, and say whether factory sensors are already fitted. Store fitting services and prices change over time, so a Halfords parking sensor fitting cost you saw online months ago may not match today's offer. Check current kits, fitting availability and terms directly with the provider before booking.
Before you agree to the work, confirm what the quote actually includes. That means the sensors and control unit, drilling and painting, the wiring route, where the module and buzzer will go, testing after installation and any workmanship warranty. Ask whether drilling could affect bumper reinforcements or other equipment behind the cover. If your car already has a factory system showing a fault, an aftermarket fitting service may not be the right choice. Diagnosing an existing park assist control module or built-in display often needs dealer-level scan tools and software that a retail fitting bay doesn't use.
Checking the System After Repair and Keeping Sensors Working
After any repair, test the system at walking pace in an empty parking lot or driveway, with no people near the bumpers. Use a soft object, such as a large cardboard box or a cushion, as the obstacle. Approach it slowly from straight on and from each corner, and check that the warning beeps get faster as the gap closes. Remember that parking sensors are driver aids. They can miss thin poles, low curbs and small children, so keep using your mirrors and camera and look over your shoulder.
Everyday care is simple. Wipe the sensor faces gently when you wash the car, clear snow and ice before driving, and keep pressure-washer nozzles well back so the spray doesn't damage seals or paint. After a minor bump, even a light tap in a parking lot, check that each sensor sits flush and that the system still responds normally. Go back to the shop if false alerts continue, warnings keep repeating or a fault message returns after being cleared. A fault that keeps coming back often points to a wiring or connector problem that needs more diagnosis.