Jeep Wrangler Rear Axle Bearing Replacement: Identify the JK Axle First
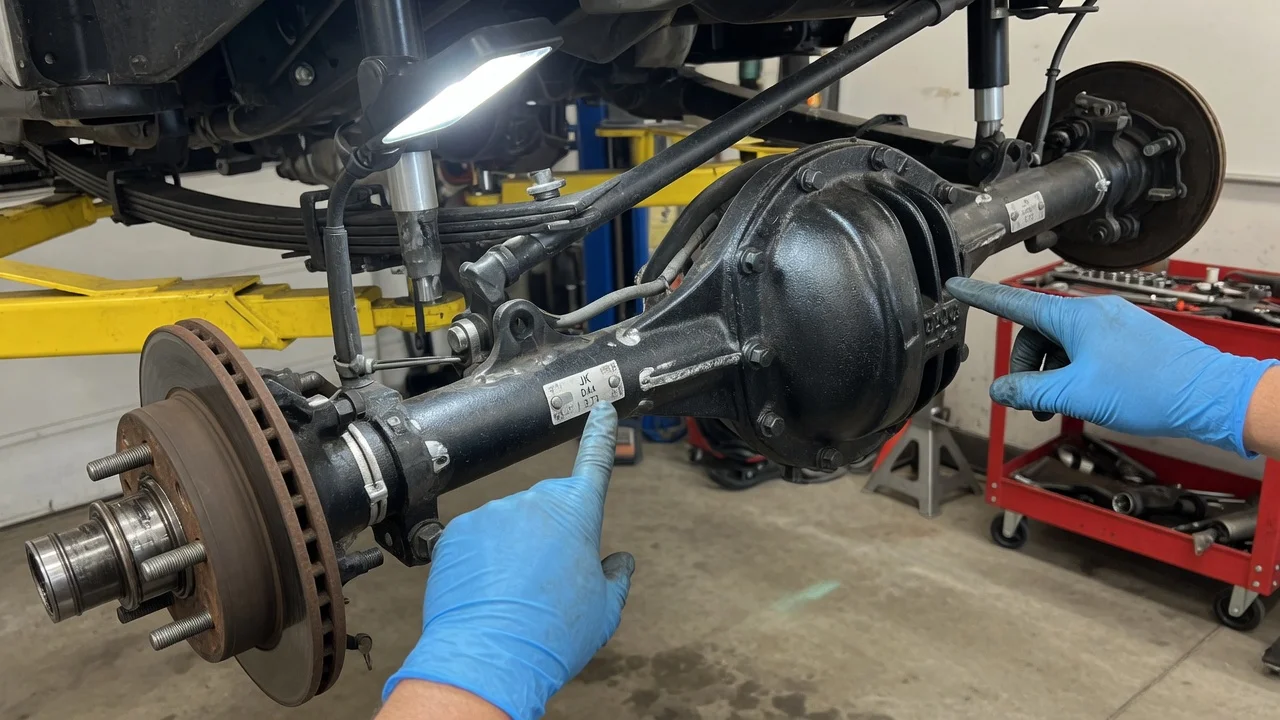
A worn rear wheel bearing on a Jeep Wrangler usually shows up as a growl or hum that rises with road speed. The repair depends on how the axle shaft and bearing are held in the housing. Before you order parts for a JK, confirm which rear axle the vehicle has and how its bearing is retained. That check decides the tools and parts you need, and whether the job suits a home garage or a shop with a hydraulic press.
Identify the JK Axle and Confirm the Repair Scope
Start with the axle itself, not the model year. Many differentials carry an identification tag or a stamping on the axle tube. A VIN-based parts lookup or the factory build data can confirm the original fitment. Wranglers are often modified, so review the service history and look for signs of a swapped or aftermarket axle. Examples include an unfamiliar differential cover, a different tube diameter, or brakes that do not match the original setup. If the axle has been replaced, a parts catalog keyed to the VIN can point you to the wrong bearing.
Rear axle bearings are retained in one of two basic ways. In a C-clip design, the bearing is pressed into the end of the axle tube and rides directly on the shaft, and a clip inside the differential holds the shaft in. In a retainer-plate design, the bearing is pressed onto the shaft and locked by a collar, and the shaft assembly is bolted to the axle tube flange behind the brake. The two designs use different bearing kits, seals and tools. Confirm which one your JK axle uses in the manufacturer specifications for your exact vehicle configuration before you buy anything.
Then make sure the bearing is really the problem. Cupped or unevenly worn tires, aggressive tread, a worn pinion or carrier bearing, and loose brake hardware can all sound like a wheel bearing. A bearing is more likely if the noise changes as you load one side in gentle turns. Other signs are play when you rock the wheel top to bottom, or roughness when you turn the shaft by hand with the brakes removed. Gear oil on the backing plate or brake parts means the axle seal is leaking. Contaminated brake parts need cleaning or replacement, and the seal should always be replaced with the bearing.
Where the XJ Cherokee Procedure Differs
If you are working on an XJ instead, note that the Cherokee used more than one rear axle during its production run, so the same identification step applies. Those axles are generally C-clip designs. That means the job involves draining the differential and removing the clips rather than pressing a bearing onto the shaft. Treat XJ instructions as a separate procedure, and do not assume that torque values, gear oil quantities or part numbers carry over to a Wrangler.
Prepare Tools, Information and Safe Access
Get the factory service information for your axle before you start. It gives the torque values, gear oil type and fill level, and the sealing method for the differential cover. You will need wheel chocks, a floor jack, rated jack stands, a breaker bar, sockets, a drain pan, a seal puller and a slide hammer or axle puller. A C-clip axle also needs a bearing puller for the tube, a bearing and seal driver, fresh gear oil, and a new cover gasket or the specified sealant. A retainer-plate axle needs a hydraulic press, a bearing separator, and a new bearing, collar and seal.
Work on level, solid ground. Chock the front wheels and support the axle on jack stands, never on the jack alone. Release the parking brake before removing the rotor. Pressing a bearing and collar onto a shaft takes high force, and parts can break suddenly under load. If you do not have a suitable press and experience using it, have a machine shop or driveline shop press the shaft assembly. You can still do the removal and reinstallation yourself. Anyone unfamiliar with brake service should also get help, because the brakes must be reassembled correctly.
Remove the Old Bearing Without Avoidable Damage
Remove the wheel, then the brake caliper. Hang the caliper with wire or a hook so it does not hang from the brake hose. Remove the caliper bracket and rotor. If the rotor sticks, check for retaining clips and that the parking brake is fully released before applying force. If a wheel speed sensor is mounted near the axle end, unplug it and remove it first so the shaft or tone ring cannot damage it during removal.
On a retainer-plate axle, remove the fasteners that hold the shaft assembly to the tube flange. Then pull the shaft straight out with a slide hammer, keeping it level so the splines do not drag across the inner seal or the differential side gear. Do not disturb the brake backing plate or parking brake shoes more than necessary. The old bearing and collar have to be split or pressed off. The collar cannot be reused, and the shaft surface under it must not be gouged during removal.
On a C-clip axle, drain the gear oil by removing the differential cover. Remove the cross shaft lock bolt and the cross shaft. Push the axle shaft inward slightly, remove the C-clip and slide the shaft out. Do not rotate the carrier with the cross shaft removed. Pull the old seal and bearing from the tube with the correct puller. Then inspect the area of the shaft where the bearing rolls. If it is pitted, scored or worn, a new bearing will fail early. Replace the shaft, or use a repair bearing designed for that condition, following its manufacturer instructions.
Install the New Bearing and Restore the Axle
For a retainer-plate shaft, put the components on the shaft in the order shown in the service information, with each part facing the right way. A part installed in the wrong order cannot be corrected without pressing everything off again. Press the bearing fully against its shoulder by pushing only on the inner race, then press the new collar against the bearing. Pressing through the outer race damages the bearing. Insert the shaft carefully, engage the splines without forcing them, and tighten the retainer fasteners to the specified torque.
For a C-clip axle, drive the new bearing squarely into the tube to its stop with a driver that contacts only its outer race. Install the new seal with its lip facing the direction the instructions specify, and lightly lubricate the lip. Slide the shaft in without letting the splines cut the seal, engage the side gear, fit the C-clip and pull the shaft outward to seat it. Reinstall the cross shaft and lock bolt to specification, including any threadlocker called for. Clean both sealing surfaces, install the cover, and refill to the correct level with the specified gear oil. Add friction modifier only if your differential requires it.
Reinstall the speed sensor, rotor, caliper bracket and caliper, and tighten each fastener to its specified torque. Adjust the parking brake if the procedure for your vehicle calls for it. Fit the wheel and torque the lug nuts in a star pattern to the manufacturer value.
Check the Completed Work
Before moving the vehicle, pump the brake pedal until it is firm, because the caliper pistons may have been pushed back. Check that the parking brake holds and releases fully. Make sure no warning lights stay on after startup. On C-clip axles, recheck the gear oil level and look for seepage at the cover and fill plug.
Start with a slow drive, then go up to normal road speeds where the noise was easiest to hear. The growl should be gone. Afterward, look for gear oil at the backing plate or hub. Check by hand, carefully, whether that side runs noticeably hotter than the other, which can point to brake drag or a bearing that is not seated correctly. Recheck lug nut torque as your service guidance recommends. Further diagnosis is needed if the noise remains, if an ABS or traction warning appears, or if oil leaks again. Likely causes are the bearing on the opposite side, the pinion or carrier bearings, tire wear, or a damaged speed sensor or tone ring. Record the repair in the service history to help with future inspection.