Isuzu Rodeo Rear Axle Bearing Replacement: Diagnosis, Removal and Installation
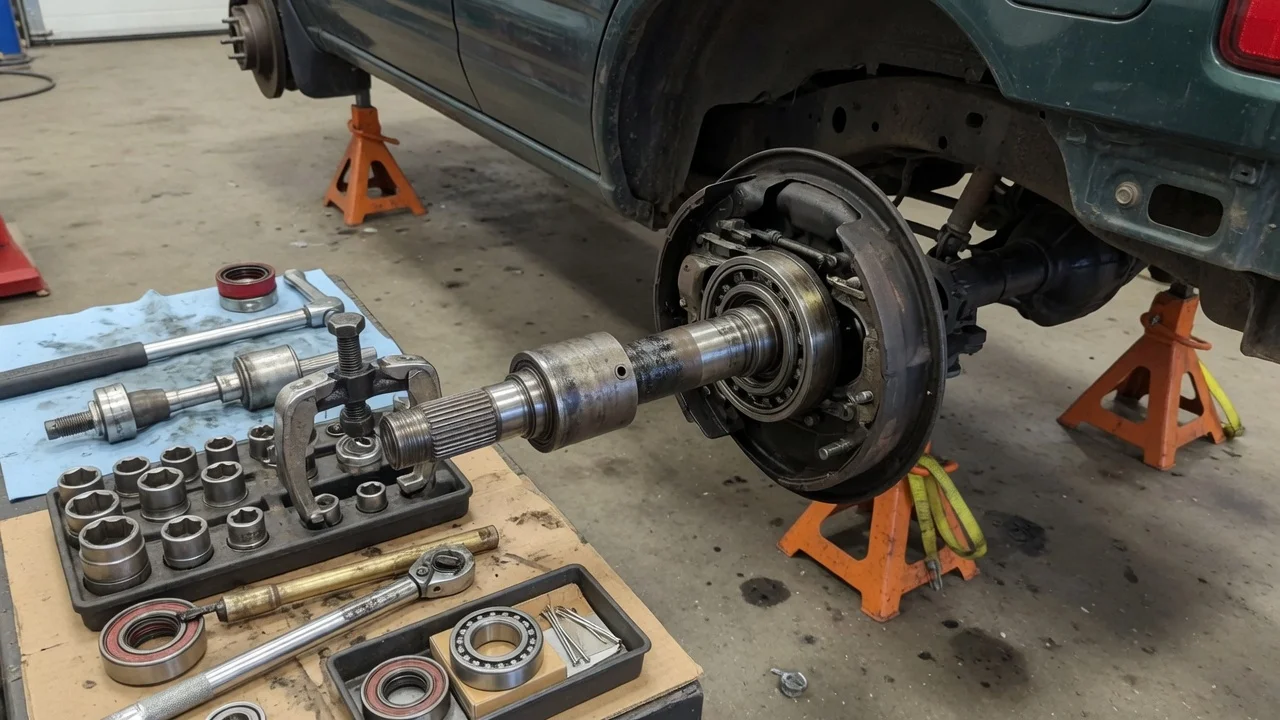
A worn rear axle bearing on an Isuzu Rodeo usually shows up as a growl or hum from the back of the vehicle that rises with road speed. Replacing it is a well-established repair, but it means removing the axle shaft, pressing a new bearing and retaining collar onto the shaft, protecting the axle seal and brake parts, and refilling the differential correctly. This guide covers confirming the diagnosis, preparing, removal, installation and final checks.
Confirm the part and repair scope
The Rodeo was built across two generations, roughly the 1991 to 1997 and 1998 to 2004 model years, and the rear axle hardware, brakes and wheel speed sensing differ between years and trims. Before ordering parts, confirm your exact vehicle configuration: model year, two-wheel or four-wheel drive, drum or disc rear brakes, whether a limited-slip differential is fitted, and whether there is a wheel speed sensor at the rear hub. Matching parts by VIN is the safest approach, because bearing, seal and retainer listings are often split by these details. Buy the bearing, retaining collar and axle seal together; the old collar cannot be reused once it is removed.
Make sure the bearing is really the problem. A failing wheel bearing typically produces a steady drone that follows vehicle speed and may change slightly when the load shifts during gentle weaving. Cupped tires, worn differential pinion or carrier bearings, and a dragging brake can sound very similar. With the rear raised and supported, spin each wheel by hand and feel for roughness, then grip the tire and check for in-and-out movement of the shaft. Look for gear oil on the backing plate or brake components, which points to a failed axle seal. If oil has soaked the shoes or pads, they need replacing as part of the job. Check the service history as well: a recently replaced bearing that is noisy again suggests an installation fault or a problem elsewhere.
Prepare tools and safe access
You will need wheel chocks, a floor jack, rated jack stands, sockets and wrenches, a slide hammer or axle puller, a seal driver, a drain pan, brake cleaner and the correct gear oil. Pressing the bearing and collar requires a hydraulic press with suitable support plates. Get the factory service manual for your exact year and drivetrain. It supplies the torque values, the bearing pressing procedure, any end play specification, and the differential oil grade and capacity. Do not rely on generic figures, because they vary with vehicle configuration.
This job is not ideal for inexperienced owners. A bearing or collar pressed incorrectly can fail early, and a collar that does not seat fully can let the axle shaft move outward in the housing, which is a serious safety hazard. If you do not have a press and experience using one, remove the shaft yourself and have a machine shop or driveline specialist press the new parts on. Work on level ground, chock the front wheels and support the axle housing on stands, never on the jack alone. Brake dust should be cleaned with brake cleaner, not blown off with compressed air.
Remove without avoidable damage
Loosen the lug nuts, raise the rear, set the stands and remove the wheel. Remove the brake drum, or the caliper and rotor on disc-equipped models. Support the caliper with wire instead of letting it hang on the brake hose. Disconnect the parking brake components and any wheel speed sensor as your configuration requires. If the procedure for your vehicle involves opening the brake line at the backing plate, cap it and plan to bleed the brakes afterward. Place a drain pan under the axle end, because some gear oil will escape. Remove the nuts that hold the bearing retainer to the axle housing, then pull the shaft straight out with a slide hammer or puller.
Keep the shaft level as it comes out so the splines do not gouge the housing or the differential side gear. If shims or spacers sit between the retainer and the housing, keep them in order and note their position; the manual explains whether they set axle end play. To remove the old bearing, the retaining collar is usually weakened by careful grinding and split with a chisel. Take care not to nick the shaft journal, and never use a torch on the shaft, since heat can weaken it. Once the shaft is bare, inspect the bearing journal, the splines and the seal surface, and check the housing seal bore for scoring or corrosion.
Install and restore the system
Slide the retainer plate and any other components that sit inboard of the bearing onto the shaft in the order and orientation shown in the manual. Press the new bearing on while supporting and pushing only on the inner race, until it is fully seated against the shaft shoulder. Then press the new retaining collar on as a separate step, unless your manual specifies otherwise. Confirm there is no gap between bearing and shoulder or between collar and bearing.
Drive the new axle seal squarely into the housing with the seal lip facing the differential oil, and lightly lubricate the lip with gear oil. Guide the shaft in slowly, rotating it so the splines engage the side gear without dragging across the seal. Refit any shims in their original positions, install the retainer nuts and tighten them to the manufacturer specifications. Check end play if a value is given. Reassemble the brakes, reconnect the wheel speed sensor with a clean mounting surface, adjust the parking brake and bleed the system if the line was opened.
Top up the differential through the fill plug with the oil grade listed for your vehicle, filling to the level the manual specifies. If a limited-slip differential is fitted, add the friction modifier only if the oil and manual call for it. Refit the fill plug, install the wheel and torque the lug nuts with the vehicle back on the ground.
Check the completed work
Before driving, spin the wheel by hand while it is still raised. It should turn smoothly with only normal brake drag. Confirm there is no oil weeping at the axle end, the brake pedal is firm, and the parking brake holds the vehicle on a slope. Recheck lug nut torque after a short drive.
Road test on a quiet surface through the speeds where the noise was loudest. If a hum persists, check the opposite bearing, the differential and the tires before assuming the new part is faulty. Clicking or chatter in tight turns on a limited-slip axle points to the wrong oil or a missing friction modifier. An ABS warning light, pulling under braking, or fresh oil on the backing plate or the inner tire sidewall over the following days needs diagnosis before further driving. Once everything checks out, record the repair, parts used and oil type in the service history, and include the axle seals in your routine inspection under your usual operating conditions.