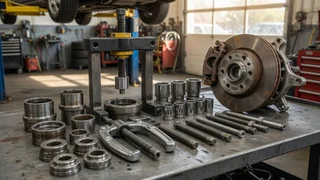
How to Use the Master Wheel Hub and Bearing Remover Kit
A master wheel hub and bearing remover kit uses a threaded forcing screw, bridge, and stepped adapters to press a press-fit bearing or hub assembly out of a steering knuckle without removing the knuckle from the vehicle. The tool works in place of hammer blows or a large bench press, which reduces the chance of damaging the mating bore or a new bearing. Before starting, match the removers and receivers to the bearing, hub, and knuckle diameters so the force remains centered. Clean threads and lubricate the screw with moly grease, replace a damaged forcing screw immediately, and support the vehicle securely at the frame because the driveline and suspension must hang or be moved for access.
Direct answer
The essential method is to support the knuckle, remove the axle nut or spindle hardware, select the closest-fitting press ring on the bearing outer race or hub flange, and thread the forcing screw through the bridge so pressure is applied squarely. A press-fit bearing leaves its seat only when the pressing plate remains parallel to the knuckle bore. If the tool cocks, thread engagement becomes uneven and the adapter can gouge the bore, so stop and reset the stack before continuing.
The kit typically contains both removers and installers in one case. Installers drive the new bearing, hub assembly, or splined hub into its seat by pulling the new component with a receiver cup on the back side. Before pressing, inspect the bore for corrosion and confirm the correct cup contacts only the machined race or flange face, never the seal, encoder ring, or rolling elements, because the press fit creates strong resistance that can damage a misaligned part.
How to proceed
Begin by removing the wheel, brake caliper, and rotor according to the vehicle service procedure. Support the lower control arm or strut so the axle does not hang on the brake hose or sensor wire, then disconnect the axle nut, tie rod end, ball joint, or wheel speed sensor only as needed for tool access. Select the remover whose lip fits the bearing outer race or hub flange and ensure the bridge legs land on solid machined surfaces around the bore, not on the backing plate or stamped dust shield.
Lubricate the forcing screw threads and use a hand wrench or impact tool in short, controlled pulls. Watch the bearing or hub move evenly into the receiver; if it stops while the screw turns hard, release tension and check that a retaining ring, snap ring, or axle stub is not still in the load path. After removal, clean the knuckle bore with a soft scraper, inspect for burrs, and press the new bearing or hub in with the correct installer so only the supported race receives pressure. The completed assembly should seat flush against its stop and rotate smoothly without binding before the axle nut and brake hardware are reinstalled to the vehicle maker's specified torque.